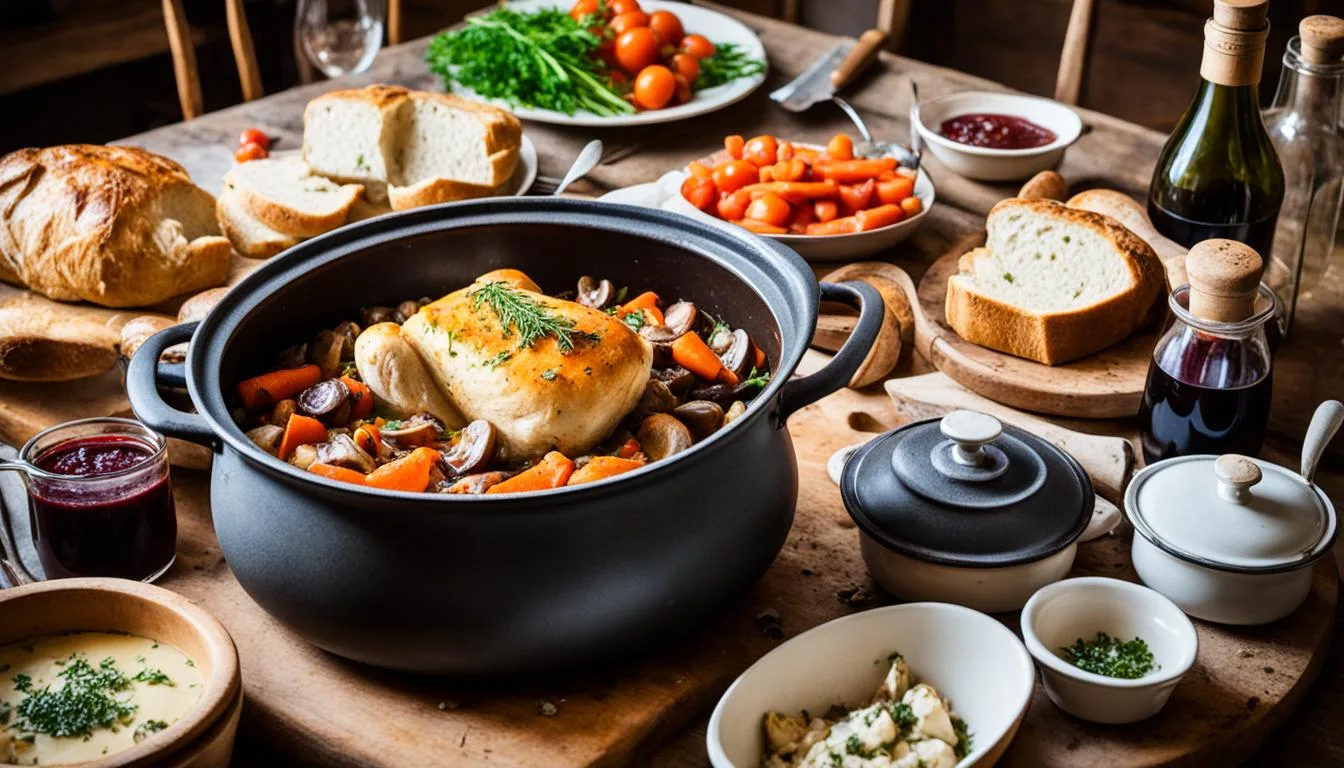
Coq au vin is as synonymous with French culture as hamburgers are with American. Hardly we can find a French who did not grew up having this dish. This is surely a comfort food with mom’s magic. Sauce it up with red wine and you will have the melting chicken in your mouth. This is of course more impressive than your average chicken recipe. (Coq au Vin)
It’s perfect for a dinner party, because it actually tastes better the next day, so you can make the entire recipe the day before and then gently reheat it as your guests arrive. Add a baguette for dunking and you’ve got an ideal cold-weather meal.
Special recommendation
How to serve Coq au Vin?
Pair it with anything starchy that can soak up the wine sauce, preferably potatoes or French bread
Goes very well with tangy salads, bitter greens like mustard or Kale.
Traditionally whole rooster is used, but if that’s not accessible chicken thighs and drumsticks can be used
Coq au Vin is always tastier the next day
Traditional Coq au Vin recipes call for a whole cut-up chicken, but using all dark meat gives you a particularly succulent dish without the risk of overcooked white meat. However, if you would rather substitute a whole cut-up bird, just add the breasts in the last 30 minutes of simmering.
Selecting the Right Ingredients for Authentic Coq au Vin
This recipe and ingredients will serve 4.
Ingredients
Quantity
Chicken (combination of legs, thighs, breasts, and wings)
3 lb skin-on, bone-in chicken legs
Kosher Salt
To taste
Freshly ground black pepper
To taste
Bay leaf
1
Carrot
1 peeled and diced
Garlic
2 minced cloves
Tomato paste
11/2 teaspoons
All purpose flour
2 tablespoons
Unsalted butter
2 tablespoons
Red wine
3 cups
Onions
1 diced
Bacon
4 ounces diced
Mushrooms
8 oz button mushrooms, trimmed and quartered
Thyme
2-4 fresh thyme sprigs
Flat leaf parsley
1/4 cup chopped
How to cook?
Season the chicken with salt and pepper. In a large bowl, combine the chicken with the wine, bay leaf, and thyme. Cover and marinate at least 30 minutes and up to one day.
In a large pot set over medium heat, cook the bacon until browned and crispy, about 10 minutes. Remove from heat and use a slotted spoon to transfer bacon to a plate lined with paper towels, reserving the fat in the pot.
Remove the chicken from the wine marinade and pat dry with paper towels. Reserve the marinade. Return the pot to the stovetop and heat the bacon fat over medium heat until it shimmers. Add the chicken, skin side down, in a single layer and cook until golden brown, about 5 minutes. Flip and cook until brown on the other side, about 4 more minutes. Transfer the seared chicken to a plate.
Add the diced onion, carrot, and mushrooms to the Dutch oven and season with salt. Cook until the vegetables are lightly browned, about 8 minutes.
Add the garlic and tomato paste and cook for about 1 minute, until it’s fragrant. Add the reserved marinade. Bring to a boil over medium-high heat and reduce liquid to about half.
Add the chicken and half of the bacon. There should be enough liquid to just cover the chicken—if not, add a little water or chicken stock. Cover and simmer over low heat until the chicken is tender, about 1 hour. Uncover, transfer chicken to a plate, and continue to simmer, about 10 minutes.
Meanwhile, whisk the flour and butter together into a smooth paste. Whisk the beurre manié into the stew to thicken. Continue to simmer until the sauce is thick enough to lightly coat the back of a spoon, about 2 more minutes.
Taste and season with salt and pepper if needed. Return the chicken to Dutch oven and simmer until warmed through, no more than 5 minutes. Remove from heat and garnish with remaining bacon and parsley.
For more such finger licking dishes please do try the below recipes:
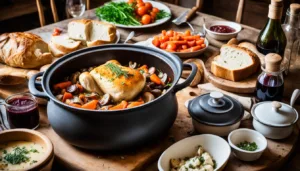
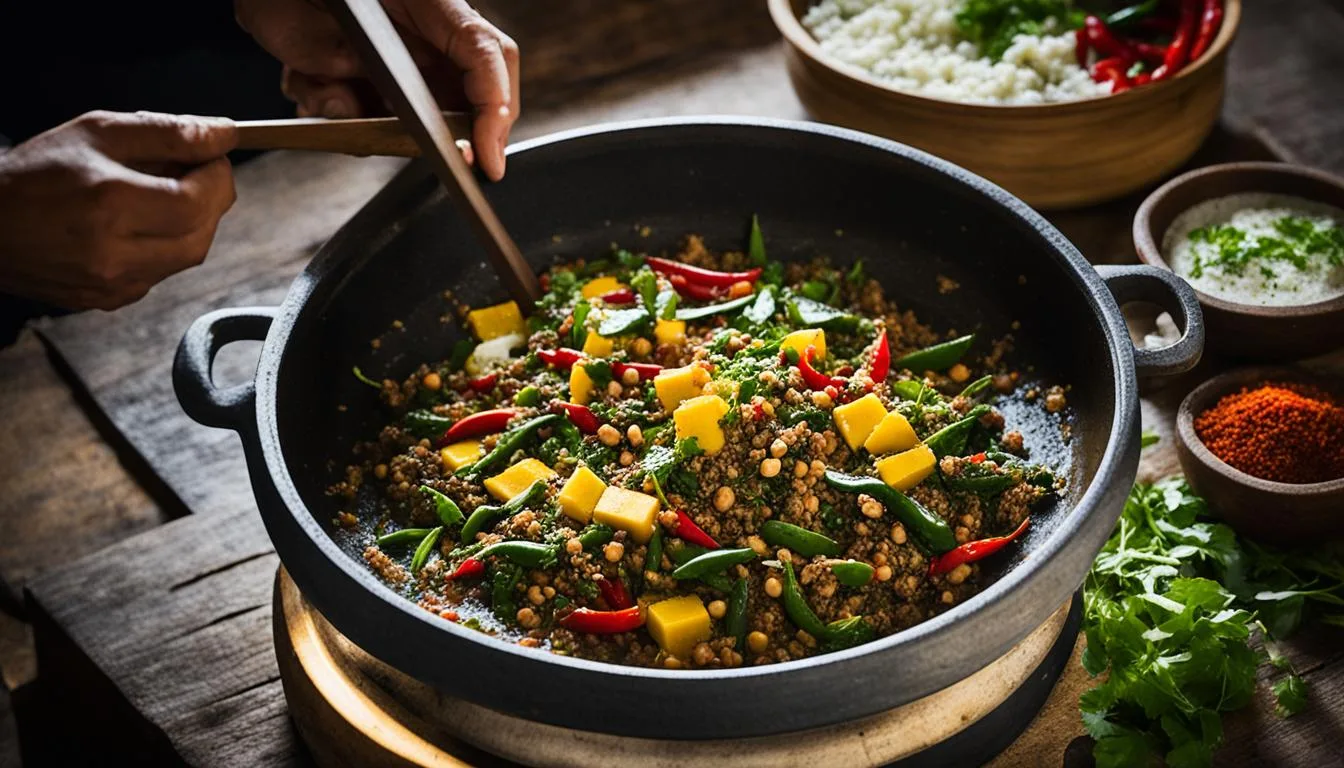
Bhutanese cuisine is known for its unique and flavorful dishes. Recognized as a national dish, Ema Datshi is a famous stew made from hot chili peppers and cheese. Ema Datshi recipe comes in a variety of flavours, and everyone has their tastes. Some people prefer it cheesy and without soup, while others prefer it soupier. you can find this dish every where you go in Bhutan. Can be easily clubbed with rice, fried rice, roti, puri, bread or as a snacks with your favourite drink.
Special recommendation for Ema Datshi recipe
Try to use Datshi, homemade cheese from cow’s or yak’s milk. If not available you can use blue cheese or gorgonzola cheese, fontina or brie might be good.
Try to use very spicy chilies as this dish is too spicy
You could top steamed Bhutanese red rice with it or serve on top of buckwheat noodles
Selecting the right ingredients for Ema Datshi recipe
This recipe and ingredients will serve 4.
Ingredients
Quantity
Tomato
1 large
Garlic
2 cloves
Green bell pepper
1
Jalapeno Pepper
1 large
Pasilla Chile(optional)
1
Serrano pepper
1 large
Small onion
1
Butter
2 tablespoon
Jack cheese
4 oz., cut into 1-inch cubes
Gorgonzola or other blue cheese
1 to 2 oz.
(Ema Datshi recipe)
How to cook Ema Datshi?
Slice up all the vegetables into strips and remove some of the seeds from the chilies for less heat if desired.
Slice the onions and the tomatoes too.
In a saucepan add the vegetables along with about one-quarter cup of water. Bring to a simmer, and cover and cook over low heat for about 10 minutes, or until the vegetables are cooked. It takes about 10 to 12 minutes for the sauce to be prepared.
Add the butter and the cheese cubes by placing on top of the vegetables. Cover the pot and simmer for just a couple more minutes, until the cheese is melted. Remove the lid and stir until combined, pour out onto a platter. Garnish with a few more blue cheese crumbles.
For more such delicious recipe do visit the below links:
Choosing the Right Chili Peppers for Ema Datshi recipe
Chili Peppers
Characteristics
Thai Green Chilies
Spicy and vibrant flavor
Thai Red Chilies
Intense heat with a hint of fruitiness
Jalapeños
Moderate heat and slightly sweet flavor
Incorporating Various Cheeses for Ema Datshi recipe
When it comes to incorporating different cheeses in your ema datshi, the possibilities are endless. Here are some cheese variations you can experiment with:
Feta cheese: Its tangy and salty flavor adds a delightful twist to the dish.
Cheddar cheese: The creamy and sharp flavor of cheddar pairs well with the spiciness of ema datshi.
Farmers cheese: This mild and soft cheese enhances the texture and creaminess of the curry.
What to Serve with Ema Datshi?
Ema datshi is a flavorful dish that pairs well with a variety of side dishes. To fully appreciate its deliciousness, it is best served with traditional Bhutanese red rice. This nutty-flavored rice has a slightly chewy texture that perfectly complements the spiciness of the ema datshi curry. The combination of the two creates a harmonious balance of flavors in every bite.
In addition to red rice, there are other side dish options that can enhance the ema datshi experience. One popular choice is daal, a lentil soup that adds a hearty, protein-rich element to the meal. The creamy consistency of daal helps counterbalance the boldness of the spicy curry. Another option is stir-fried vegetables, such as broccoli, carrots, and bell peppers. These fresh and vibrant veggies provide a refreshing contrast to the rich and spicy ema datshi.
No matter which side dishes you choose, they will add depth and variety to your ema datshi meal. Each bite becomes a symphony of flavors, bringing out the best in this beloved Bhutanese dish. Feel free to experiment and find your own perfect pairing to create a memorable dining experience.
Nutrition Value
Serving size – 1 bowl (300 g)
Calories – 275 cal, Fat – 18 g, Saturated fat – 11.3 g, Sodium – 850 mg, Total carbohydrates – 14 g, Sugars – 8 g, Protein – 14 g
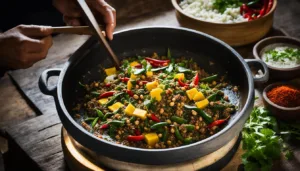
Whether you’re a fan of authentic Indian cuisine or simply looking to try something new, our homemade recipe is guaranteed to impress. Chicken butter masala recipe (Murgh Makhani) is one of the most popular curries in the world and yet happens to be one of the easiest! It’s made with spiced tomato and butter. The curry was developed at the Moti mahal restaurant in the Daryaganj neighbourhood of Old Delhi in the 1950s
Chicken marinated for several hours is either cooked in a tandoor, grilled, oven-roasted or even pan fried. Do try our recipe and enjoy the restaurant style dish at home with friend and family!
Special recommendation (Chicken butter masala recipe)
How can you serve the Chicken butter masala?
Fluffy Rice: Basmati rice or steamed jasmine rice provides a neutral base to soak up the flavorful sauce.
Buttery Naan: Garlicky or plain naan bread adds a soft and chewy texture that pairs well with the creamy curry.
Refreshing Raita: A side of yogurt-based raita with cucumber, mint, and spices offers a cool and tangy contrast to the richness of the dish.
Crunchy Papadums: These thin and crispy lentil crackers provide a delightful crunch and a touch of spiciness.
Side Salad: A simple salad with fresh greens, tomatoes, and onions can add a dose of freshness to your meal.
(Chicken butter masala recipe)
Choosing the right ingredients is important for Chicken butter masala recipe
Ingredients
Quantity
Chicken Thighs
1 kg skinless and boneless , cut into 1.5 inch pieces (or use bone-in Chicken pieces
Oil
1 tablespoon
Ingredients(for the marinade)
Quantity
Hung Curd
1/2 cup
Kashmiri chili powder
1 tablespoon
Coriander Powder
1 tablespoon
Turmeric
1/2 teaspoon
Ginger Garlic Paste
1 1/2 tablespoons
Garam Masala powder
1 teaspoon
Salt
1 teaspoon
Ingredients(for the gravy)
Quantity
Oil
1 tablespoon
Butter
1 tablespoon
Cinnamon
1 inch
Green Cardamom Pods
2
Cloves
3
Kashmiri Red Chillies dried chillies
5
Garlic Cloves
6
Onion roughly chopped
1
Cashew Nuts
1/4
Tomatoes roughly chopped
500 gms
Red Chilli Powder
1/2 teaspoon
Ketchup
2 tablespoons
Dried fenugreek leaves
1 tablespoons
Salt
to taste
Fresh cream
3-4 tablespoons
Ingredients for Chicken butter masala recipe
How to prepare?
Marinade
Mix all the ingredients under marinade, add the chicken and set aside for 30 minutes.
For the gravy
Heat 1 tablespoon oil and 1 tablespoon butter in a pan.
Add cinnamon, cardamom, cloves, whole red chilies and garlic and for a minute or so till fragrant.
Add onions and saute on high heat for 2-3 minutes till pink and translucent.
Now add tomatoes and cashew nuts. Mix once, reduce the flame to a simmer and cover and cook for 10-15 minutes till the tomatoes start breaking down and becoming pulpy.
Switch off the flame. Cool completely and transfer to a blender or liquidiser, and blend till smooth.
Final preparation (Chicken butter masala recipe)
In a pan heat a tablespoon of oil. Add the chicken pieces and sear them on each side for 2-3 minutes on high heat, till there is a char on them. Remove them from the pan and set aside.
Add the puree back to the pan, add chilli powder, ketchup, salt and ¼ cup water. Bring this to a boil and reduce the flame to low, and cover and cook for 15-20 minutes.
At this stage add the chicken pieces and simmer for 10 minutes. Stir in the kasuri methi and fresh cream.
To add a smoky flavour to it place a small steel bowl in the middle of the butter chicken while it’s still in the pan. Heat a piece of charcoal or lump coal on an open flame till red hot and then place it in the bowl. Pour a teaspoon of oil or ghee over it, and as soon as it starts smoking, cover the pan with a lid. Smoke for 3-4 minutes and remove the bowl.
Serve it according to your taste buds. You can choose any recommendation from above.
For more such appetizing dishes please do visit the below links:
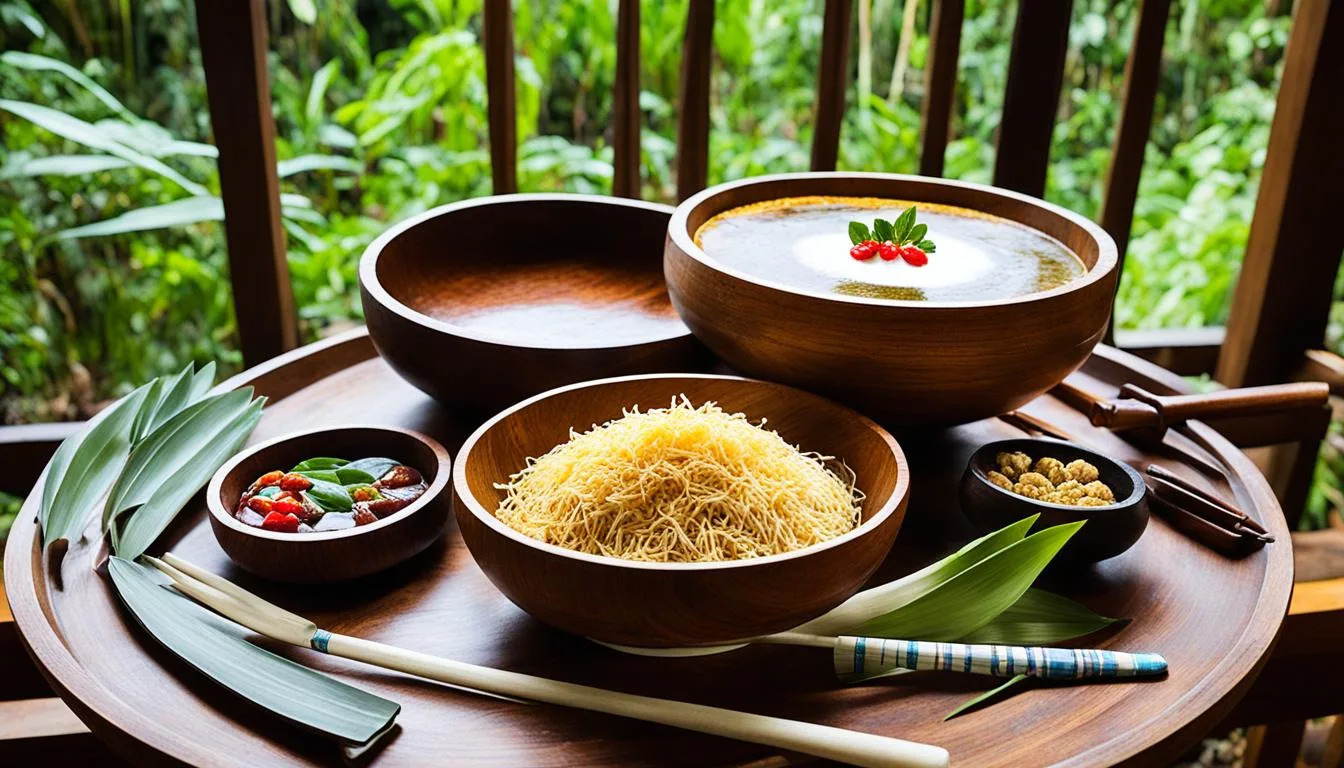
Welcome to our article on the ambuyat recipe, a traditional Bruneian delicacy that has gained popularity worldwide. Ambuyat is a unique dish made from the interior trunk of the sago palm and is a staple in Brunei’s culinary heritage. In this article, we will take you on a journey through the history and cultural significance of ambuyat, and provide you with a step-by-step guide on how to make this delightful dish at home.
Ambuyat is a dish derived from the interior trunk of the sago palm. It is a starchy bland substance, similar to tapioca starch. Ambuyat is the national dish of Brunei, and a local specialty in the Malaysian states of Sarawak, Sabah, and the federal territory of Labuan, where it is sometimes known as linut.
“Ambuyat is not just a dish; it’s a cultural experience. It embodies the essence of Brunei, its history, and the values we hold dear. Sharing a meal of ambuyat is a celebration of our heritage and our love for our land.” – Bruneian food enthusiast
Special Recommendation for Ambuyat Recipe
Making ambuyat involves specific tools and techniques to ensure the best results. To create this traditional Bruneian delicacy, you will need the following tools and equipment:
A large pot: This is used to cook the ambuyat mixture and create the desired texture.
A whisk or wooden spatula: These tools are essential for whisking the starch and water, ensuring a smooth and lump-free mixture.
A bamboo fork or “chandas”: This traditional eating utensil is used to pick up the viscous ambuyat and enjoy it with different dips and side dishes.
A serving plate or bowl: Ambuyat is typically served on a large communal plate or in individual bowls for each diner.
Special Ambuyat recipe
The Ooey Gooey Ingredients for Ambuyat Recipe
Ingredients
Quantity
Sago starch
1 lb
Water
2 1/2 cups
Thai chilli pepper
1
Shrimp paste
1 tablespoon
Dried shrimp
1 tablespoon
Durian sauce
1 tablespoon
Ingredients for Ambuyat Recipe
How to make it?
Add some cool water to the sago starch and set aside in a bowl for few minutes
Heat the water in the kettle and slowly pour the hot boiled water in the container with the starch.
If you feel the starch to be sticky, you can utilize a wooden spoon to start whisking it together. Once it is done, the Ambuyat will now be starchy and sticky.
Shrimp-flavoured tempoyak or Durian sauce needs to be prepared to be served with the ambuyat.
Crumble the dried shrimp with Thai chili pepper, you can use a mortar and pestle.
Then add the shrimp paste to the pepper mixture and minced shrimp. You need to sprinkle a bit of salt to taste. Transfer to a bowl and stir in a little hot water slowly to the durian and shrimp mixture.
Serve the Ambuyat dish of Brunei while still hot with the shrimp sauce for dipping. You can also enjoy this dish with vegetables, fried belutak, fried fish fillets, and sweet and sour sauces.
Sago plays a crucial role in the making of ambuyat. Its unique properties contribute to the texture and taste of this traditional Bruneian dish. Made from the interior trunk of the sago palm, sago starch is the key ingredient that gives ambuyat its signature smooth and gelatinous consistency.
Sago starch has a neutral flavour, allowing it to absorb the flavours of the accompanying sauces and side dishes. This makes ambuyat a versatile dish that can be enjoyed with a wide variety of flavours and ingredients. The texture of sago starch transforms into a sticky and viscous mass when mixed with water, creating the distinctive texture of ambuyat that is loved by locals and visitors alike.
Are you ready to embark on a culinary journey filled with aromatic spices and mouth-watering flavours? Look no further because we have the perfect recipe for you – an Authentic Mutton Biryani Recipe that is both easy to make and incredibly flavourful.
At Our Kitchen, we believe that cooking should be a joyous and satisfying experience. That’s why we have carefully crafted this step-by-step mutton biryani recipe to ensure that even novice chefs can recreate this traditional favourite with ease.
Whether it’s a festive occasion or a cozy family dinner, our authentic mutton biryani recipe is sure to impress your loved ones and become a staple in your culinary repertoire. So, let’s dive in and discover the magic of this beloved dish together.
(Authentic Mutton Biryani Recipe)
Special recommendation
Selecting the Best Mutton cuts for Flavourful Mutton Biryani Recipe
Shoulder: This cut is perfect for biryani as it contains a good amount of fat, which helps keep the meat tender and juicy during the cooking process.
Ribs: Lamb ribs are known for their rich flavor and are often used to add depth to the mutton biryani.
Leg: The leg of lamb or mutton is a popular choice for biryani due to its firm texture and flavorful meat.
Chops: Mutton chops are tender and flavourful, making them an excellent option for biryani.
What you need for Authentic Mutton Biryani Recipe
Ingredients
Quantity
Mutton
500g
Basmati Rice
2 cups
Onions, thinly sliced
2
Tomatoes, chopped
2
Yogurt
1/2 cup
Ginger-Garlic Paste
2 tablespoons
Biryani Masala
2 tablespoons
Cumin Powder
1 teaspoon
Cardamom Pods
4-5
Cinnamon Stick
1
Bay Leaves
2
Saffron Strands
A pinch
Coriander Leaves, chopped
A handful
Mint Leaves, chopped
A handful
Ghee
4 tablespoons
Salt
To taste
Water
4 cups
Marination Secrets for Tender Mutton
Marinating the mutton is a crucial step in preparing a tender and flavourful biryani. The right combination of spices and marinade ingredients can help tenderize the meat and infuse it with delicious flavours. Here are some marination secrets for achieving tender mutton:
Use yogurt: Yogurt acts as a natural tenderizer and helps to break down the proteins in the meat, resulting in a more tender texture. It also adds a tangy flavor to the mutton biryani.
Add acidic ingredients: Lemon juice, vinegar, or raw papaya can be added to the marinade to further tenderize the meat. These acidic ingredients help in the process of meat tenderization.
Spice it up: Use a combination of aromatic spices such as ginger, garlic, turmeric, red chili powder, and garam masala to enhance the flavor of the marinated mutton.
Allow time for marination: It’s essential to marinate the mutton for at least 2-4 hours, or overnight if possible. This allows the flavours to penetrate the meat and results in a more tender and flavourful biryani.
By following these marination secrets and selecting the best mutton cuts, you can ensure a biryani that is tender, flavourful, and truly satisfying.
Creating Your Biryani Masala from Scratch
Ingredients
Quantity
Kashmiri red chilli, dried
3
Bay leaf
7
Coriander seeds
2 tablespoons
Cumin
1 tablespoon
Caraway seeds
1 tablespoon
Mace
3
Cinnamon stick
2 inches
Nutmeg
1
Cloves
1 teaspoon
Black cardamom
3
Star anise
3
Cardamom
10
Pepper
1 tablespoon
Fennel
1 teaspoon
Turmeric
1/2 teaspoon
Preparation of biriyani masala for Authentic Mutton Biryani Recipe
firstly, in a thick bottomed pan dry roast 3 red chilli and 7 bay leaf till they turn crisp. keep aside.
further dry roast 2 tbsp coriander seeds, 1 tbsp cumin and 1 tbsp caraway seeds till they turn aromatic. keep aside.
also dry roast 3 mace, 2 inch cinnamon stick, 1 nutmeg, 1 tsp cloves, 3 black cardamom, 3 star anise, 10 cardamom, 1 tbsp pepper and 1 tsp fennel
transfer to a blender and allow to cool completely.
also add in ½ tsp turmeric.
blend to fine powder and transfer to the airtight container.
finally, store biryani masala powder in airtight container and use to prepare biryani.
Preparation Tips for Basmati Rice
Preparing basmati rice for biryani requires some extra care to ensure that it turns out fluffy, aromatic, and perfectly cooked. Here are some helpful tips to ensure your basmati rice is a success:
Soak the rice: Before cooking, it’s important to soak the basmati rice for at least 30 minutes. This helps to remove excess starch and allows the grains to cook evenly.
Rice to water ratio: For biryani, the ideal rice to water ratio is 1:1.5. This means for every cup of rice, use 1.5 cups of water. Adjust the quantity according to your recipe, but keep the ratio consistent for best results.
Cooking techniques: There are two popular methods for cooking basmati rice for biryani – the absorption method and the draining method. In the absorption method, the rice is cooked in just enough water, which is absorbed entirely during the cooking process. In the draining method, the rice is partially cooked, then drained of excess water to prevent overcooking.
Avoid overcooking: Basmati rice is delicate and can easily become overcooked and mushy. Keep a close eye on the cooking process and follow the recommended cooking time to achieve perfectly cooked rice.
Fluffing the rice: Once the rice is cooked, let it sit for a few minutes before fluffing it gently with a fork. This helps to separate the grains and prevent clumping.
Mutton Biryani Recipe: Step-by-Step Cooking Guide
Initial Preparations and Marinating Process
Before we dive into the cooking process, it’s essential to make the necessary preparations and marinate the mutton to enhance its flavours. First, gather all the ingredients listed in the recipe. Then, wash and clean the mutton pieces thoroughly. Next, in a mixing bowl, combine the mutton with yogurt, ginger-garlic paste, red chili powder, turmeric powder, garam masala, and salt. Mix well, ensuring that the mutton pieces are evenly coated with the marinade. Allow the mutton to marinate for at least 2 hours or preferably overnight in the refrigerator. This marinating process will tenderize the mutton and infuse it with aromatic flavours.
Cooking Mutton to Perfection
(Authentic Mutton Biryani Recipe)
When it comes to cooking mutton for biryani, achieving the perfect tenderness is crucial. In a large cooking pot, heat oil or ghee. Add whole spices like cinnamon, cloves, cardamom, and bay leaves to the hot oil. Once the spices release their aroma, add finely chopped onions and sauté until golden brown. This will give the mutton a rich and flavourful base. Now, add the marinated mutton and cook on medium-high heat until it changes colour and starts to release its juices. At this point, reduce the heat, cover the pot, and let the mutton simmer until it becomes soft and tender. This slow cooking process will ensure that the mutton is cooked to perfection, resulting in melt-in-your-mouth biryani.
The Art of Mutton Biryani Layering
Biryani Layer
Ingredients
Method
Rice Layer
Basmati rice, cooked
Spread a layer of cooked rice evenly at the bottom of the biryani pot.
Mutton Layer
Mutton, marinated and cooked
Add a layer of tender and flavourful mutton on top of the rice layer.
Fried Onions Layer
Fried onions, thinly sliced
Sprinkle a layer of fried onions on top of the mutton layer to add a caramelized flavor.
Herbs Layer
Cilantro, mint, chopped
Sprinkle a generous amount of fresh herbs on each layer to add a refreshing aroma.
Repeat
Repeat the layering process until all the rice, mutton, fried onions, and herbs are used.
Alternate between the different layers, creating a beautiful and flavorful biryani.
When it comes to elevating the flavours and aromas of mutton biryani, there are two ingredients that stand out: saffron and rose water. These aromatic touches add a unique and delightful sensory experience to the dish, making it truly special.
Saffron in Biryani:
Saffron, with its vibrant colour and intense flavor, is a prized spice that brings a touch of luxury to any dish, including biryani. This exquisite spice is derived from the delicate threads of the Crocus sativus flower, commonly known as the saffron crocus.
In mutton biryani, saffron is often used to add depth and complexity to the rice layer. Soaked in warm milk or water, the saffron infuses the grains with a beautiful yellow hue and a distinct earthy taste. Each bite becomes a fragrant celebration of flavours.
Rose Water in Biryani:
Rose water, derived from rose petals, has been used for centuries to add a delicate floral essence to various cuisines. In mutton biryani, a dash of rose water can transform the dish into a truly aromatic feast.
Adding rose water during the cooking process infuses the biryani with a subtle and delightful fragrance. As the dish simmers, the rose water blends harmoniously with the other spices and ingredients, creating a symphony of aromas that will captivate your senses.
Serving and Presentation of Your Mutton Biryani
Once your flavourful mutton biryani is ready, it’s time to serve and present it in a way that elevates the dining experience. The way you garnish, plate, and pair your biryani can make a significant difference in its overall appeal. Here are some tips to help you serve and present your mutton biryani in a memorable way:
Garnish with Fresh Herbs: Add a pop of freshness and colour to your biryani by garnishing it with fresh herbs like cilantro or mint. Simply chop the herbs and sprinkle them over the top of the biryani before serving.
Layer with Fried Onions: To enhance the flavor and visual appeal of your biryani, layer it with crispy fried onions. These golden, caramelized onions add a delightful crunch and sweetness to the dish.
Plating Techniques: When plating your mutton biryani, use a wide, shallow dish to showcase the layers of rice and meat. Be mindful of the rice-to-meat ratio, ensuring that each serving contains a generous amount of both.
Pairing Accompaniments: Complement your mutton biryani with a variety of accompaniments that enhance its flavours. Serve raita (a yogurt-based side dish) to cool down the spiciness, and add a squeeze of fresh lemon juice for a tangy twist. You can also serve it with a side of pickle or papad (Indian crispy flatbread) for added texture and taste.
Remember, the presentation of your mutton biryani is an opportunity to create a memorable dining experience. Take the time to garnish, plate, and pair it thoughtfully, and you’ll delight your guests with both the visual appeal and the delicious flavor of this traditional dish.
Welcome to our culinary adventure as we delve into the flavors of Barbados and explore the traditional Bajan dish, Cou Cou and Flying Fish recipe. This fish and cornmeal dish holds a special place in Barbadian cuisine, representing the rich cultural heritage and mouthwatering flavors that make Caribbean cuisine so beloved.
At the heart of this Bajan delight is the combination of tender flying fish and a smooth, polenta-like cornmeal cou cou. Together, they create a harmonious blend of textures and flavors that will transport you straight to the sun-soaked shores of Barbados.
Get ready to embark on a culinary journey that celebrates the traditions and flavors of Barbadian cooking.
Special recommendation for Cou Cou and Flying Fish Recipe
In Barbados, cou cou is often served alongside fish, particularly the famous flying fish, to create the iconic cou cou and flying fish dish. The flavors of the cou cou and fish complement each other, resulting in a delicious harmony of taste.
Traditionally, cou cou is served in a mound-like shape, with the fish arranged on top. The combination is often accompanied by a side of pickled cucumber and tomato salad, providing a refreshing contrast to the richness of the dish.
In case you do not have flying fish available, you can replace it with sea Bass.
The Uniqueness of Flying Fish in Barbadian Cuisine
What Makes Flying Fish Special?
Flying fish is a truly unique ingredient that holds a special place in Barbadian cuisine. Known for its distinct characteristics, flying fish adds a touch of authenticity to traditional Barbadian dishes. This agile fish is famous for its ability to glide above the water’s surface, making it a remarkable sight in the Caribbean seas.
The tender and delicate flesh of flying fish has a mild flavor with a hint of sweetness. Its firm texture holds up well in various cooking methods, whether it’s grilled, fried, or steamed. The flavor profile of flying fish perfectly complements the vibrant spices and ingredients found in Barbadian recipes, creating a harmonious blend of tastes.
Barbadians take great pride in this indigenous fish, considering it a symbol of their culture and identity. Flying fish represents the spirit of the Caribbean and is deeply intertwined with the country’s culinary heritage.
For some other lip smacking dishes do visit the below links:
To create the delicious cou cou and flying fish dish, you’ll need a range of ingredients that come together to form its unique flavors and textures. Here is an overview of the key components:
Ingredients for Cou Cou
Ingredients for Flying Fish
Yellow cornmeal
Water
Okra
Onion
Garlic
Thyme
Butter
Salt
Black pepper
Flying fish fillets
Lime juice
Seasoned flour
Vegetable oil
Onion
Garlic
Thyme
Scotch bonnet pepper
Salt
Black pepper
Guide to prepare the dish
Prepping the Seasonings and Sauces
Before we start cooking, let’s prepare the seasonings and sauces that will enhance the flavors of our cou cou and flying fish. Here’s what you need to do:
Finely chop the onions, garlic, thyme, and parsley.
In a small bowl, combine the chopped onions, garlic, thyme, and parsley.
Add salt, pepper, and other desired seasonings to the mixture. Mix well to create a flavorful seasoning blend.
In a separate bowl, combine the tomato paste, vinegar, and hot sauce to create a tangy sauce.
By prepping the seasonings and sauces beforehand, you ensure that the flavors have time to meld together, resulting in a more delicious final dish.
Cooking Techniques for the Perfect Dish
Now that the seasonings and sauces are ready, let’s move on to the cooking techniques that will bring our cou cou and flying fish to life. Follow these steps for a perfectly cooked dish:
Start by marinating the flying fish fillets in the tangy sauce we prepared earlier. Allow them to marinate for at least 30 minutes to soak in all the flavors.
In a deep pan, bring water to a boil and gradually add the cornmeal while continuously stirring. This ensures a smooth texture without any lumps.
Reduce the heat to low and continue stirring the cornmeal mixture until it thickens to a creamy consistency. This step requires patience, as it can take around 20 minutes. Make sure to stir consistently to prevent the mixture from sticking to the pan.
While the cou cou is cooking, heat a separate pan with oil and sauté the seasoned flying fish fillets until they are golden brown and cooked through.
Once the cou cou and flying fish are ready, plate them together for a stunning presentation. You can also garnish with fresh parsley or thyme for an added touch of flavor and aesthetics.
This dish serves as a culinary bridge, connecting generations and preserving cultural traditions. Passed down from one kitchen to the next, this dish carries the stories of our ancestors and the heritage of Barbados.
As younger generations learn to cook and appreciate Bajan cuisine, they become custodians of their cultural legacy. They carry forward the flavors, techniques, and secrets of traditional recipes, ensuring that the emotional connection to Bajan dishes endures. This generational connection is a testament to the
Enhancing Your Meal with a Traditional Drink
When enjoying the cou cou and flying fish dish, consider these traditional Bajan drinks that have been enjoyed for generations:
Rum Punch: Made with the finest Barbadian rum, tropical fruit juices, and a hint of spice, rum punch is a classic beverage to pair with the cou cou and flying fish. Its refreshing sweetness and bold flavors perfectly blend with the dish’s savory and rich taste.
Mauby: This unique Bajan drink is made from the bark of the mauby tree, infused with a variety of spices and sweetened to perfection. Its distinct flavor profile provides a delightful contrast to the flavors of the cou cou and flying fish, creating a harmonious balance.
Sorrel: A popular drink during festive seasons, sorrel is made from the petals of the sorrel flower, ginger, spices, and sweetened with sugar. Its tangy and vibrant taste complements the cou cou and flying fish, bringing a burst of flavor to every bite.
Golden Apple Juice: Made from the tropical golden apple fruit, this refreshing beverage provides a light and fruity accompaniment to the cou cou and flying fish. Its natural sweetness and crispness enhance the overall dining experience.
Welcome to our culinary journey as we explore the flavors of India with an authentic aloo dum recipe. Aloo dum, a popular Indian dish, is known for its rich flavors and simplicity. Whether you’re a novice or an experienced cook, this recipe is guaranteed to impress your taste buds and transport you to the vibrant streets of India.
The aloo dum recipe is known for its unique cooking technique called “dum.” This technique involves slow-cooking the dish in a sealed pot, allowing the flavors to infuse and intensify. The dum cooking method dates back centuries and originated in the royal kitchens of India. It was used to create rich, flavorful dishes that were fit for royalty.
Special recommendation for Aloo Dum Recipe
When selecting potatoes for aloo dum, it is important to choose the variety that holds its shape well during the cooking process.
This ensures that the potatoes remain firm and do not disintegrate, giving the dish a desirable texture. Some of the best potatoes for aloo dum include Yukon Gold, Idaho, or even red-skinned potatoes. These varieties are known for their starchy texture, making them ideal for absorbing the flavors of the dish while maintaining their integrity.
Whole spices, such as cardamom, cinnamon, cloves, and bay leaves, are integral to the authentic flavors of aloo dum.
Ingredients for the Perfect Aloo Dum Recipe
Ingredients
Quantity
Potatoes
4-5 medium-sized
Tomatoes
3-4 ripe
Onions
2 medium-sized
Whole Spices (cardamom, cinnamon, cloves, bay leaves)
5-6 pieces each
Cashews
1/4 cup
With these ingredients in your pantry, you’ll be well on your way to creating a delicious and authentic Aloo Dum recipe
Mastering the Aloo Dum Texture
One of the key aspects of aloo dum that sets it apart is its texture. Achieving the perfect balance of creaminess and tenderness in this popular Indian dish can take it to a whole new level. If you want to elevate your aloo dum game and impress your family and friends with a dish that has the ideal texture, follow these tips and techniques:
Choose the right potatoes: To achieve the desired texture, it is essential to select the right type of potatoes. Look for potatoes that are starchy and have a creamy texture when cooked.
Cooking method: The cooking method used can significantly impact the texture of your aloo dum. While some recipes call for deep-frying the potatoes before adding them to the gravy, others suggest sautéing them. Experiment with both techniques to find the one that gives you the desired texture.
Creamy consistency: To achieve a creamy consistency in your aloo dum, consider blending a portion of the cooked potatoes with the gravy. This will help thicken the sauce and give it a rich, velvety texture.
Simmering technique: Allow your aloo dum to simmer gently on low heat to allow the flavors to meld together and the potatoes to absorb the spices and gravy. This slow cooking process will help achieve a tender texture.
By following these tips and techniques, you can master the texture of your aloo dum and create a dish that is incredibly flavorful and satisfying. Experiment with different variations and cooking methods to find the perfect balance that suits your taste.
The Secret to Rich and Creamy Gravy Aloo Dum recipe
Another essential element of restaurant-style aloo dum is the creamy gravy that envelops the potatoes. Achieving this luxurious consistency requires careful attention to the cooking process.
To start, ensure that the tomato and onion purée is cooked until it reaches a smooth and silky texture. This step allows the flavors to develop and intensify, resulting in a luscious base for the gravy.
Next, add a generous amount of cashews to the purée. These nuts contribute to the richness of the gravy and lend a velvety smoothness. Their natural oils create a creamy texture that complements the soft potatoes perfectly.
To further enhance the creamy richness, consider adding a dollop of thick yogurt or heavy cream towards the end of the cooking process. This will add a luxurious touch and bring all the flavors together.
(Aloo Dum recipe)
For many other toothsome recipes please visit the below links:
When it comes to enjoying the rich flavors of aloo dum, choosing the right accompaniments can elevate your dining experience. Pairing this popular Indian dish with complementary side dishes can enhance the overall taste and provide a well-rounded meal. Here are some of the best accompaniments to serve with aloo dum:
Jeera Rice: The fragrant aroma of jeera rice, also known as cumin rice, pairs beautifully with the spicy and flavorful aloo dum.
Naan: Soft and pillowy naan bread is perfect for scooping up the delicious aloo dum gravy and savoring every bite.
Poori: These deep-fried, fluffy breads make a delightful combination with aloo dum, offering a satisfying crunch.
Paratha: Whether it’s plain paratha or stuffed paratha, the flaky texture of this Indian bread complements the velvety aloo dum gravy.
Raita: A refreshing and cooling side dish like cucumber raita or boondi raita can balance the heat of the aloo dum and add a creamy element to the meal.
Pickle: A tangy and spicy pickle, such as mango pickle or mixed vegetable pickle, can provide a zesty contrast to the richness of the aloo dum.
Papad: Crispy papad or poppadum adds a delightful crunch to the meal and offers a contrasting texture to the creamy aloo dum.
By serving these popular Indian side dishes alongside your aloo dum, you can create a truly memorable and satisfying dining experience. Experiment with different combinations to find your favorite pairing and enjoy the explosion of flavors on your plate.
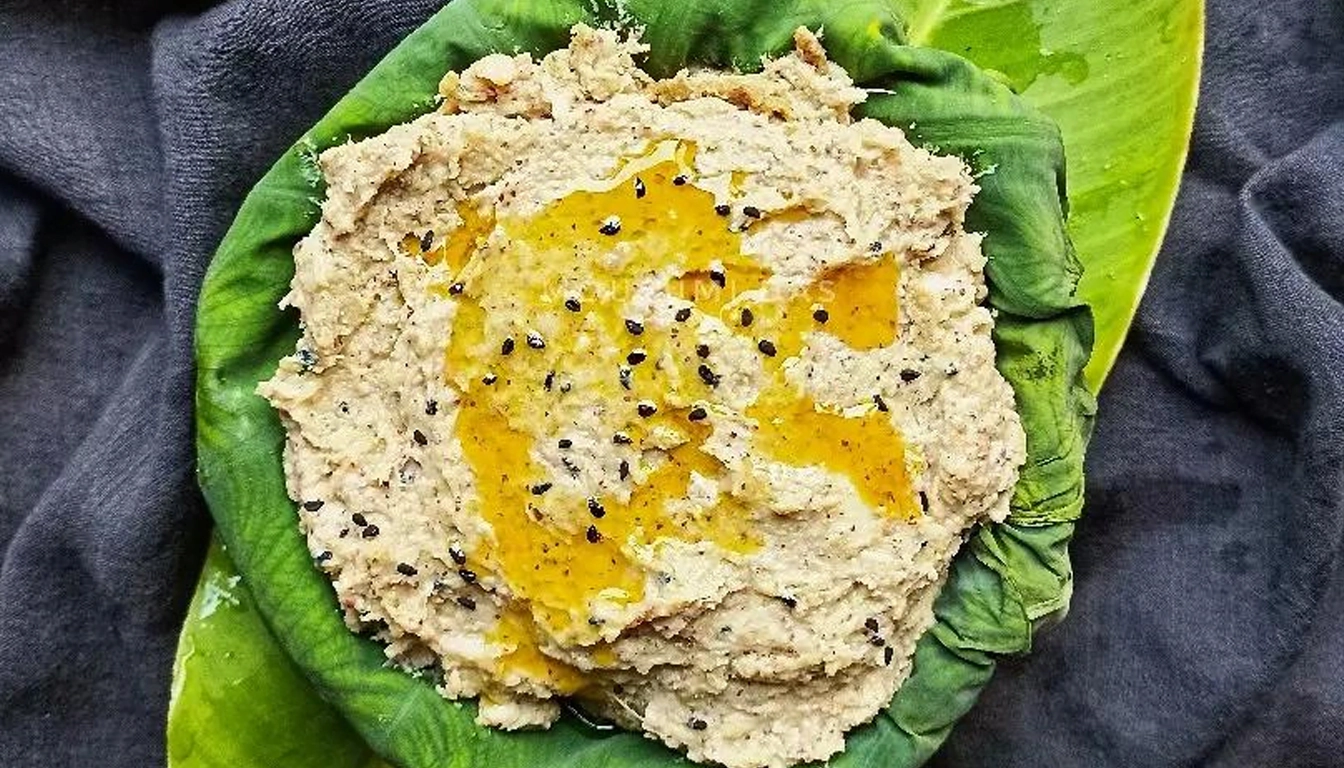
Welcome to our article on the delicious Kochu Bata recipe, a Bengali delicacy that will surely add a burst of flavor to your meals. As we explore this easy-to-follow recipe, get ready to embark on a culinary journey that showcases the unique tastes of Bengal. Whether you’re a seasoned cook or a beginner, this side dish recipe is perfect for home cooking.
Kochu Bata is a traditional Bengali dish that holds a special place in Bengali cuisine. It is a monsoon favorite, known for its unique flavors and versatility. Kochu Bata adds a touch of authenticity and spice to any meal, making it a must-try recipe for food enthusiasts.
Special recommendation for Kochu Bata Recipe
Use Maan Kochu, also known as Malanga Coco or Taro Root, as the main ingredient for Kochu Bata Recipe. Maan Kochu is a seasonal vegetable that adds a distinct flavor and texture to the dish. The process of preparing Kochu Bata involves grating the Maan Kochu and combining it with other spices and ingredients to create a flavorful paste.
Use raw mustard oil for garnishing at the end
Kochu bata with rice
Variety
Seasonality
Taste
Sreedevi
Monsoon
Delicate, slightly sweet
Prajanma
Monsoon
Robust, earthy
Radhika
Monsoon
Distinctive, nutty
The Traditional Cooking Method for Kochu Bata Recipe
In the preparation of Kochu Bata, tradition plays a significant role. The process of making this Bengali delicacy has evolved over the years, with the introduction of modern kitchenware and cooking techniques. Let us explore the traditional cooking method for Kochu Bata and the transition from using traditional tools like Shil-Nora to contemporary kitchenware.
From Shil-Nora to Modern Kitchenware (Kochu Bata Recipe)
In the past, the primary tool used to make Kochu Bata was the Shil-Nora, a traditional grinding stone made of granite or other sturdy materials. This tool consisted of a flat surface and a cylindrical rolling pin-like object. The Maan Kochu (Taro Root) was manually ground on the stone to create a fine paste.
Today, with the advent of modern kitchenware, home cooks have various appliances at their disposal to simplify the process. Electric blenders and food processors have replaced the labor-intensive grinding process, making it quicker and more convenient to prepare Kochu Bata.
Boiling vs. Pan-Roasting Techniques
When it comes to cooking Kochu Bata, two popular techniques stand out: boiling and pan-roasting. Each method imparts a distinct flavor and texture to the dish.
Boiling Technique:
In the boiling technique, the Maan Kochu is peeled, chopped, and boiled until tender. Once cooked, the taro roots are drained and mashed to create a smooth paste. This method is ideal for a softer and creamier texture in the final dish.
Pan-Roasting Technique:
The pan-roasting technique involves roasting the peeled and chopped Maan Kochu on a dry pan until it turns golden brown. This process intensifies the flavor of the taro root and adds a nutty aroma to the paste. The roasted roots are then ground into a paste, resulting in a slightly chunkier texture.
Both techniques have their unique charm, and the choice between them depends on personal preference and the desired texture in Kochu Bata.
Essential Ingredients for a Mouthwatering Kochu Bata Recipe
To create a mouthwatering Kochu Bata, there are a few essential ingredients that you’ll need. These ingredients are the key to achieving the mouthwatering flavor and traditional taste that make Kochu Bata a beloved Bengali delicacy.
Let’s take a look at the essential ingredients:
Maan Kochu (Malanga Coco) – also known as Taro Root, this vegetable forms the base of the Kochu Bata paste, lending its unique flavor and texture.
Traditional Spices – a blend of flavorful spices like cumin seeds, coriander seeds, red chili powder, and turmeric powder adds depth and complexity to the dish.
Mustard Oil – an indispensable ingredient in Bengali cooking, mustard oil enhances the flavor and authenticity of Kochu Bata.
By combining these essential ingredients, you’ll be able to create a Kochu Bata that is bursting with mouthwatering flavor and tantalizing aroma. The traditional spices and the distinctive taste of mustard oil will transport you to the heart of Bengal with every bite.
Preparing the Perfect Kochu Bata
Cleaning and Grating Maan Kochu
Before you can start preparing the perfect Kochu Bata, it is crucial to ensure that your Maan Kochu is clean and ready to be transformed into a delicious paste. Start by washing the Maan Kochu thoroughly under running water to remove any dirt or impurities. Use a vegetable brush to scrub the surface gently, paying special attention to the crevices and rough areas. Once clean, pat it dry with a clean kitchen towel.
Next, it’s time to grate the Maan Kochu. Select a grater with small holes to achieve the desired texture for your paste. Hold the Maan Kochu firmly in one hand and use the other to grate it against the grater’s surface. Be cautious of your fingers and maintain a steady grip to ensure a consistent and even grating. Continue until the entire Maan Kochu is grated and ready for the next step.
A Step-by-Step Guide to Making Kochu Bata Recipe
In this section, we will provide you with a step-by-step guide to making Kochu Bata, ensuring that you can recreate this flavorful Bengali dish with ease. From cooking techniques to essential tips, we have got you covered.
Cooking on Medium Heat: Techniques and Tips
When it comes to cooking Kochu Bata, using medium heat is key to achieving the perfect balance between flavor and texture. Here are some techniques and tips to keep in mind:
Start by heating a pan on medium heat and adding mustard oil. Allow the oil to heat up before proceeding.
Add the grated Maan Kochu and cook it slowly, stirring continuously to ensure even cooking. This gentle cooking process helps to unlock the flavors of the ingredients.
Be patient and avoid rushing the cooking process. Cooking on medium heat allows the flavors to meld together and prevents the spices from burning.
Keep a close eye on the Kochu Bata while it’s cooking. Stir frequently to prevent sticking and ensure that it cooks evenly.
Feel free to adjust the cooking time based on your preference for the final consistency. If you like a smoother texture, cook for a longer time. For a chunkier Kochu Bata, cook for a shorter time.
Knowing When Your Kochu Bata is Ready
Determining the doneness of your Kochu Bata is crucial to achieving the desired flavors. Here are some indicators to help you know when your Kochu Bata is ready:
Texture: The grated Maan Kochu should become soft and translucent while retaining its shape. It should no longer have a raw, crunchy texture.
Color: The color of the Kochu Bata will deepen as it cooks, turning into a rich golden hue.
Aroma: The aromatic blend of spices and mustard oil will permeate the air, indicating that the flavors have developed.
Taste: With a little taste test, you will be able to tell if the Kochu Bata has reached the desired level of spiciness and seasoning. Adjust the flavors accordingly if needed.
(Kochu Bata Recipe)
How to Present Kochu Bata on Your Dining Table
When it comes to presenting Kochu Bata, visual appeal plays a significant role. Consider the following presentation ideas:
Traditional Thali: Serve Kochu Bata in the center of a traditional Thali, surrounded by bowls of complementary dishes and a side of fragrant rice.
Garnish with Fresh Herbs: Sprinkle freshly chopped cilantro or mint leaves on top of the Kochu Bata to add a vibrant pop of color and freshness.
Artistic Plating: Use a ring mold to create a beautifully plated Kochu Bata on a rectangular dish, drizzling mustard oil in an elegant design.
By following these serving suggestions and presentation ideas, you can elevate your dining experience with Kochu Bata, impressing your guests and enjoying the authentic flavors of this Bengali delicacy.
For more such mouth-watering recipes do visit the below links:
Kochu bata is a good source of carbohydrates and dietary fiber. It also contains vitamins and minerals, including vitamin C, vitamin A, potassium, and magnesium. However, it should be noted that kochu(Taro) contains oxalates, which can cause irritation in the mouth and throat if consumed raw.
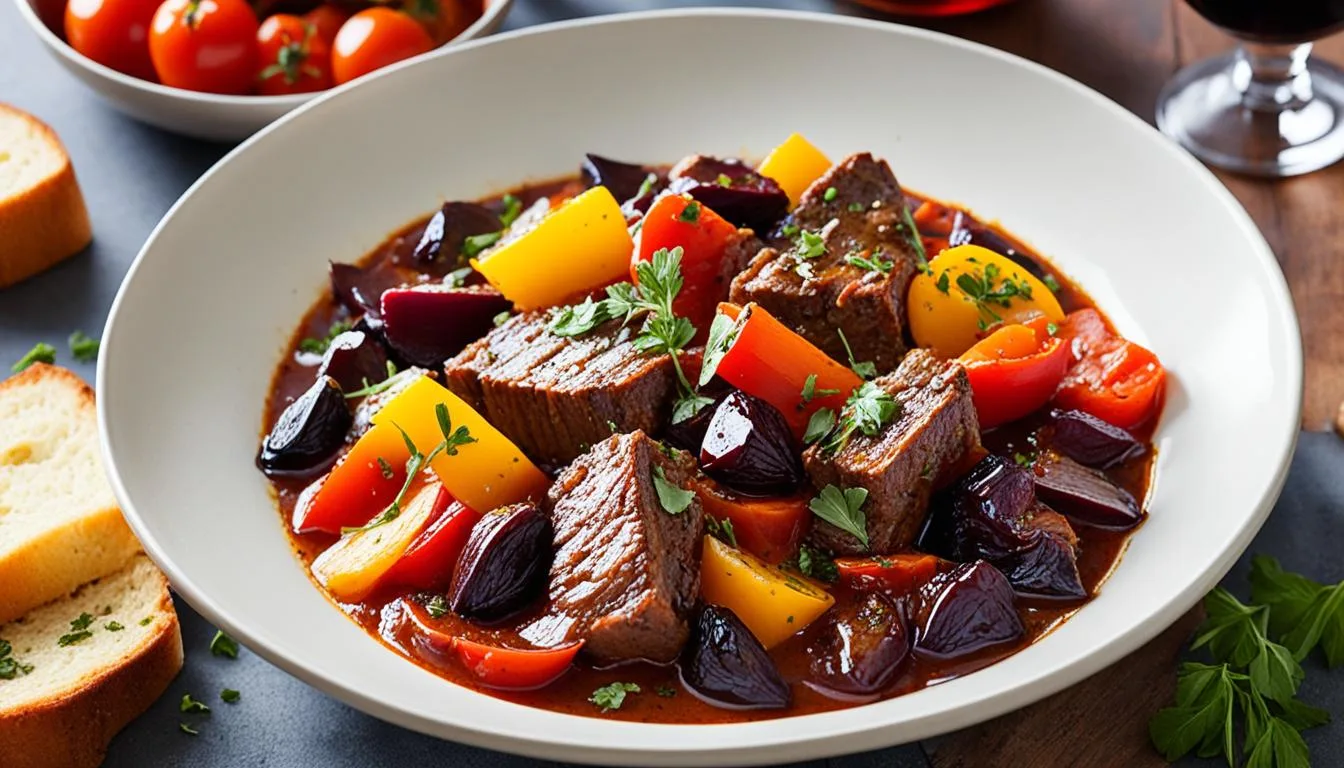
Dalmatian Pasticada Recipe is by far the best known and most traditional dish that reminds you of Dalmatia. It is interesting that not only every city has its own version or the method of preparation, but the recipes vary from household to household.
Pašticada is a Dalmatian specialty whose roots date back to the ancient Greek and Roman cuisine. This dish is listed in the List of Croatian gastronomic heritage. The preparation is very complex, you have to stuff the meat first, marinate overnight, and then cook it for hours. But it is worth it.
Whether enjoyed at a local tavern or prepared at home, Pasticada stew offers a truly authentic taste of Dalmatian cuisine. Its rich flavors and tender meat make it a cherished dish among locals and a must-try for visitors to the region.
(Pasticada Recipe)
Special recommendation for Pasticada Recipe
When marinating Pasticada, it’s important to choose the right cut of beef. Look for cuts that are well-marbled with fat, such as beef chuck or round roast for Pasticada Recipe. These cuts have enough fat content to keep the meat moist and tender during the slow cooking process. Avoid lean cuts of beef, as they can become dry and tough when marinated and cooked for an extended period.
Vinegar plays a significant role in tenderizing the beef and enhancing the flavors of Pasticada. It acts as a natural meat tenderizer by breaking down the connective tissues and proteins in the beef, resulting in a more tender and juicy texture. Additionally, vinegar helps to balance the flavors of the marinade and adds a subtle tang to the dish.
Use red wine vinegar or apple cider vinegar for a rich and robust flavor in your Pasticada marinade. Recommended for Pasticada Recipe
Allow the cooked beef to rest for a few minutes before slicing. This helps retain the juices and ensures a succulent texture.
Use a sharp knife to make clean, thin slices. Aim for uniform thickness to ensure consistent cooking throughout.
Slice against the grain to maximize tenderness. The grain refers to the lines visible on the surface of the meat.
The image above visualizes the rich history of Pasticada, showcasing its significance in Croatian gastronomic heritage.
Choosing the Perfect Cut of Beef
When marinating Pasticada, it’s important to choose the right cut of beef. Look for cuts that are well-marbled with fat, such as beef chuck or round roast. These cuts have enough fat content to keep the meat moist and tender during the slow cooking process. Avoid lean cuts of beef, as they can become dry and tough when marinated and cooked for an extended period.
Ingredients for Your Pasticada Recipe
Ingredients
Quantity
Beef
2 pounds (900 grams)
Red wine vinegar
1 cup
Carrots
2
Onions
2
Celery stalks
2
Garlic cloves
4
Bacon slices
4
Prunes
10
Bay leaves
3
Dried rosemary
1 tablespoon
Dried thyme
1 tablespoon
Olive oil
3 tablespoons
Salt
To taste
Black pepper
To taste
Cooking Your Dalmatian Pasticada
(Pasticada Recipe)
First, begin by browning the meat in a hot skillet. This step is essential for enhancing the depth of flavors and creating a rich, caramelized exterior on the beef.
Once the meat is browned, it’s time to add the marinade and flavors that will infuse the Pasticada with its distinctive taste. Slowly simmer the meat with red wine, vinegar, garlic, cloves, and various spices. Allow the flavors to meld together as the stew simmers over low heat, gradually transforming the simple ingredients into a culinary masterpiece.
The slow cooking process is crucial in achieving tender and succulent meat. The meat should be cooked until it becomes fork-tender, allowing it to melt in your mouth with each bite.
As the Pasticada cooks, your kitchen will be filled with the delightful aroma of the marinade and spices, building anticipation for the upcoming feast.
To further enhance the flavors, consider adding a touch of sweetness and acidity to the stew. Some variations of Pasticada include the addition of prunes or dried figs, which contribute to the sweet and sour balance of the dish.
Once the cooking process is complete, remove the tender meat from the flavorful sauce and let it rest for a few minutes. This will allow the juices to redistribute and ensure that every bite is moist and juicy.
Serving and Presentation: Plating Your Pasticada
The presentation of Pasticada plays a crucial role in enhancing the overall dining experience. To create an appetizing and visually appealing dish, careful attention must be paid to plating. There are two key aspects to consider: slicing the meat and arranging it on the plate, and dressing up your Pasticada with homemade gnocchi and sauce.
For more such delicious recipe please do visit the below links:
The history of Pasticada can be traced back to ancient times when Greek and Roman civilizations flourished. The dish was born out of the rich flavors, ingredients, and cooking techniques that characterized these ancient cultures. Over time, Pasticada developed its unique identity and became synonymous with Dalmatian cuisine.
To fully understand the ancient roots of Pasticada, we need to explore the traditions, ingredients, and cooking methods of this bygone era. By doing so, we gain insight into the authentic flavors and culinary heritage that have been preserved throughout history.
Nutrition value
Magnesium mg 96.5 Phosphor mg 556.02 Potassium mg 1360.21 Niacin mg 21.51 154 Vitamin C mg 23.7 Vitamin D μg 26.84 Vitamin A μg 4858.94 Salt g 2.61 Total proteins g 63.57 Diet fibres g 4.31 Total carbohydrates g Total fat g 37.1
Danish open faced sandwiches, known as smorrebrod, are an integral part of Danish food culture. These delectable sandwiches are not only a feast for the taste buds but also a reflection of the rich food traditions and artistic presentation that the Danish people are proud of.
In this article, we will guide you through the world of smorrebrod, from the essential ingredients to crafting the perfect spreads, selecting diverse toppings, and mastering the art of layering. We’ll also provide a step-by-step guide to preparing your very own smorrebrod at home.
So, get ready to tantalize your senses and experience the true essence of Danish cuisine as we explore the delightful world of authentic smorrebrod!
Special recommendation for Danish Open Faced Sandwiches
Topping
Description
Explore a wide range of toppings including roast beef, smoked salmon, pickled herring, fresh vegetables, and creamy cheeses. Let your creativity soar and mix and match to create the perfect open-faced sandwich.
Essential Ingredients for a True Smorrebrod Experience
A true Smorrebrod experience is marked by the use of fresh, high-quality ingredients. Traditional Danish dishes, such as pickled herring, smoked salmon, liver pate, and roast beef, are often featured as toppings. Accompanied by an array of flavorful spreads, herbs, vegetables, and garnishes, these ingredients come together to create a symphony of tastes and textures on a foundation of hearty Danish rye bread.
Exploring the world of Smorrebrod is a journey through the diverse flavors and culinary traditions of Denmark. Each bite offers a delightful combination of sweet, savory, tangy, and spicy flavors, harmoniously arranged to tantalize the taste buds and celebrate the art of Danish cuisine.
Crafting the Perfect Spreads: From Butter to Creative Toppings
In addition to the delicious base of rye bread, a key element in creating the perfect smorrebrod is the spread. The spread not only enhances the flavors of the toppings but also adds a creamy and smooth texture to each bite. Whether you prefer a classic butter spread or want to explore more creative options, there are plenty of choices to elevate your open-faced sandwiches.
Classic Butter Spread and its Significance in Smorrebrod
The classic butter spread is a staple in Danish open-faced sandwiches, and its significance cannot be overstated. The smooth and creamy butter is the foundation upon which the other toppings are built. It provides a rich and velvety texture while enhancing the flavors of the meat, fish, or vegetables that accompany it. Danish butter, known for its high fat content, ensures a luscious and indulgent experience on every smorrebrod.
Pate and Spreads that Elevate Your Sandwich
While the classic butter spread is beloved, there are endless possibilities to take your smorrebrod to a new level of deliciousness.
Spread
Classic Butter Spread
Pate
Herb-Infused Creams
Tangy Mustard Sauces
Creamy Avocado Spreads
Ingredients of Danish Open Faced Sandwiches
For more such finger licking recipes please click below:
Topping Varieties: Meat, Fish, and Vegetarian Options
For meat lovers, smorrebrod offers an array of delicious options. Thinly sliced roast beef, pork loin, or Danish liver pate are popular choices that add a rich and savory element to the sandwich. Smoked meats such as ham or mackerel provide a smoky and distinctive flavor profile. And for those looking for a taste of traditional Danish cuisine, try topping your smorrebrod with hot dog slices, meatballs, or even cured herring.
For seafood enthusiasts, fish options for smorrebrod are abundant. Smoked salmon, known as “røget laks” in Danish, is a classic and elegant topping choice that pairs perfectly with cream cheese, dill, and lemon. Other popular fish toppings include pickled herring, shrimp, and marinated mackerel. These fish options not only add a burst of flavor but also provide a refreshing and light element to the smorrebrod.
Vegetarians need not worry, as there are plenty of delicious options for them as well. From fresh vegetables such as tomatoes, cucumbers, and radishes to creamy cheeses like brie and Danish blue, the possibilities for vegetarian smorrebrod are endless. Consider topping your open-faced sandwich with avocado, hummus, or even pickled beets for a burst of tangy sweetness.
The Art of Layering: Constructing Your Danish Open Faced Sandwiches
When it comes to crafting the perfect Danish open faced sandwich, layering is key. Each layer contributes to the overall flavor and texture of the smorrebrod, creating a harmonious and satisfying eating experience. In this section, we will explore the art of layering and the importance of balancing flavors and textures to create visually appealing smorrebrod.
Balancing Flavors and Textures
Layering smorrebrod involves carefully selecting ingredients that complement each other, creating a symphony of flavors. It’s important to balance different tastes, such as sweet, savory, tangy, and salty, to create a well-rounded and delicious sandwich. Consider combining contrasting flavors, like the richness of smoked salmon with the freshness of dill and lemon, or the creaminess of avocado with the crunch of radishes.
Texture also plays a crucial role in layering smorrebrod. Aim for a balance of soft and crisp elements by incorporating ingredients like creamy spreads, crunchy vegetables, and crispy toppings. The contrast in textures adds depth and interest to each bite, elevating the overall enjoyment of the sandwich.
Danish Open Faced Sandwiches
Preparation Tips for Danish Open Faced Sandwiches
To ensure a successful smorrebrod preparation, keep the following tips in mind:
Start with fresh, high-quality ingredients to maximize flavors.
Have all the necessary ingredients and spreads ready before assembling.
Prepare the toppings in advance to save time during assembly.
Slice the bread evenly to create a sturdy base for the toppings.
Keep the spreads and toppings refrigerated until ready to assemble.
Designate a clean and spacious work area for assembling the smorrebrod.
By following these preparation tips, you’ll ensure a seamless experience and reduce stress during the assembly process.
Assembling the Smorrebrod – Danish Open Faced Sandwiches
When it comes to assembling smorrebrod, precision and care are crucial. Here’s a step-by-step guide:
Place a slice of bread on a clean plate or board.
Spread a thin layer of butter or other spread on the bread to enhance the flavors.
Add your desired toppings, arranging them in an appealing and balanced manner.
Garnish the smorrebrod with fresh herbs or other decorative elements for an aesthetic touch.
Repeat the process with additional slices of bread and different toppings to create a variety of smorrebrod.
Beverages and Side Dishes
When enjoying the delightful flavors of smorrebrod, it’s essential to consider the perfect beverage pairing and side dishes to elevate your dining experience. Whether you prefer a refreshing Danish beer or a glass of aquavit, we have you covered. Additionally, complementing your open-faced sandwiches with side dishes will create a complete and satisfying meal.
In this article, we will explore an easy poha recipe that is a traditional Indian breakfast. Poha, also known as flattened rice, is a popular breakfast option in India, loved for its simplicity and delicious flavors. Whether you’re looking for a quick and healthy breakfast, a vegetarian option, or a simple and satisfying meal, poha ticks all the boxes.
Made with ingredients like onions, potatoes, spices, and flattened rice flakes, poha can be easily customized to suit your taste preferences and dietary needs. It’s a versatile dish that can be enjoyed by people of all ages, and it’s perfect for busy mornings when you need something quick and nutritious to start your day.
Special recommendation
You can pair you plate full of poha with the below accompaniments:
Yogurt: The creamy and cooling effect of yogurt complements the spiciness of poha, creating a harmonious balance of flavors.
Chutney: Whether it’s a tangy coconut chutney or a spicy green chutney, adding a dollop of chutney enhances the taste of poha.
Pickle: The tangy and sour taste of pickles adds a punch of flavor to every bite of poha, making it a perfect combination.
Papad: Crispy and crunchy papads offer a delightful texture contrast to the softness of poha, making it a satisfying meal.
Sev: Sprinkling some sev on top of poha not only adds a delightful crunch but also enhances the visual appeal of the dish.
Delving into the Flavors of Easy Poha Recipe
What is Poha?
In order to understand the versatility of poha, let’s first explore what this traditional Indian recipe entails. Poha, also known as flattened rice, is a popular dish that is commonly enjoyed for breakfast in India. It is made by processing rice into flattened flakes, resulting in a light and easily digestible ingredient.
The Use of Flattened Rice in Poha
Flattened rice, or poha, is made by parboiling rice grains and then drying them before flattening them into thin flakes. These flakes can be easily rehydrated and cooked to create a soft and fluffy texture. Poha is an essential ingredient in poha recipes, providing a delicious and satisfying base for the dish.
Ingredients for Poha recipe
Ingredients
Quantity
Flattened rice
1 cup
Finely chopped onion
1 medium
Boiled and diced potato
1 small
Finely chopped green chili
1
Mustard seed
1 teaspoon
Turmeric powder
1/2 teaspoon
Curry leaves
Handful
Peanuts
1/4 cup
Oil
2 tablespoons
Salt
To taste
Coriander leaves
few chopped for garnishing
Preparation of Poha
Rinse the flattened rice: Place the flattened rice in a colander and rinse it under cold water for a few seconds. Gently fluff the rice with your fingers to separate any clumps. Set it aside to drain.
Prepare the tempering: Heat oil in a pan over medium heat. Add mustard seeds and let them splutter. Then, add the curry leaves, green chili, and peanuts. Sauté them for a minute until the peanuts turn golden brown.
Add the onions: Add the finely chopped onions to the pan and sauté until they turn translucent.
Season with spices: Sprinkle turmeric powder and salt over the sautéed onions. Mix well to evenly coat the onions with the spices.
Add the potatoes: Now, add the boiled and diced potatoes to the pan. Gently mix everything together.
Combine with flattened rice: Add the rinsed flattened rice to the pan. Using a light hand, mix all the ingredients together until the flattened rice is well-coated with the spices.
Cook until heated through: Cover the pan and let the poha cook for 2-3 minutes on low heat, allowing all the flavors to meld together.
Garnish and serve: Remove the lid and give the poha a final mix. Garnish with freshly chopped coriander leaves. Your homemade poha is now ready to be served!
Enjoy your delicious homemade poha for a satisfying breakfast or snack. It’s a versatile dish that can be enjoyed on its own or paired with a hot cup of masala chai. Bon appétit!
For more such delicious recipes please click below:
Welcome to our blog post on a homemade potato dumplings recipe, the epitome of cozy comfort food. There’s nothing quite like indulging in a warm bowl of potato dumplings during the colder months or enjoying them as a comforting family dinner. Whether you’re looking for a delicious and satisfying meal or seeking a taste of nostalgia, potato dumplings are sure to hit the spot.
Homemade potato dumplings are a cozy comfort food, perfect for colder months.
Enjoy the satisfying and comforting nature of potato dumplings.
Potato dumplings have a rich heritage in German cuisine.
Choose the right ingredients to make flavorful potato dumplings.
Follow our step-by-step guide for foolproof potato dumplings.
(Potato Dumplings Recipe)
Special recommendation
Choose the right potatoes: Opt for starchy potatoes like Russets or Yukon Golds. They have a higher starch content, which helps create light and fluffy dumplings.
Avoid overworking the dough: When mixing the potato and flour mixture, be gentle. Overworking the dough can make the dumplings tough and dense.
Adjust the dough consistency: Make sure to add enough flour to the dough to prevent it from being too sticky. The right consistency is crucial for shaping and cooking the dumplings.
Test the dumpling consistency: Before cooking all the dumplings, test one in simmering water to ensure it holds its shape. If it falls apart, add more flour to the dough.
Use a light touch when shaping: When rolling the dumplings, use a light touch. Pressing too hard can lead to dense dumplings instead of light and airy ones.
Cook in simmering liquid: Rather than boiling the dumplings vigorously, cook them in gently simmering water or broth. This helps maintain their shape and texture.
Give them time to cook: Dumplings need adequate cooking time to become fully cooked and tender. Resist the temptation to rush the process.
Enjoy leftovers in a new way: If you have leftover potato dumplings, pan-fry them with butter for a crispy and delicious alternative.
Gathering Your Ingredients for Potato Dumplings
In order to make delicious potato dumplings, it’s important to gather the right ingredients. From selecting the best potatoes to choosing the right binders and spices, each component plays a crucial role in creating dumplings that are full of flavor and have the perfect texture.
When selecting potatoes, look for ones that are firm and smooth without any sprouting or green patches. These imperfections can affect the taste and texture of the dumplings. Additionally, choose potatoes that are medium to large in size, as they are easier to work with when mashing and forming dumplings.
For more such lip smacking recipes please do click below
Peel and dice the potatoes. Place them in a large pot of boiling water and cook until fork-tender, approximately 15-20 minutes.
Drain the potatoes and allow them to cool slightly before transferring them to a large mixing bowl. Use a potato masher or fork to mash the potatoes until smooth.
In a separate bowl, combine the flour, eggs, salt, and nutmeg. Mix well until a sticky dough forms.
Add the dough to the mashed potatoes and gently knead until well combined.
Dust your hands with flour to prevent sticking. Take a small portion of the dough and roll it into a ball, approximately 1-2 inches in diameter.
Repeat the rolling process with the remaining dough, placing the formed dumplings onto a lightly floured surface.
In a large pot, bring water to a gentle simmer. Carefully drop the dumplings into the simmering water and cook for 10-15 minutes or until they float to the surface.
Remove the dumplings from the water using a slotted spoon and serve immediately with your favorite sauce, gravy, or soup.
Enjoy these homemade potato dumplings as a hearty side dish or as the main attraction in a comforting meal. The creamy texture and rich flavor will surely satisfy your taste buds.
Potato Dumplings recipe
Potato Dumplings Recipe tips and tricks
Tips for Achieving the Perfect Texture
Choose starchy potatoes (such as Russet or Yukon Gold)
Mash potatoes thoroughly to a smooth consistency
Balance the moisture: avoid adding too much liquid
Form the dumplings gently and avoid applying excessive pressure
Cook dumplings until they float and avoid overcooking
There you have it! With these tips and tricks, you’ll be able to achieve the perfect texture for your potato dumplings every time. Enjoy the light, fluffy goodness that will elevate your dining experience and leave your taste buds craving more.