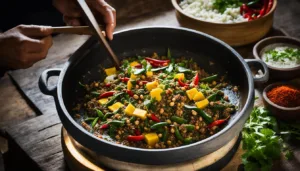
Welcome to our culinary adventure as we delve into the flavors of Barbados and explore the traditional Bajan dish, Cou Cou and Flying Fish recipe. This fish and cornmeal dish holds a special place in Barbadian cuisine, representing the rich cultural heritage and mouthwatering flavors that make Caribbean cuisine so beloved.
At the heart of this Bajan delight is the combination of tender flying fish and a smooth, polenta-like cornmeal cou cou. Together, they create a harmonious blend of textures and flavors that will transport you straight to the sun-soaked shores of Barbados.
Get ready to embark on a culinary journey that celebrates the traditions and flavors of Barbadian cooking.
Special recommendation for Cou Cou and Flying Fish Recipe
In Barbados, cou cou is often served alongside fish, particularly the famous flying fish, to create the iconic cou cou and flying fish dish. The flavors of the cou cou and fish complement each other, resulting in a delicious harmony of taste.
Traditionally, cou cou is served in a mound-like shape, with the fish arranged on top. The combination is often accompanied by a side of pickled cucumber and tomato salad, providing a refreshing contrast to the richness of the dish.
In case you do not have flying fish available, you can replace it with sea Bass.
The Uniqueness of Flying Fish in Barbadian Cuisine
What Makes Flying Fish Special?
Flying fish is a truly unique ingredient that holds a special place in Barbadian cuisine. Known for its distinct characteristics, flying fish adds a touch of authenticity to traditional Barbadian dishes. This agile fish is famous for its ability to glide above the water’s surface, making it a remarkable sight in the Caribbean seas.
The tender and delicate flesh of flying fish has a mild flavor with a hint of sweetness. Its firm texture holds up well in various cooking methods, whether it’s grilled, fried, or steamed. The flavor profile of flying fish perfectly complements the vibrant spices and ingredients found in Barbadian recipes, creating a harmonious blend of tastes.
Barbadians take great pride in this indigenous fish, considering it a symbol of their culture and identity. Flying fish represents the spirit of the Caribbean and is deeply intertwined with the country’s culinary heritage.
For some other lip smacking dishes do visit the below links:
To create the delicious cou cou and flying fish dish, you’ll need a range of ingredients that come together to form its unique flavors and textures. Here is an overview of the key components:
Ingredients for Cou Cou
Ingredients for Flying Fish
Yellow cornmeal
Water
Okra
Onion
Garlic
Thyme
Butter
Salt
Black pepper
Flying fish fillets
Lime juice
Seasoned flour
Vegetable oil
Onion
Garlic
Thyme
Scotch bonnet pepper
Salt
Black pepper
Guide to prepare the dish
Prepping the Seasonings and Sauces
Before we start cooking, let’s prepare the seasonings and sauces that will enhance the flavors of our cou cou and flying fish. Here’s what you need to do:
Finely chop the onions, garlic, thyme, and parsley.
In a small bowl, combine the chopped onions, garlic, thyme, and parsley.
Add salt, pepper, and other desired seasonings to the mixture. Mix well to create a flavorful seasoning blend.
In a separate bowl, combine the tomato paste, vinegar, and hot sauce to create a tangy sauce.
By prepping the seasonings and sauces beforehand, you ensure that the flavors have time to meld together, resulting in a more delicious final dish.
Cooking Techniques for the Perfect Dish
Now that the seasonings and sauces are ready, let’s move on to the cooking techniques that will bring our cou cou and flying fish to life. Follow these steps for a perfectly cooked dish:
Start by marinating the flying fish fillets in the tangy sauce we prepared earlier. Allow them to marinate for at least 30 minutes to soak in all the flavors.
In a deep pan, bring water to a boil and gradually add the cornmeal while continuously stirring. This ensures a smooth texture without any lumps.
Reduce the heat to low and continue stirring the cornmeal mixture until it thickens to a creamy consistency. This step requires patience, as it can take around 20 minutes. Make sure to stir consistently to prevent the mixture from sticking to the pan.
While the cou cou is cooking, heat a separate pan with oil and sauté the seasoned flying fish fillets until they are golden brown and cooked through.
Once the cou cou and flying fish are ready, plate them together for a stunning presentation. You can also garnish with fresh parsley or thyme for an added touch of flavor and aesthetics.
This dish serves as a culinary bridge, connecting generations and preserving cultural traditions. Passed down from one kitchen to the next, this dish carries the stories of our ancestors and the heritage of Barbados.
As younger generations learn to cook and appreciate Bajan cuisine, they become custodians of their cultural legacy. They carry forward the flavors, techniques, and secrets of traditional recipes, ensuring that the emotional connection to Bajan dishes endures. This generational connection is a testament to the
Enhancing Your Meal with a Traditional Drink
When enjoying the cou cou and flying fish dish, consider these traditional Bajan drinks that have been enjoyed for generations:
Rum Punch: Made with the finest Barbadian rum, tropical fruit juices, and a hint of spice, rum punch is a classic beverage to pair with the cou cou and flying fish. Its refreshing sweetness and bold flavors perfectly blend with the dish’s savory and rich taste.
Mauby: This unique Bajan drink is made from the bark of the mauby tree, infused with a variety of spices and sweetened to perfection. Its distinct flavor profile provides a delightful contrast to the flavors of the cou cou and flying fish, creating a harmonious balance.
Sorrel: A popular drink during festive seasons, sorrel is made from the petals of the sorrel flower, ginger, spices, and sweetened with sugar. Its tangy and vibrant taste complements the cou cou and flying fish, bringing a burst of flavor to every bite.
Golden Apple Juice: Made from the tropical golden apple fruit, this refreshing beverage provides a light and fruity accompaniment to the cou cou and flying fish. Its natural sweetness and crispness enhance the overall dining experience.
Welcome to our ultimate guide to making easy buffalo wings that are both flavorful and spicy. Whether you’re planning a game day party or a casual gathering with friends, these buffalo wings are sure to be a hit. We’ve perfected a special technique that delivers incredibly crispy wings without the need for deep frying. Get ready to indulge in the perfect combination of tender meat and a tangy, spicy sauce that will leave you wanting more!
There’s nothing quite like sinking your teeth into a plate of buffalo wings. The crispy exterior, juicy interior, and bold flavors make them a crowd favorite. And the best part? Our recipe is easy to follow and doesn’t require any fancy equipment. You can achieve restaurant-quality buffalo wings right in your own kitchen.
So let’s dive right in and discover the secrets to making these mouthwatering wings. From the crispy baking technique to the flavorful homemade sauce, we’ll guide you through every step to ensure your buffalo wings turn out perfectly every time.
Table of Contents
Key Takeaways:
Our easy buffalo wings recipe delivers deliciously crispy wings without deep frying.
The special baking technique ensures maximum crispiness.
Using baking powder and a combination of low and high heat produces a shatteringly crisp exterior.
Our homemade buffalo sauce is the perfect balance of tangy and spicy.
Properly drying the wings before baking is essential for achieving ultimate crispiness.
The Secret to Incredibly Crispy Baked Buffalo Wings
In this section, we will reveal the secret to making incredibly crispy baked buffalo wings. The technique we will discuss has been popularized by Cooks’ Illustrated and results in shatteringly crispy wings straight from the oven. To achieve the desired crispiness, we will explore the importance of using baking powder and the low and high heat strategy.
The Cooks’ Illustrated Technique
The Cooks’ Illustrated technique for making crispy baked buffalo wings involves specific steps and temperature adjustments. By following this technique, you can render the fat and crisp up the skin on the wings, resulting in an irresistibly crispy texture.
Baking Powder: Not Just for Baking
Baking powder plays a crucial role in creating crispy buffalo wings. It draws moisture to the surface of the skin, which helps achieve a crispy texture without adding any unwanted flavors. This pantry staple is not just for baking; it elevates the crispiness of your wings to a whole new level.
Low and High Heat: The Crisping Strategy
Using both low and high heat is essential when baking buffalo wings. Starting with a low temperature helps melt the fat under the skin, while cranking up the heat in the final stages makes the skin super crispy. This combination of temperatures ensures that your baked buffalo wings turn out perfectly crispy on the outside while remaining juicy and tender on the inside.
Buffalo Wings Recipe Ingredient List
In order to make delicious buffalo wings, you will need the following ingredients:
Chicken wings
Baking powder
Garlic powder
Onion powder
Paprika
Salt
Black pepper
Frank’s Original Red Hot Sauce
Unsalted butter
White vinegar
Worcestershire sauce
Cayenne pepper
Blue cheese
Sour cream
Mayonnaise
Lemon juice
Garlic cloves
Chives
Each ingredient plays a crucial role in creating the flavorful and spicy buffalo wings that everyone loves. From the chicken wings themselves to the special combination of spices and the tangy buffalo sauce, each component contributes to the overall deliciousness of this classic dish.
Savor the Flavors: Making the Classic Buffalo Sauce
In this section, we will focus on making the classic buffalo sauce that gives the wings their signature flavor. The buffalo sauce is a key component of the beloved buffalo wings, bringing together the perfect balance of heat, tanginess, and buttery richness. We will highlight the magic of Frank’s Original Red Hot Sauce, a staple ingredient that adds a distinct kick of spiciness to the sauce.
Frank’s Original Red Hot Sauce Magic
When it comes to creating an authentic buffalo sauce, Frank’s Original Red Hot Sauce is a game-changer. With its unique blend of aged cayenne peppers, vinegar, and spices, this sauce delivers the perfect level of heat and tang. Its bold and zesty flavor serves as the foundation for the classic buffalo sauce, elevating the taste of the wings to new heights. Incorporating Frank’s Red Hot Sauce into your homemade buffalo sauce ensures that every bite is packed with authentic buffalo flavor.
The Right Balance: Butter and Sweetness
Creating the perfect buffalo sauce is not just about the heat; it’s also about achieving the right balance of butter and sweetness. Butter plays a crucial role in adding richness and a smooth, velvety texture to the sauce. It helps bind the flavors together and coats the wings beautifully, enhancing the overall taste experience. To achieve the ideal level of sweetness, a touch of sweetness is added to the buffalo sauce. This can come from a variety of sources, including honey, brown sugar, or even a hint of sugar. The sweetness complements the heat and tanginess of the sauce, providing a well-rounded flavor profile that tantalizes the taste buds.
With the combination of Frank’s Original Red Hot Sauce, butter, and a touch of sweetness, you can create a classic buffalo sauce that embodies the true essence of this iconic dish. The next step is to toss your perfectly baked wings in this flavorful sauce, coating them in a mouthwatering glaze that will have everyone reaching for more.
Preparing Your Wings for the Oven
In order to achieve maximum crispiness, it is essential to properly prepare your wings before they go into the oven. This section will outline two key steps to ensure your buffalo wings turn out perfectly:
The Importance of Drying Your Wings
Before you start cooking, make sure to thoroughly dry your wings. This step is crucial for achieving a crispy texture. Excess moisture on the wings can prevent them from properly browning and becoming crispy. Pat them dry with paper towels or let them air-dry in the refrigerator for a few hours. Your efforts will be rewarded with irresistibly crispy wings!
Oven Rack Positions and Preheating Tips
When it comes to baking buffalo wings, oven rack position is important for even cooking. For the best results, place your oven racks in the upper and lower thirds of the oven. This allows for optimal air circulation around the wings, ensuring they cook evenly and become crispy on all sides.
Additionally, preheating the oven is essential for consistent and efficient cooking. Preheat your oven to the specified temperature in the recipe before placing the wings inside. This ensures that the wings cook evenly and develop a golden-brown color.
By following these tips, you’ll be well on your way to preparing crispy and flavorful buffalo wings.
Step-by-Step Baking Instructions
Initial Slow Baking to Render Fat
To achieve the perfect texture and taste in your baked buffalo wings, it is essential to follow a step-by-step process. The initial slow baking step plays a crucial role in rendering the fat under the skin, resulting in juicy and flavorful wings.
Begin by preheating your oven to 250°F (120°C) and lining a baking sheet with aluminum foil. Place a wire rack on top of the foil-lined sheet to allow air circulation and prevent the wings from becoming soggy.
Arrange the wings on the rack in a single layer, making sure they are not touching each other. This ensures even cooking and allows the fat to render properly.
Place the wings in the preheated oven and bake for 30 minutes. This slow cooking process allows the fat to gradually melt, leaving behind tender and moist meat. Be patient, as this step sets the foundation for the crispy wings that follow.
Final High Heat Blast for Crispiness
After the initial slow baking, it’s time to turn up the heat and achieve ultimate crispiness. Increase the oven temperature to 450°F (230°C) and prepare for the final high heat blast.
Remove the wings from the oven and carefully flip each one using tongs. This ensures that both sides of the wings get evenly crispy.
Return the wings to the oven and bake for an additional 20-25 minutes, or until they turn golden brown and the skin is delightfully crispy. Keep an eye on them as they bake to avoid burning.
Once the wings are beautifully golden and crispy, remove them from the oven and let them cool for a few minutes before serving. This allows the flavors to fully develop and ensures that you don’t burn your mouth in your eagerness to try them.
Dressing Your Wings: Tossing with Buffalo Sauce
Once your baked buffalo wings are perfectly crispy, it’s time to dress them in the iconic Buffalo sauce. The tangy and spicy flavors of the sauce will elevate your wings to new heights of deliciousness. Here’s how to achieve the perfect coating and balance of sauce to wings:
Prepare your Buffalo sauce by combining Frank’s Original Red Hot Sauce and melted butter in a bowl. Adjust the ratio according to your preferred level of spiciness.
Place your baked wings into a large mixing bowl.
Using a pair of tongs or a spatula, carefully pour the Buffalo sauce onto the wings.
Gently toss the wings in the sauce, making sure to fully coat each wing.
Continue tossing until all the wings are evenly coated with the flavorful sauce.
Alternatively, if you prefer a less messy method, you can also use a large resealable plastic bag. Simply place the wings and sauce in the bag, seal it tightly, and shake vigorously to coat the wings.
Once your wings are dressed in the Buffalo sauce, they are ready to be enjoyed. The combination of crispy wings and tangy, spicy sauce is a match made in flavor heaven. Serve them as a crowd-pleasing appetizer at your next game day party or any gathering where you want to impress your guests.
The Blue Cheese Dip: A Love-it or Hate-it Affair
In the world of buffalo wings, there is one accompaniment that inspires passionate debate – the Blue Cheese Dip. Some people can’t get enough of its tangy, creamy goodness, while others can’t understand the appeal. Love it or hate it, the Blue Cheese Dip is undeniably a part of the buffalo wings experience.
Customizing Your Blue Cheese Dip’s Texture
When it comes to the Blue Cheese Dip, texture plays a crucial role in the overall enjoyment. Some prefer a smooth and velvety consistency, while others crave a chunky and robust experience. The good news is that you can easily customize the texture to suit your personal taste.
To achieve a smooth and creamy Blue Cheese Dip, blend the ingredients using a blender or food processor until you reach your desired consistency. For a chunkier dip with more pronounced blue cheese chunks, simply hand-crush the cheese and stir it into the base dip.
Experiment with different methods to find the texture that pleases your palate. Whether you prefer it silky smooth or delightfully lumpy, there is a perfect Blue Cheese Dip waiting to enhance your buffalo wings.
Ingredient Highlights for the Ultimate Dip
The success of any Blue Cheese Dip lies in the quality of its ingredients. To create the ultimate dip that perfectly complements your buffalo wings, consider these key ingredient highlights:
Blue Cheese: Opt for a high-quality blue cheese with rich flavor and creamy texture. The intensity of the blue cheese will greatly impact the dip’s taste, so choose according to your preferences.
Sour Cream: The smooth and tangy nature of sour cream adds a balancing creaminess to the dip. Use full-fat sour cream for a luxurious texture.
Mayonnaise: Mayo contributes to the richness and body of the dip. Choose a good-quality mayonnaise that complements the other flavors without overpowering them.
Garlic and Onion: Freshly minced garlic and onion bring depth and complexity to the dip. Saute them lightly before adding to enhance their flavors.
Herbs and Spices: Consider adding a touch of freshness with herbs like parsley or chives. Additionally, season the dip with salt, black pepper, and a dash of Worcestershire sauce to elevate the overall taste.
By using these premium ingredients, you can create a Blue Cheese Dip that truly elevates your buffalo wings experience. The combination of quality blue cheese, sour cream, and other flavors will take your taste buds on a delightful journey.
“The love-it or hate-it nature of Blue Cheese Dip adds to the dynamic experience of enjoying buffalo wings. With a customized texture and the right ingredients, this dip is the perfect companion for your spicy, flavorful wings.”
In addition to the delicious buffalo wings, it’s important to consider the perfect pairings and serving suggestions to elevate your dining experience. Whether you’re hosting a game day party or simply enjoying a casual gathering with friends and family, these recommendations will complement the flavors of the wings and satisfy everyone’s taste buds.
Celery Sticks: The Classic Companion
No buffalo wings platter is complete without the classic addition of celery sticks. These crunchy greens not only provide a refreshing contrast to the spicy flavors of the wings but also offer a cooling effect for those who prefer a milder palate. Simply slice fresh celery into thin sticks and arrange them alongside the wings for a traditional pairing.
Drink Pairings: What to Sip with Spicy Wings
When it comes to choosing the perfect beverage to complement your spicy wings, there are plenty of options to consider. Whether you prefer a cold beer, a refreshing cocktail, or a non-alcoholic drink, we’ve got you covered.
Cold Beer: A crisp and cold beer is a classic choice to wash down the heat of spicy buffalo wings. Opt for an ice-cold lager or a hoppy IPA to balance the flavors and enhance the overall experience.
Refreshing Cocktail: If you’re in the mood for a cocktail, try a refreshing mojito, made with fresh mint, lime juice, and rum. The minty flavors will complement the spiciness of the wings and provide a pleasant contrast.
Non-Alcoholic Beverage: For those who prefer a non-alcoholic option, a citrus-infused iced tea or a sparkling water with a splash of lime can provide a refreshing and light accompaniment to the flavorful buffalo wings.
Remember to drink responsibly and choose beverages that suit your personal preferences. No matter what you choose, the drink pairings mentioned above will enhance your enjoyment of the spicy buffalo wings.
Storing and Re-Heating Tips for Your Buffalo Wings
Properly storing and re-heating buffalo wings is essential to preserve their delicious flavor and crispy texture. Follow these tips to keep your leftover wings tasting just as amazing as when they were first baked.
Storing Buffalo Wings
When storing buffalo wings, it’s crucial to maintain their crispiness. Here’s how:
Cool them down: Allow the wings to cool to room temperature before storing them. This helps prevent moisture buildup and keeps the skin crispy.
Airtight container: Place the cooled wings in an airtight container or wrap them tightly with aluminum foil. This prevents exposure to air and helps retain their moisture.
Refrigeration: Store the container of wings in the refrigerator for up to 3 days. Make sure to place them in the main compartment as opposed to the door, as the door can experience temperature fluctuations.
Re-Heating Buffalo Wings
When it’s time to re-heat your buffalo wings, use these methods to maintain their crispiness:
Oven: Preheat your oven to 350°F (175°C). Place the wings on a baking sheet lined with parchment paper and re-heat for 12-15 minutes or until heated through. This method helps retain the crispy skin.
Air Fryer: If you have an air fryer, it’s another great option for re-heating buffalo wings. Preheat the air fryer to 350°F (175°C), then place the wings in a single layer and re-heat for 5-7 minutes or until heated through and crispy.
Skillet: Heat a skillet over medium heat and add a small amount of oil. Place the wings in the skillet, cover with a lid, and re-heat for 5-7 minutes, turning occasionally. This method helps crisp up the skin while heating the wings.
Enjoying Delicious Buffalo Wings Anytime
By following these storing and re-heating tips, you can savor the flavors of buffalo wings whenever you crave them. Whether you’re enjoying them as leftovers or preparing them in advance for a party, these methods will help maintain their irresistible taste and crispy texture.
Conclusion
In conclusion, our buffalo wings recipe is a standout choice for any occasion. The unique baking technique ensures an incredibly crispy texture that rivals deep-fried wings, without all the extra oil. Paired with the classic Buffalo sauce, these wings are bursting with flavor and just the right amount of spiciness.
Why This Buffalo Wings Recipe Stands Out
What sets our buffalo wings recipe apart is the attention to detail in achieving the perfect texture. By following the Cooks’ Illustrated technique, the wings come out shatteringly crispy, thanks to the use of baking powder and a combination of low and high heat. This ensures that every bite is satisfyingly crunchy on the outside and tender on the inside.
Additionally, our recipe stands out because of the homemade Buffalo sauce. Made with Frank’s Original Red Hot Sauce, the sauce delivers the authentic and tangy flavor that buffalo wings are known for. The balance of butter and sweetness adds richness and enhances the overall taste.
Your New Go-To for Game Day and Gatherings
Whether you’re hosting a game day party or having a casual gathering with friends, our buffalo wings recipe is your new go-to dish. The combination of the crispy texture, bold flavors, and easy preparation makes these wings a crowd-pleaser. Plus, they can be easily scaled up or down depending on the number of guests.
So why settle for store-bought wings or deep frying when you can make these flavorful and spicy buffalo wings in the comfort of your own kitchen? With our recipe, you’ll have everyone asking for seconds and coming back for more.
FAQ
What makes this buffalo wings recipe easy?
This buffalo wings recipe is easy because it uses a special baking technique that results in incredibly crispy wings without the need for deep frying.
How do I achieve crispy baked buffalo wings?
To achieve crispy baked buffalo wings, follow the Cooks’ Illustrated technique of starting with a slow baking process to render the fat and then turning up the heat to make the skin super crispy.
Why is baking powder important in making crispy buffalo wings?
Baking powder draws moisture to the surface of the skin, resulting in a crispy texture without adding any unwanted flavor to the wings.
What is the low and high heat strategy for baking buffalo wings?
The low and high heat strategy involves starting with a low temperature to melt the fat under the skin and then cranking up the heat to make the skin super crispy.
What are the ingredients required to make buffalo wings?
The ingredients required to make buffalo wings include chicken wings, baking powder, salt, pepper, garlic powder, cayenne pepper, unsalted butter, Frank’s Original Red Hot Sauce, and Worcestershire sauce.
What is the significance of Frank’s Original Red Hot Sauce in Buffalo sauce?
Frank’s Original Red Hot Sauce is a key ingredient in authentic Buffalo sauce. Its distinctive flavor contributes to the overall taste of the buffalo wings.
How do I balance the butter and sweetness in the Buffalo sauce?
Balancing the butter and sweetness in the Buffalo sauce is essential. Butter adds richness and smoothness, while a touch of sweetness enhances the overall flavor profile. Adjust the amounts according to personal preference.
Why is it important to dry the wings before cooking them?
Properly drying the wings before cooking them results in a better texture and allows the skin to crisp up more effectively.
What are the optimal oven rack positions for baking buffalo wings?
For baking buffalo wings, place the oven racks in the upper and lower thirds of the oven to ensure even and efficient cooking.
What is the initial slow baking step for in making buffalo wings?
The initial slow baking step helps render the fat under the skin of the wings, resulting in a better texture and flavor.
What is the final high heat blast for in making buffalo wings?
The final high heat blast is crucial for achieving the desired crispiness in the buffalo wings. It ensures they turn out golden brown and the skin is crispy.
How do I dress the baked buffalo wings with Buffalo sauce?
To dress the baked buffalo wings with Buffalo sauce, toss them in a bowl with the desired amount of sauce until evenly coated. Adjust the sauce amount to achieve your preferred balance of sauce to wings.
How can I customize the texture of the Blue Cheese Dip?
You can customize the texture of the Blue Cheese Dip by adjusting the amount of mashing you do to the blue cheese. For a smoother dip, mash it more. For a lumpy dip, mash it less.
What are the key ingredients that make the Blue Cheese Dip the ultimate accompaniment to buffalo wings?
The key ingredients that make the Blue Cheese Dip the ultimate accompaniment to buffalo wings include quality blue cheese, sour cream, mayonnaise, garlic powder, onion powder, and Worcestershire sauce.
Why are celery sticks considered the classic companion to buffalo wings?
Celery sticks are considered the classic companion to buffalo wings because their fresh, crunchy texture provides a refreshing contrast to the spicy flavors of the wings.
What are some drink pairings that go well with spicy buffalo wings?
Some drink pairings that go well with spicy buffalo wings include cold beer, refreshing cocktails, and non-alcoholic beverages like soda or iced tea. Choose the drink that suits your taste preferences.
How can I store and re-heat buffalo wings?
To store buffalo wings, place them in an airtight container and keep them in the refrigerator for up to 3 days. To re-heat the wings, place them on a baking sheet and bake in a preheated oven until heated through and crispy again.
Welcome to our homemade apple pie recipe guide! We are excited to share with you a recipe that combines the warmth of freshly baked apples with the indulgence of a flaky pie crust. Whether you’re a seasoned baker or just starting out, this easy and delicious apple pie recipe is sure to impress your family and friends.
There’s something truly special about a homemade apple pie. The aroma of cinnamon and apples wafting through the kitchen, the golden crust with a hint of buttery sweetness, and the anticipation of that first bite – it all adds up to a classic dessert that never fails to delight.
So, why not roll up your sleeves and join us on a mouthwatering journey to create the perfect apple pie? From choosing the right apples to achieving a flaky pie crust, we’ll guide you every step of the way.
Table of Contents
Key Takeaways
Our homemade apple pie recipe is easy to follow and results in a delicious treat.
Choosing the right apples, such as Granny Smith, is crucial for a perfect apple pie.
A flaky and tender pie crust is achievable with our secrets and tips.
Preparing your ingredients properly, including the perfect spice combination, enhances the flavor of your apple pie.
Assembling and baking your apple pie requires attention to detail and expert techniques.
The Allure of a Classic Homemade Apple Pie
When it comes to classic desserts, few can rival the timeless appeal of a homemade apple pie. The delicious combination of sweet, tart apples, warm cinnamon spice, and a flaky crust evokes feelings of comfort and nostalgia. It’s a dessert that has been passed down through generations, becoming a cherished tradition in American culture.
The Tradition of Apple Pie in American Culture
Apple pie holds a special place in American culture. It has long been considered a symbol of home and family, with its roots dating back to the early colonial days. The tradition of serving apple pie during holidays, gatherings, and even as a simple weeknight treat has endured over the years.
From the picturesque imagery of a rustic apple pie cooling on a windowsill to the nostalgic scent that fills the kitchen while it bakes, the tradition of apple pie brings people together and creates lasting memories.
The Irresistible Combination of Cinnamon and Apples
One of the key elements that makes a classic homemade apple pie so irresistible is the perfect pairing of cinnamon and apples. The warm, aromatic spice of cinnamon enhances the natural sweetness of the apples, creating a harmonious flavor profile that is undeniably delicious.
Every bite offers a comforting balance of tender, spiced apples enveloped in a buttery, golden crust. It’s a combination that has stood the test of time and continues to captivate taste buds with its simple yet mouthwatering allure.
So, whether you’re looking to carry on a beloved family tradition, celebrate a special occasion, or simply indulge in a comforting slice of pie, a classic homemade apple pie is sure to satisfy your cravings and warm your heart.
Why “Granny Smith” Apples Make Your Apple Pie Recipe Perfect
In the world of apple pies, the choice of apple is crucial to achieving the perfect balance of flavors and textures. And when it comes to creating the ideal apple pie recipe, Granny Smith apples are a game-changer.
The Importance of Choosing the Right Apple
When selecting apples for your apple pie, it’s essential to choose the right variety to ensure the best results. Each apple has its unique characteristics in terms of flavor, texture, and tartness. And finding the perfect balance is crucial to creating a delicious apple pie.
While some apple varieties, like Red Delicious or Gala, may be your go-to choices for snacking, they might not be the best option for baking. Baking apples need to hold their shape, retain some firmness, and provide a balanced sweetness and tartness that complements the pie’s flavors.
Granny Smith’s Balance of Tartness and Firmness
When it comes to baking an apple pie, Granny Smith apples are widely regarded as the ultimate choice. These beautiful green apples have a perfect balance of tartness and firmness that makes them ideal for pie making.
The tartness of Granny Smith apples adds a refreshing tang to the apple pie, cutting through the sweetness and providing a delightful contrast. At the same time, their firm texture holds up well during baking, ensuring that the apple slices maintain their shape and don’t turn mushy.
Furthermore, Granny Smith apples have a distinct acidity that helps enhance the overall flavors of the pie, resulting in a well-rounded and memorable taste experience.
Apple Variety
Tartness
Firmness
Granny Smith
High
High
Red Delicious
Low
Low
Gala
Low
Medium
Table: Comparison of Tartness and Firmness in Different Apple Varieties
Secrets to a Flaky and Tender Pie Crust
Creating a flaky and tender pie crust is essential for a truly delicious homemade apple pie. With a few key techniques and tricks, you can elevate your pie crust game and impress your guests with a pastry that is buttery, light, and irresistible. Discover the secrets to achieving the perfect pie crust texture and take your apple pie to the next level.
1. Start with cold ingredients: Using cold butter and icy water is crucial to achieving a flaky crust. Cold ingredients create small pockets of butter in the dough, which melt during baking and create those coveted layers.
2. Use the right flour: Opt for all-purpose flour, as it provides the ideal balance of protein and starch. This will give your crust structure while still maintaining tenderness.
3. Don’t overwork the dough: When mixing the dough, be careful not to overmix or knead it too much. Overworking the dough can develop gluten, resulting in a tough crust. Mix until the dough just comes together, then stop.
4. Chill the dough: After preparing the dough, wrap it tightly in plastic wrap and refrigerate for at least 30 minutes. This allows the butter to re-solidify, resulting in a more tender crust.
5. Roll it out with care: Roll the dough gently and evenly to maintain an even thickness. Avoid adding excessive flour, as this can make the crust dry and tough. Use a minimal amount of flour on the rolling pin and work surface to prevent sticking.
6. Try the vodka trick: Some bakers swear by replacing some of the ice water in the recipe with vodka. Vodka inhibits gluten development, resulting in a more tender crust. Plus, the alcohol evaporates during baking, leaving behind a perfectly flaky crust.
7. Use a decorative crust: Impress your guests by trying different decorative crust techniques, such as a lattice design or cut-out shapes. Not only does this add visual appeal to your pie, but it also helps create additional layers for a flakier texture.
Remember, practice makes perfect when it comes to pie crust. Don’t be discouraged if your first attempt doesn’t turn out exactly as planned. With time and experience, you’ll discover the techniques that work best for you. So, roll up your sleeves, arm yourself with these secrets, and prepare to create the flakiest, tenderest pie crust ever.
Preparing Your Ingredients for the Ultimate Apple Pie
In order to create the ultimate apple pie, it’s crucial to start with the best ingredients and prepare them properly. Paying attention to the details will elevate your pie from good to exceptional. From the flaky crust to the flavorful apple filling, every element contributes to the perfection of this beloved dessert.
Pie Crust Essentials: Butter and a Hint of Vinegar
The foundation of any great apple pie is a buttery and flaky crust. To achieve this, it’s important to use quality ingredients and follow a few key steps. Firstly, make sure your butter is cold and cut it into small cubes. This will help create the desired texture as the butter melts during baking. Additionally, a hint of vinegar adds tenderness to the crust and helps prevent a tough texture. Incorporating these essentials into your pie crust will result in a pastry that is both melt-in-your-mouth and structurally sound.
Spicing Up Your Apples: Cinnamon and Nutmeg Love Affair
No apple pie is complete without the perfect blend of spices to enhance the flavor of the apples. The classic combination of cinnamon and nutmeg is the secret to achieving that nostalgic, warm, and aromatic taste. Cinnamon adds a sweet and slightly spicy note, while nutmeg brings a hint of earthiness. Together, they create a harmonious love affair that will transport your taste buds to autumn bliss. Be generous with the spices, and don’t be afraid to adjust the amounts to suit your preference.
Now that you understand the importance of preparing your ingredients, it’s time to move on to the next step: the art of assembling your apple pie recipe.
The Art of Assembling Your Apple Pie Recipe
Now that you have all the elements ready, it’s time to bring them together and assemble your delicious apple pie. Follow these step-by-step instructions for the best results:
Start by preheating your oven to the recommended temperature.
Prepare your pie crust according to the recipe or using a store-bought crust if preferred.
Place one pie crust into a pie dish, gently pressing it into the bottom and sides, ensuring there are no air pockets.
Add your apple filling, ensuring it is evenly distributed across the crust.
Place the second pie crust on top of the filling. You can leave it as a whole crust or create a lattice design for an eye-catching presentation.
Seal the edges of the crust by pressing them together and crimping if desired.
Make a few slits or decorative cutouts on the top crust to allow steam to escape during baking.
Brush the top crust with an egg wash or milk for a golden finish.
Place the assembled pie on a baking sheet to catch any drips and prevent a messy oven.
Now, your apple pie is ready to be baked to perfection.
Follow the baking instructions in the recipe, and soon, your kitchen will be filled with the irresistible aroma of a freshly baked apple pie.
Once the pie is baked to a golden brown and the filling is bubbly, remove it from the oven and allow it to cool on a wire rack before serving.
Now that you know the art of assembling an apple pie, it’s time to savor each delicious bite. Whether enjoying it warm with a scoop of vanilla ice cream or savoring a slice with a cup of freshly brewed coffee, your homemade apple pie is sure to be a crowd-pleaser.
Expert Tips for Baking and Protecting Your Apple Pie Crust
When it comes to baking the perfect apple pie, the crust is just as important as the filling. A flaky and golden crust not only adds flavor and texture but also protects the luscious apple filling inside. In this section, we will share some expert tips for baking and protecting your apple pie crust.
Perfecting the Bake: Temperature Tips and Techniques
One of the keys to a successful apple pie is baking it at the right temperature. Here are some temperature tips and techniques to ensure a perfectly baked pie:
Preheat your oven to 425°F (220°C) to ensure that it reaches the correct temperature for baking.
Place your pie on the center rack of the oven for even heat distribution.
Consider using a pie crust shield or foil to cover the edges of the crust during baking. This will prevent the edges from over-browning while allowing the rest of the pie to bake to perfection.
For a golden brown crust, brush the top of the pie with an egg wash before baking. This will give your pie a beautiful shine.
Bake the pie for the recommended time stated in your recipe, but always keep an eye on it. Every oven is different, so you may need to adjust the baking time accordingly.
Shielding the Edges: Foil Tricks to Prevent Over-Browning
Over-browning of the crust edges can be a common issue when baking apple pies. To prevent this, here are some foil tricks you can try:
Tear off a strip of aluminum foil that is long enough to cover the edges of the pie crust.
Gently fold the foil strip in half lengthwise to create a smooth, straight edge.
Place the foil strip around the edges of the pie crust, covering them completely.
Make sure the foil is snug against the crust to prevent any heat from escaping.
During the last 15-20 minutes of baking, carefully remove the foil to allow the edges to brown.
By following these temperature tips and foil tricks, you can bake an apple pie with a perfectly golden and protected crust. Your pie will come out of the oven looking and tasting amazing, ready to be enjoyed by friends and family.
How to Achieve the Perfectly Set and Juicy Apple Filling
Creating a perfectly set and juicy apple filling is crucial to the success of your homemade apple pie. Follow these tips and techniques for a deliciously cooked filling:
Choose the right apples: Select apples that are known for their balance of tartness and firmness, such as Granny Smith apples. These apples hold their shape well during baking and provide a delightful tanginess to your pie.
Slice your apples evenly: To ensure even cooking and texture, slice your apples evenly. This will help them cook consistently and prevent some pieces from being overcooked while others are undercooked.
Coat your apple slices: Coat your apple slices in a mixture of sugar, spices, and a bit of lemon juice. This will enhance the flavor of the apples and allow them to release their juices during baking.
Precook your filling: For a perfectly set apple filling, consider precooking your apple slices before assembling the pie. This will soften the apples and allow the flavors to meld together, resulting in a cohesive and firm filling.
Allow for cooling time: Once your pie is baked, let it cool completely before serving. This will give the filling time to set, ensuring that each slice holds together perfectly.
By following these steps, you’ll achieve a pie with a beautifully set and juicy apple filling that will have everyone coming back for seconds.
Apple Pie Recipe: Step-by-Step Guide to the Perfect Slice
In this section, we will take you through a detailed, step-by-step guide to achieving the perfect slice of apple pie. Follow these instructions carefully to create a stunning dessert that will impress your family and friends.
Lattice Work: Weaving Your Top Crust
Creating a lattice top crust adds a beautiful and intricate design to your apple pie. Here’s how to do it:
Roll out your pie dough and cut it into even strips.
Place half of the strips horizontally across the top of the pie, spacing them evenly.
Fold back every other strip halfway, then lay a strip vertically across the unfolded strips.
Unfold the folded strips back over the vertical strip.
Fold back the remaining strips that weren’t folded in step 3, then lay another strip vertically across the unfolded ones.
Continue this process until a lattice pattern covers the entire top of the pie.
The Golden Finish: Egg Wash for a Shiny Crust
To achieve a golden finish on your apple pie crust, use an egg wash. Here’s how:
In a small bowl, beat an egg until it is well blended.
Using a pastry brush, lightly brush the egg wash onto the crust, covering the entire surface.
Be careful not to apply too much egg wash, as it can cause the crust to become soggy.
Now that you’ve mastered the art of lattice work and creating a golden finish with an egg wash, your apple pie is ready to be baked to perfection!
Preventing Common Apple Pie Baking Mishaps
When it comes to baking an apple pie, there are a few common mishaps that can occur along the way. But fear not, we’re here to help you navigate through these pitfalls and ensure that your apple pie turns out perfectly every time. By being aware of these common mistakes and following our expert tips, you’ll be well on your way to baking the best apple pie of your life.
One common mishap is a soggy bottom crust. There’s nothing worse than biting into a slice of apple pie only to find the crust is soggy and undercooked. To prevent this, make sure to blind bake your crust before adding the filling. Blind baking involves pre-baking the crust without the filling, allowing it to crisp up and create a barrier between the filling and the crust.
Another common mishap is an overcooked or burned top crust. To prevent this, cover the edges of the pie with foil or a pie shield to prevent them from getting too dark. This will allow the pie to bake evenly and result in a golden, perfectly cooked crust.
Unevenly cooked apples can also be a problem when baking an apple pie. To ensure that your apple filling is perfectly cooked, make sure to slice your apples evenly and toss them in a mixture of sugar, spices, and a thickening agent such as flour or cornstarch. This will help to distribute the heat evenly and prevent any undercooked or raw apples in your pie.
Lastly, a collapsed or runny filling can be a disappointment. This can happen if the pie is not baked long enough or if the filling is not thickened properly. To prevent this, make sure to bake the pie for the recommended time and allow it to cool and set before slicing into it. Also, make sure to use a thickening agent such as flour or cornstarch in your filling to ensure a cohesive and delicious pie filling.
By keeping these tips in mind and being aware of these common apple pie baking mishaps, you’ll be well-equipped to create the perfect apple pie every time. Don’t let these mishaps discourage you from baking this classic dessert. With a little knowledge and practice, you’ll become a master at baking apple pies that are sure to impress.
Storing & Savoring: Keeping Your Apple Pie Fresh and Delicious
After putting in the effort to bake a delicious homemade apple pie, you’ll want to ensure it stays fresh and flavorful for as long as possible. Here are some handy tips for storing and savoring your apple pie:
Short-Term and Long-Term Pie Storage Tips
For short-term storage, simply cover your apple pie with a clean kitchen towel or plastic wrap and keep it at room temperature for up to 24 hours. This will help preserve its texture and prevent it from drying out. If you prefer a chilled pie, you can store it in the refrigerator for up to 3 days. Just make sure to cover it tightly with plastic wrap to prevent any odors from seeping in.
If you need to store your apple pie for a longer period, freezing is the way to go. First, allow the pie to cool completely at room temperature. Then, wrap it tightly in several layers of plastic wrap, followed by a layer of aluminum foil to prevent freezer burn. Place the wrapped pie in a freezer-safe container or bag, and make sure to label it with the date. Your apple pie can be stored in the freezer for up to 3 months.
When you’re ready to enjoy your frozen apple pie, simply thaw it overnight in the refrigerator. Once thawed, you can either serve it cold or reheat it for a warm, freshly baked taste.
Reheating Your Pie: How to Restore Fresh-Baked Warmth
To reheat your apple pie and restore that fresh-baked warmth, follow these easy steps:
Preheat your oven to 350°F (175°C).
Remove the pie from the freezer or refrigerator, and discard the plastic wrap and foil.
Place the pie on a baking sheet to catch any drips or spills.
Lightly cover the pie with aluminum foil to prevent the crust from burning.
Bake the pie in the preheated oven for 15-20 minutes, or until heated through.
Remove the foil and continue baking for an additional 5-10 minutes to crisp up the crust.
Once heated to your liking, remove the pie from the oven and let it cool for a few minutes before serving.
Now you’re ready to savor the deliciousness of your freshly reheated apple pie!
Conclusion
As we wrap up our article on the homemade apple pie recipe, it’s clear that this classic dessert holds a special place in American culture. The irresistible combination of cinnamon and apples, along with the flaky and tender pie crust, creates a truly mouthwatering experience.
Choosing the right apples, such as Granny Smith, is crucial for achieving the perfect balance of tartness and firmness in your apple pie. And don’t forget the importance of properly preparing the ingredients, from the butter and vinegar in the pie crust to the delightful spice combination of cinnamon and nutmeg in the apple filling.
Assembling and baking the pie requires attention to detail, but following expert tips ensures a beautifully golden crust and a perfectly set and juicy apple filling. And once your apple pie is baked to perfection, our tips for storing and reheating will help you enjoy its fresh-baked warmth for days to come.
In conclusion, with our detailed step-by-step guide and helpful tips, you’ll be able to create the ultimate homemade apple pie that will impress your family and friends. So, gather your ingredients, roll up your sleeves, and let the aroma of baked apples and cinnamon fill your kitchen as you embark on the wonderful journey of making your very own homemade apple pie.
FAQ
What is the allure of a classic homemade apple pie?
The allure of a classic homemade apple pie lies in its rich tradition in American culture and the irresistible combination of cinnamon and apples.
Why are Granny Smith apples recommended for apple pie recipes?
Granny Smith apples are the perfect choice for apple pie because they strike the right balance of tartness and firmness, creating an ideal texture and flavor in the pie filling.
What are the secrets to creating a flaky and tender pie crust?
The secrets to a flaky and tender pie crust include using the right techniques and ingredients, such as using chilled butter and handling the dough gently.
How should I prepare the ingredients for the ultimate apple pie?
To prepare the ultimate apple pie, make sure to use quality ingredients, including butter and a hint of vinegar for the pie crust, and the perfect spice combination of cinnamon and nutmeg for the apple filling.
What is the step-by-step process for assembling an apple pie?
The step-by-step process for assembling an apple pie involves layering the pie crust and apple filling, creating a balanced and delicious pie.
How can I bake an apple pie without over-browning the crust?
To bake an apple pie without over-browning the crust, follow expert tips on temperature control and use foil tricks to shield the edges of the pie crust.
How can I achieve the perfect set and juicy apple filling in my apple pie?
Achieving the perfect set and juicy apple filling in your apple pie requires proper cooking techniques and ensuring the filling reaches the desired consistency.
What is the step-by-step guide to creating the perfect slice of apple pie?
The step-by-step guide to creating the perfect slice of apple pie includes instructions on creating a lattice top crust and achieving a golden finish with an egg wash.
How can I prevent common baking mishaps when making an apple pie?
To prevent common baking mishaps when making an apple pie, be aware of potential pitfalls and follow expert tips and techniques to overcome them.
What are the best practices for storing and savoring an apple pie?
The best practices for storing and savoring an apple pie include short-term and long-term storage tips, as well as instructions on how to reheat the pie to restore its fresh-baked warmth.
Welcome to our ultimate guide on how to prepare the perfect Thanksgiving turkey with stuffing. As the holidays approach, many of us are eagerly anticipating the cherished tradition of gathering around the table with loved ones, indulging in a mouthwatering feast that captures the spirit of gratitude and celebration. The centerpiece of this festive occasion is often a beautifully roasted turkey, succulent and flavorful, accompanied by a delicious stuffing that adds an extra layer of taste and texture.
In this comprehensive guide, we will take you on a culinary journey that covers everything you need to know about crafting a memorable Thanksgiving feast. From selecting the right turkey to mastering the art of brining, from understanding the difference between stuffing and dressing to carving the perfect slices, we’ll provide you with expert tips and techniques that will elevate your cooking skills and impress your guests.
Whether you’re a seasoned chef or a novice in the kitchen, our step-by-step instructions and detailed explanations will ensure that you can confidently create a Thanksgiving turkey with stuffing that will leave everyone craving more. So, let’s dive in and explore the secrets to a truly unforgettable holiday meal.
Table of Contents
Key Takeaways:
Our ultimate guide will help you prepare a mouthwatering Thanksgiving turkey with delicious stuffing.
Learn how to choose the perfect turkey, whether fresh or frozen, and understand different turkey labels.
Discover the best methods for safely thawing your turkey.
Explore traditional and dry brining techniques for enhancing the flavor and juiciness of your turkey.
Understand the regional debate between stuffing and dressing and discover the variations in ingredients and techniques.
Choosing the Perfect Turkey for Thanksgiving
When it comes to the centerpiece of your Thanksgiving feast, selecting the perfect turkey is essential. In this section, we’ll explore the key considerations for choosing a turkey that will delight your guests and create a memorable holiday meal.
Fresh vs. Frozen: Selecting the Right Type
One of the first decisions you’ll need to make is whether to go with a fresh or frozen turkey. Each has its own advantages and considerations.
Fresh Turkey: A fresh turkey can offer superior flavor and texture, as it hasn’t been frozen. It’s important to note that fresh turkeys need to be cooked within a few days of purchase and may require special orders from your local butcher or supermarket.
Frozen Turkey: Frozen turkeys are convenient and widely available. They can be purchased well in advance, allowing you to plan your Thanksgiving preparations in advance. Keep in mind that a frozen turkey requires proper thawing before cooking.
Ultimately, the choice between fresh and frozen turkey depends on your personal preference and the availability of options in your area.
Understanding Turkey Labels: Organic, Free-range, and More
When browsing for a turkey, you may come across various labels that indicate certain qualities or production methods. Here are some common turkey labels and their meanings:
Label
Meaning
Organic
Turkeys labeled organic are raised on organic feed, without antibiotics or growth hormones. They have been certified by an authorized agency.
Free-range
Free-range turkeys have access to the outdoors and are not confined to cages. They may have more space to roam and are generally considered to have better welfare.
Heritage
Heritage turkeys are older breeds that have been raised for generations. They offer unique flavors and textures but may have less meat compared to commercial varieties.
Understanding these labels can help you make an informed decision based on your preferences and values.
Sizing Up: How Much Turkey Per Person?
Calculating the right amount of turkey is crucial to ensure everyone at your Thanksgiving table is satisfied. A rough guideline is to plan for about 1 pound (0.45 kg) of turkey per person.
Keep in mind that this estimate can vary depending on factors such as the number of side dishes and appetites of your guests. To be on the safe side, consider rounding up and factoring in leftovers.
Now that we’ve covered the considerations for choosing the perfect turkey, let’s move on to the next section to learn how to properly thaw your turkey for Thanksgiving.
Mastering the Thawing Process
Thawing a Thanksgiving turkey properly is essential for ensuring safe and delicious results. In this section, we will provide you with detailed instructions on how to thaw your turkey correctly. We will cover two methods: refrigerator thawing and the quick-thaw method. Let’s dive in!
Safety First: Refrigerator Thawing Explained
Refrigerator thawing is the recommended method for thawing a turkey. It allows the bird to thaw slowly and evenly, reducing the risk of bacterial growth. Follow these steps for refrigerator thawing:
Remove the turkey from its packaging and place it in a shallow, leak-proof container to catch any liquid.
Ensure the turkey is completely covered, and place it on the bottom shelf of your refrigerator.
Allow approximately 24 hours of thawing time for every 4-5 pounds of turkey. Refer to the table below for estimated thawing times:
Turkey Weight
Thawing Time (Refrigerator)
8-12 pounds
1-2 days
12-16 pounds
2-3 days
16-20 pounds
3-4 days
20-24 pounds
4-5 days
Once the turkey is completely thawed, proceed with your chosen cooking method.
Quick-Thaw Method: When Time Is of the Essence
If you need to thaw your turkey quickly, you can use the cold water quick-thaw method. Follow these steps:
Remove the turkey from its packaging and place it in a leak-proof plastic bag.
Fill a large container or sink with cold water.
Submerge the turkey in the cold water, breast side down.
Change the water every 30 minutes to keep it cold. Allow 30 minutes of thawing time per pound of turkey. Refer to the table below for estimated thawing times:
Turkey Weight
Thawing Time (Cold Water)
8-12 pounds
4-6 hours
12-16 pounds
6-8 hours
16-20 pounds
8-10 hours
20-24 pounds
10-12 hours
Once the turkey is completely thawed, discard any packaging and proceed with your chosen cooking method. Remember to prioritize food safety when using the quick-thaw method.
Now that you have mastered the thawing process, you are ready to move on to the next step in preparing your Thanksgiving turkey. Stay tuned for our next section, where we will discuss the art of brining to achieve a flavorful and juicy turkey!
The Art of Brining: Flavorful and Juicy
Brining is a technique that can take your Thanksgiving turkey to new heights of flavor and juiciness. Whether you opt for a traditional wet brine or a drier method known as dry brining, the process involves soaking the turkey in a saltwater solution to enhance its taste and texture. In this section, we’ll explore both traditional brining techniques and the simpler, equally delicious alternative of dry brining.
Traditional Brining Techniques
When it comes to traditional brining, there are a few key steps to follow:
First, you’ll need to prepare a brine solution by dissolving salt in water. You can add other flavorings like herbs, spices, and sugar to enhance the taste.
Next, immerse the turkey in the brine, ensuring that it is fully submerged. You can use a large container, brining bag, or even a clean cooler to hold the turkey and brine.
Allow the turkey to brine for the recommended amount of time, usually around 12-24 hours, depending on the size of the bird.
After brining, rinse the turkey thoroughly to remove excess salt and pat it dry before cooking.
Traditional brining can result in a turkey that is not only flavorful but also incredibly moist. The salt in the brine helps the turkey retain moisture, resulting in a juicier final product. Additionally, the added herbs and spices infuse the meat with delicious flavors that will leave your guests craving for more.
Dry Brining: A Simpler, Equally Delicious Alternative
If you’re looking for a quicker and easier brining method, dry brining is a fantastic option. Unlike traditional wet brining, this technique involves applying a salt rub directly to the turkey’s surface and letting it sit in the refrigerator. The salt helps to draw out moisture from the turkey, creating a concentrated brine effect.
To dry brine your Thanksgiving turkey:
Begin by generously seasoning the turkey with kosher salt or a salt mixture, ensuring that every part of the bird is covered.
Place the seasoned turkey on a baking sheet or in a roasting pan and refrigerate uncovered for at least 24 hours.
After the brining period, rinse the turkey to remove excess salt and pat it dry.
Dry brining offers the same benefits as traditional brining, resulting in a flavorful and moist turkey. It also forms a crispy, flavorful skin that is sure to impress your guests.
Whether you choose traditional wet brining or the simplicity of dry brining, both techniques can elevate your Thanksgiving turkey to new heights of flavor and juiciness. Experiment with different herbs and spices in your brine to add your own unique twist to this classic Thanksgiving tradition.
Stuffing vs. Dressing: A Regional Debate
When it comes to Thanksgiving side dishes, one debate that has divided families and sparked lively discussions is the distinction between stuffing and dressing. These two terms are often used interchangeably, but there are regional variations that set them apart.
American Regional Variations in Thanksgiving Side Dishes
In the United States, Thanksgiving side dishes vary greatly from region to region. Each area has its own culinary traditions and unique flavors that influence the dishes served alongside the Thanksgiving turkey.
For example, in the Northeast, particularly in New England, traditional Thanksgiving dinners often feature stuffing made with bread, onions, celery, sage, and other aromatic herbs. This stuffing is typically moist and cooked inside the turkey, absorbing the delicious juices as the bird roasts.
On the other hand, in the Southern states, such as Louisiana and Texas, cornbread dressing takes center stage. Made with cornbread, onions, peppers, and a medley of spices, this dressing has a slightly drier texture and is typically baked separately from the turkey.
Moving west to the Midwest, dishes like wild rice stuffing or sausage stuffing with apples and cranberries are popular choices. The addition of regional ingredients adds a unique twist to the traditional Thanksgiving fare.
Out on the West Coast, the Pacific Northwest showcases their culinary flair with seafood stuffing featuring crab or oysters, reflecting the region’s abundant coastal offerings.
These are just a few examples of the regional variations in Thanksgiving side dishes found across the United States, highlighting the diverse flavors and culinary traditions that make this holiday truly special.
The Stuffing and Dressing Difference: More Than Just Name
While the terms “stuffing” and “dressing” are often used interchangeably, there is a subtle difference that goes beyond just their names. The primary distinction lies in how these dishes are prepared and cooked.
Stuffing is traditionally the term used when a mixture of bread, vegetables, herbs, and seasonings is stuffed inside the cavity of the turkey before roasting. As the turkey cooks, the stuffing absorbs the flavorful juices, resulting in a moist and savory accompaniment to the roasted bird.
Dressing, on the other hand, refers to the same mixture of ingredients that is baked separately from the turkey. Whether in a casserole dish or individual servings, dressing is cooked on its own, allowing it to develop a slightly drier and crispier texture.
The difference between stuffing and dressing goes beyond their cooking methods and regional variations; it captures the essence of culinary traditions and the unique flavors of each region.
Thanksgiving Turkey with Stuffing: A Step-by-Step Guide
Preparing a Thanksgiving turkey with stuffing can be a daunting task, especially for those who are new to hosting this beloved holiday meal. But fear not! We have put together a comprehensive step-by-step guide to help you navigate through the process and create a delicious centerpiece for your Thanksgiving feast. So let’s get started!
Step 1: Prepping the Turkey
Start by ensuring that your turkey is fully thawed, following the guidelines mentioned in Section 3 of this guide. Remove the giblets and neck from the cavity, and rinse the turkey under cold water. Pat it dry with paper towels, inside and out. Season the cavity with salt and pepper, or any other desired spices.
Step 2: Creating the Stuffing
Now, let’s move on to creating the flavorful stuffing that will complement your turkey perfectly. Use your favorite stuffing recipe or try something new from Section 10. Sauté onions, celery, and other desired vegetables in butter until they are tender. Add your choice of herbs, spices, and any additional ingredients that your recipe calls for. Then, combine the sautéed vegetables with bread cubes or other desired stuffing base in a large mixing bowl. Add broth or stock gradually until the mixture is moist but not overly saturated.
Step 3: Stuffing the Turkey
With the stuffing ready, it’s time to stuff the turkey. Begin by loosely filling the cavity of the turkey with stuffing, being careful not to overstuff as it can lead to uneven cooking. Once the cavity is filled, you can secure the neck skin to the back using metal skewers or kitchen twine. Tuck the wings underneath the turkey to prevent them from burning during cooking.
Step 4: Cooking the Turkey
Place the stuffed turkey on a rack in a roasting pan. Tent the turkey with aluminum foil, leaving enough space for air circulation. Preheat your oven to the recommended temperature, based on the weight of your turkey. Roast the turkey according to the cooking times provided in Section 8. Remember to baste the turkey periodically to ensure moistness.
Step 5: Checking for Doneness
To ensure that your turkey is cooked thoroughly, use a meat thermometer to check its internal temperature. The thickest part of the turkey, typically the thigh, should register 165°F (74°C). Once the turkey reaches this temperature, remove it from the oven and let it rest for 20-30 minutes before carving.
Step 6: Carving and Serving the Turkey
Once the turkey has rested, it’s time to carve and serve your delicious masterpiece. Follow the carving techniques outlined in Section 9 to achieve picture-perfect slices. Arrange the carved turkey on a platter, and garnish with fresh herbs or other desired decorations. Serve alongside your favorite Thanksgiving side dishes and enjoy!
Congratulations! You have successfully prepared a Thanksgiving turkey with stuffing using our step-by-step guide. We hope this comprehensive and easy-to-follow guide has helped make your holiday cooking experience enjoyable and stress-free. Now, sit back, relax, and savor the flavors of this traditional Thanksgiving dish with your loved ones.
Secrets to Cooking and Basting
When it comes to preparing a Thanksgiving turkey that will wow your guests, cooking and basting are key. We’ve gathered some secrets and tips to help you achieve a perfectly cooked and moist turkey, along with suggestions for flavorful basting methods. Let’s dive in!
The Perfect Cooking Temperature
One of the secrets to cooking a Thanksgiving turkey is getting the temperature just right. For a moist and tender bird, roast your turkey at a consistent temperature of 325°F (163°C). This allows the turkey to cook evenly without drying out.
Use a Meat Thermometer
To ensure your turkey is cooked to perfection, use a meat thermometer to check its internal temperature. Insert the thermometer into the thickest part of the thigh without touching the bone. The turkey is done when it reaches 165°F (74°C).
Brine for Flavor and Moisture
“One of our top secrets for a flavorful and juicy turkey is to brine it before cooking. Brining involves soaking the turkey in a solution of salt, water, and spices, which helps to enhance the flavor and moisture retention of the meat. Give it a try!”
Enhance Flavor with Aromatics
To infuse your turkey with additional flavor, stuff the cavity with aromatic ingredients such as onions, garlic, herbs, citrus fruits, and spices. As the turkey roasts, the aromatics will release their flavors, resulting in a more delicious and fragrant bird.
Basting for Extra Moisture
Basting the turkey throughout the cooking process is another secret to a moist and succulent bird. Every 30 minutes, use a baster or spoon to drizzle the juices from the bottom of the roasting pan over the turkey. This helps to keep the meat moist and adds flavor.
Try a Flavorful Basting Glaze
For an extra burst of flavor, consider using a flavorful basting glaze. Whether it’s a butter and herb glaze, a maple syrup and bourbon glaze, or a honey and Dijon mustard glaze, applying a tasty coating to the turkey will enhance its taste and appearance.
By following these cooking and basting secrets, you’ll be well on your way to serving a Thanksgiving turkey that is moist, tender, and bursting with flavor. Now that you have mastered the secrets, it’s time to move on to the next section where we will discuss timings and temperatures for the perfect turkey.
Disclaimer: The image shown above is for visual representation purposes only and may not depict the exact cooking and basting techniques mentioned in this article.
Timings and Temperatures for the Perfect Turkey
When it comes to cooking a Thanksgiving turkey, accurate timings and temperatures play a crucial role in achieving a delicious and perfectly cooked bird. Whether you’re a seasoned chef or a novice in the kitchen, having the right cooking guidelines is essential for a successful holiday feast.
Let’s start with the basics. The recommended cooking temperature for a Thanksgiving turkey is 325°F (163°C). This allows for even cooking and ensures that the turkey reaches a safe internal temperature to eliminate any harmful bacteria. It’s important to use a reliable meat thermometer to check the internal temperature, which should reach 165°F (74°C) in the thickest part of the thigh.
Now, let’s talk timings. The cooking time for a turkey can vary depending on the size of the bird. As a general rule of thumb, you should allow approximately 15 minutes of cooking time per pound (0.45 kg) of turkey. However, it’s always best to refer to a cooking chart or calculator to get precise timings based on the weight of your turkey.
Keep in mind that these timings are estimates, and it’s crucial to rely on the internal temperature rather than the cooking time alone. Factors such as oven temperature accuracy, the presence of stuffing, and the turkey’s temperature before cooking can affect the cooking time.
When cooking your Thanksgiving turkey, it’s important to consider the resting time. After removing the turkey from the oven, allow it to rest for at least 15-30 minutes before carving. Resting allows the juices to redistribute throughout the turkey, resulting in a moist and tender bird. During this time, cover the turkey loosely with foil to retain heat and prevent it from drying out.
For a visual representation of the recommended timings and temperatures, refer to the table below:
Turkey Weight
Cooking Time (Unstuffed)
Internal Temperature
8-12 pounds
2.75-3 hours
165°F (74°C)
12-14 pounds
3-3.75 hours
165°F (74°C)
14-18 pounds
3.75-4.25 hours
165°F (74°C)
18-20 pounds
4.25-4.5 hours
165°F (74°C)
20-24 pounds
4.5-5 hours
165°F (74°C)
Remember, these timings are just a guideline, and it’s essential to monitor the temperature using a meat thermometer to ensure your turkey is cooked thoroughly. By following these timings and temperatures, using accurate measurements, and allowing your turkey to rest, you’ll be well on your way to serving a perfectly cooked Thanksgiving turkey that will wow your guests.
Carving Techniques for a Picture-Perfect Presentation
Once your Thanksgiving turkey is perfectly cooked, it’s time to showcase your carving skills for a picture-perfect presentation. With the right carving techniques and tools, you can ensure that each slice is beautifully carved and ready to be enjoyed by your guests.
Tools and Tricks for Effortless Carving
Before you start carving, make sure you have the necessary tools on hand:
A sharp carving knife: Invest in a high-quality carving knife with a long, thin blade. A sharp knife will make the carving process much easier and result in cleaner slices.
A carving fork: Use a carving fork to hold the turkey securely in place as you carve. This will help prevent any accidents and ensure more precise carving.
A cutting board: Choose a sturdy cutting board with a groove to catch any juices that may escape during carving.
Now that you have the right tools, here are some tricks for effortless carving:
Let the turkey rest: Before you start carving, let the turkey rest for about 20 minutes. This allows the juices to redistribute and makes the meat easier to carve.
Remove the legs and wings: Start by removing the legs and wings of the turkey. Use a steady hand and the carving knife to separate them from the body.
Slice the breast meat: Hold the turkey firmly with the carving fork and make thin, even slices across the grain of the breast meat. This will result in tender and flavorful slices.
Separate the thigh and drumstick: Carefully separate the thigh from the drumstick by cutting through the joint. This will make it easier to serve and enjoy.
Carve the dark meat: Slice the dark meat, such as the thighs and drumsticks, in the same manner as the breast meat. Aim for uniform slices to ensure an even serving.
How to Serve Your Thanksgiving Masterpiece
Now that you’ve mastered the carving techniques, it’s time to serve your Thanksgiving masterpiece:
Arrange the carved meat on a platter: Transfer the carved slices of turkey onto a beautiful platter, arranging them in an appealing way. This will create an impressive presentation for your guests.
Add garnishes and herbs: Sprinkle some fresh herbs or add garnishes like cranberries or citrus slices to enhance the visual appeal of the platter. This will make your turkey even more enticing.
Keep it warm: To ensure your carved turkey remains warm and juicy, cover the platter loosely with foil while you finish preparing other dishes or serving food. This will help retain the turkey’s temperature.
Remember, carving the turkey is not just about the technique; it’s also about creating an experience. Take your time, enjoy the process, and savor the moment as you serve your Thanksgiving masterpiece to your loved ones.
When it comes to Thanksgiving, stuffing recipes are a vital component of the holiday feast. They add a delicious blend of flavors and aromas, complementing the star of the show – the turkey. To elevate your stuffing game this year, we’ve curated a selection of delightful variations that are sure to impress your guests. Whether you’re looking for traditional recipes, unique regional twists, or options to accommodate dietary restrictions, we have you covered.
Incorporating Regional Ingredients
One way to add a distinctive touch to your stuffing is by incorporating regional ingredients. By using local ingredients, you can infuse your stuffing with unique flavors and celebrate the culinary heritage of different areas. Here are some delicious regional stuffing recipes to try:
Region
Stuffing Recipe
New England
Clam and Bacon Stuffing
South
Cornbread and Andouille Sausage Stuffing
Midwest
Wild Rice and Mushroom Stuffing
Southwest
Green Chile and Cheddar Cornbread Stuffing
West Coast
Artichoke and Sourdough Stuffing
Gluten-Free and Vegetarian Options
For those with dietary restrictions, it’s important to offer stuffing options that cater to their needs. Here are some gluten-free and vegetarian stuffing recipes that are bursting with flavor:
Gluten-Free Cornbread and Cranberry Stuffing
Vegetarian Quinoa and Butternut Squash Stuffing
Gluten-Free and Vegan Wild Rice and Chestnut Stuffing
Vegetarian Mushroom and Spinach Stuffing
Gluten-Free and Dairy-Free Cornbread and Chorizo Stuffing
These recipes ensure that everyone at your Thanksgiving table can enjoy a delicious stuffing without compromising their dietary needs.
With these delightful variations of stuffing recipes, you can take your Thanksgiving feast to the next level. Incorporate regional ingredients to add a unique touch, and consider the dietary restrictions of your guests by offering gluten-free and vegetarian options. Your stuffing will be a standout dish that perfectly complements your Thanksgiving turkey.
Repurposing Leftovers: Creative Ideas
After your Thanksgiving feast, you might find yourself with an abundance of leftovers. Don’t let them go to waste! With a little creativity, you can transform those Thanksgiving leftovers into new and delicious meals. From using turkey leftovers in hearty sandwiches to repurposing stuffing into savory appetizers, here are some creative ideas to help you make the most of your Thanksgiving bounty.
Transforming Turkey Leftovers Into New Feasts
Leftover turkey is incredibly versatile and can be used in a variety of dishes. Here are a few ideas to inspire you:
Turkey Pot Pie: Combine diced turkey with vegetables and a creamy sauce, then top it with a flaky pastry crust for a comforting and satisfying pot pie.
Turkey Enchiladas: Roll shredded turkey in tortillas, smother them in a zesty enchilada sauce, and bake until bubbly for a delicious Mexican-inspired meal.
Turkey Fried Rice: Stir-fry leftover turkey with rice, vegetables, and soy sauce for a quick and flavorful Asian-inspired dish.
By repurposing turkey leftovers, you can enjoy new meals that are completely different from your Thanksgiving feast.
Savoring Stuffing Beyond the Holiday
Stuffing is often a favorite part of the Thanksgiving meal, and luckily, it can be used in various ways beyond the holiday. Here are a few ideas:
Stuffed Mushrooms: Fill mushroom caps with leftover stuffing, top with cheese, and bake for a tasty appetizer or side dish.
Stuffing Stuffed Peppers: Hollow out bell peppers and fill them with stuffing, then bake until tender and golden for a flavorful vegetarian main course.
Stuffing Muffins: Press leftover stuffing into muffin tins and bake until crispy on the outside and soft on the inside. These make a delightful side dish or snack.
Using stuffing creatively allows you to enjoy its delicious flavors in new and exciting ways, extending the joy of Thanksgiving beyond the holiday.
With these creative ideas, you can transform Thanksgiving leftovers into delightful and satisfying meals that everyone will love. Don’t let those leftovers go to waste – let your imagination run wild and enjoy new feasts and flavors!
Conclusion
As we wrap up our ultimate guide on Thanksgiving turkey with stuffing, we hope we’ve provided you with valuable insights, tips, and techniques to make your holiday feast a resounding success. For the perfect centerpiece, we emphasized the importance of choosing the right turkey, whether it’s fresh or frozen, and understanding labels such as organic and free-range. Remember to calculate the amount of turkey per person to ensure everyone goes home satisfied.
We also covered the crucial step of thawing your turkey safely, offering instructions for both refrigerator thawing and quick-thaw methods. To enhance the flavor and juiciness, we explored the art of brining, introducing traditional wet brining techniques and the simpler approach of dry brining.
Furthermore, we discussed the regional debate between stuffing and dressing, sharing insights into American variations of Thanksgiving side dishes. Our step-by-step guide took you through the entire process of preparing a delicious Thanksgiving turkey with stuffing, highlighting the secrets to successful cooking and basting along the way.
With the timings, temperatures, and resting period covered, you’re now equipped to achieve perfect results. And when it comes to carving, we provided you with techniques, the right tools, and tips for an impressive presentation. Lastly, we explored delightful stuffing variations, incorporating regional ingredients, as well as gluten-free and vegetarian options to cater to different dietary needs.
Now, armed with the knowledge and skills acquired through this ultimate guide, it’s time to put it all into practice. Create a memorable Thanksgiving feast with a succulent turkey and flavorful stuffing that will delight your loved ones. Happy cooking and have a wonderful holiday!
FAQ
What should I consider when choosing a turkey for Thanksgiving?
You should consider whether you want a fresh or frozen turkey, understand various turkey labels such as organic and free-range, and calculate the right amount of turkey per person.
How do I thaw a Thanksgiving turkey?
The recommended method is to thaw the turkey in the refrigerator for optimal food safety. However, if you need to thaw it quickly, there is a quick-thaw method available.
What are the different brining techniques for a Thanksgiving turkey?
There are traditional wet brining techniques and the dry brining method. Both methods can enhance the flavor and juiciness of the turkey.
What is the difference between stuffing and dressing in Thanksgiving side dishes?
Stuffing and dressing are regional variations of the same concept. The difference lies in the ingredients and techniques used in different regions of the United States.
How do I prepare a Thanksgiving turkey with stuffing?
We provide a comprehensive step-by-step guide on preparing a Thanksgiving turkey with stuffing. This guide covers everything from prepping the turkey to creating and cooking the stuffing.
What are some tips for cooking and basting a Thanksgiving turkey?
We offer tips and techniques for achieving a perfectly cooked and moist turkey. We also provide suggestions for flavorful basting methods.
What are the specific timings and temperatures for cooking a Thanksgiving turkey?
We emphasize the importance of accurate measurements in achieving desired results. We also explain why allowing the turkey to rest after cooking is crucial for optimal tenderness and juiciness.
How do I properly carve a Thanksgiving turkey for a picture-perfect presentation?
We provide instructions on using the right tools and offer tricks for effortless carving. We also offer guidance on how to properly serve the turkey to impress your guests.
Are there any variations of stuffing recipes for Thanksgiving?
Yes, we showcase delightful variations of stuffing recipes. We highlight the use of regional ingredients to add unique flavors and offer options for those with dietary restrictions such as gluten-free and vegetarian stuffing recipes.
What are some creative ideas for repurposing Thanksgiving leftovers?
We offer recipes and suggestions for transforming turkey leftovers into new and delicious meals. We also provide ideas for utilizing leftover stuffing beyond the holiday feast.
Welcome to our blog post dedicated to an easy hamburger home recipe that is perfect for family nights. We know how important it is to spend quality time with loved ones while enjoying a delicious meal, and hamburgers are a classic choice that never fails to bring smiles to everyone’s faces.
In this section, we will provide you with a step-by-step guide to creating mouth-watering homemade hamburgers that will surely become a family favorite. Whether you’re a seasoned chef or a beginner in the kitchen, our easy recipe will help you create burgers that are bursting with flavor and made with love.
Table of Contents
Key Takeaways:
Create lasting memories with your family by preparing a delicious hamburger meal at home.
Follow our step-by-step guide to make juicy and flavorful homemade hamburgers.
Customize your hamburgers with a variety of toppings and side dishes.
Explore adaptations for special diets and kid-friendly variations to please picky eaters.
Enjoy the satisfaction of bringing the whole family together around a homemade meal.
Why Hamburger Nights Are a Family Favorite
In this section, we will discuss why hamburger nights are a family favorite. We will explore the captivating family traditions that surround these meals and the way they bring everyone together.
Captivating Family Traditions
One of the reasons why hamburger nights hold a special place in our hearts is the captivating family traditions that go hand in hand with these meals. Whether it’s grilling burgers in the backyard during summer evenings or gathering around the kitchen counter to build customized burgers together, these traditions create lasting memories and strengthen family bonds.
These special moments often involve time-honored family recipes, secret seasoning blends, and even friendly competitions to create the ultimate burger masterpiece. The anticipation and excitement that accompany these traditions make hamburger nights an eagerly anticipated event that brings joy to everyone involved.
A Meal That Brings Everyone Together
Perhaps the most remarkable aspect of hamburger nights is their ability to bring everyone together around the dinner table. Sharing a delicious meal is an opportunity for family members to connect, unwind, and engage in meaningful conversations. It’s a time to catch up on each other’s lives, share stories, and create new memories.
What makes hamburger nights truly special is that they cater to everyone’s preferences. From customizing toppings to accommodating dietary restrictions, these meals allow each family member to create a burger that perfectly suits their tastes. This inclusivity fosters a sense of togetherness and ensures that everyone feels heard and valued.
Furthermore, the casual and relaxed atmosphere of hamburger nights encourages open communication and genuine interactions. There are no formalities or distractions, just the simple pleasure of enjoying a delicious meal together. It’s during these moments that meaningful connections are formed and cherished family traditions are passed down through generations.
Reasons Hamburger Nights Are a Family Favorite:
1. Captivating family traditions
2. A meal that brings everyone together
Choosing the Best Ground Beef for Your Hamburgers
In the world of hamburgers, the quality of the ground beef you use can make a world of difference. The flavor, texture, and juiciness of your burgers depend on the type of ground beef you choose. Here, we will guide you through the process of selecting the bestground beef for your homemade hamburgers.
1. Consider the cuts of beef:
When choosing ground beef for your hamburgers, it’s essential to pay attention to the cuts of beef used. Different cuts have varying levels of fat content and flavor profiles. For example, ground chuck is a popular choice due to its rich flavor and medium fat content, while ground sirloin is leaner and has a slightly different taste. Experiment with different cuts to find the flavor profile that suits your preferences.
2. Determine the fat content:
The fat content of your ground beef plays a significant role in the taste and juiciness of your burgers. Ground beef is typically labeled with a fat percentage, such as 80/20 or 85/15. The first number represents the lean meat content, while the second number indicates the fat percentage. A higher fat content results in a juicier burger, but it’s important to find the right balance for your taste preferences and dietary needs.
3. Choose high-quality ground beef:
Opting for high-quality ground beef is crucial for achieving the best flavor and texture in your hamburgers. Look for ground beef that is fresh and sourced from reputable suppliers. Grass-fed beef, for example, is known for its outstanding flavor and tenderness. It’s worth investing in quality ground beef to elevate your hamburgers to the next level.
4. Check for proper packaging and labeling:
When buying ground beef, ensure that the packaging is intact and properly sealed. It’s also important to check the labeling for any additional information, such as the date of packaging or expiration. Proper packaging and labeling are essential for maintaining the freshness and quality of the ground beef.
By following these tips, you can choose the best ground beef for your hamburgers, ensuring a flavorful and juicy experience every time. Remember, the quality of the ingredients is key to creating a delicious homemade burger that will impress your family and friends.
The Secret to a Juicy, Flavorful Hamburger
When it comes to making a mouthwatering hamburger, the secret lies in a combination of techniques and ingredients that bring out the juiciness and flavor of the patty. In this section, we will unveil the hidden gems that turn an ordinary burger into a tantalizing delight for your taste buds.
One important factor to consider is the quality of the meat. Opt for freshly ground beef with a higher fat content, such as 80/20 or 85/15, to ensure a juicy texture. The marbling in the meat will provide richness and succulence, resulting in a flavorful burger that melts in your mouth.
Another secret to achieving a juicy hamburger is to handle the meat gently. Overmixing or compacting the patty can lead to a dense and dry burger. Instead, lightly form the meat into loose patties, allowing the patty to retain its natural moisture and juiciness during cooking.
Seasoning also plays a crucial role in enhancing the flavor of your hamburger. A simple combination of salt, pepper, and garlic powder can work wonders, but don’t be afraid to experiment with other herbs and spices that complement your taste preferences. Remember to season the meat just before cooking to prevent it from becoming too salty or losing moisture.
Cooking your hamburger to perfection is equally important in achieving a juicy and flavorful result. Whether you prefer grilling, pan-frying, or using a griddle, always aim for medium heat. This allows the patty to cook evenly, retaining its juiciness without drying out or becoming overcooked.
Resting the cooked patty for a few minutes before assembling your burger is the final touch to ensure ultimate juiciness. This allows the meat to relax and redistribute its juices, resulting in a tender and succulent bite.
By following these secrets to a juicy, flavorful hamburger, you can elevate your home cooking to gourmet burger status. Get ready to savor every bite and impress your friends and family with your culinary skills!
Hamburger Home Recipe: Step-by-Step Guide
Are you ready to embark on a culinary adventure and create your own mouthwatering homemade burgers? Look no further! In this section, we will provide you with a detailed, step-by-step guide to making your very own delicious hamburgers at home. From selecting the perfect ground beef to grilling or cooking the patties to perfection, we’ll cover it all.
Let’s get started with the first step: choosing the best ground beef for your homemade burgers. It’s important to select high-quality ground beef that will result in juicy and flavorful patties. Consider the fat content and different cuts of beef to find the perfect balance that suits your taste.
Once you have the perfect ground beef, it’s time to move on to the patty preparation. Molding the ideal patty shape is essential for a consistent cook. Make sure to evenly divide the meat and shape it into round patties of your desired thickness. You can use a burger press or simply shape them by hand.
Next comes the seasoning, where you have the opportunity to infuse your burgers with incredible flavors. Experiment with various seasoning techniques to enhance the taste. Whether you prefer a simple salt and pepper seasoning or a more elaborate blend of spices, the choice is yours.
Now that your homemade patties are ready, it’s time to cook them to perfection. Whether you choose to grill them on a barbecue or cook them on a stovetop skillet, make sure to follow the appropriate cooking time and temperature guidelines for a juicy and well-cooked result.
To give you a visual representation of the process, take a look at the step-by-step guide below:
Step
Description
1
Choose high-quality ground beef and season it with your desired spices.
2
Mold the ground beef into round patties of your desired thickness.
3
Cook the patties on a grill or stovetop skillet, following the appropriate cooking time and temperature guidelines.
4
Assemble your homemade burgers with your favorite toppings and condiments.
5
Serve and enjoy your homemade burgers!
By following this step-by-step guide, you’ll be able to create perfectly juicy and flavorful homemade burgers that will impress your family and friends. So, put on your chef’s hat and get ready to savor every bite of your delicious creations!
Tips for Perfecting Your Hamburger Patty
Creating the perfect hamburger patty is an art form. It’s all about achieving the ideal shape and enhancing the flavor with proper seasoning techniques. In this section, we will share valuable tips to help you perfect your hamburger patty.
Molding the Ideal Patty Shape
When it comes to molding your hamburger patties, consistency is key. Here are some tips to help you achieve the ideal shape:
Start with high-quality ground beef that has a good fat content. This will ensure juiciness and flavor in your patties.
Divide the meat into equal portions to ensure uniform cooking. A kitchen scale can be handy for this task.
Gently shape each portion into a round ball, then flatten it into a patty shape.
Make sure the patty is slightly larger than the size of the bun, as it will shrink during cooking.
Use your thumb or the back of a spoon to create a small indentation in the center of the patty. This prevents the burger from puffing up in the middle.
By following these molding techniques, you’ll have perfectly shaped hamburger patties that cook evenly and look great on the bun.
Seasoning Techniques for Enhanced Flavor
Seasoning is crucial to elevate the flavor of your hamburger patty and take it to the next level. Here are some seasoning techniques to enhance the taste:
Start with a generous sprinkle of salt and pepper on both sides of the patty. The salt helps to bring out the natural flavors of the meat.
Experiment with different seasonings like garlic powder, onion powder, paprika, or chili powder to add depth and complexity to your burger.
Consider marinating the patties with Worcestershire sauce or your favorite marinade for a burst of flavor.
Don’t forget to season the patties just before cooking to ensure the flavors penetrate the meat.
By mastering these seasoning techniques, you’ll create hamburger patties that are bursting with flavor and leave your taste buds wanting more.
Molding the Ideal Patty Shape
Seasoning Techniques for Enhanced Flavor
Start with high-quality ground beef
Start with a generous sprinkle of salt and pepper
Divide the meat into equal portions
Experiment with different seasonings
Gently shape each portion into a round ball
Consider marinating the patties
Flatten the ball into a patty shape
Season the patties just before cooking
Create a small indentation in the center
With these helpful tips for molding the ideal patty shape and using seasoning techniques for enhanced flavor, you’ll be able to create mouthwatering hamburgers that will impress your family and friends.
Creative Toppings to Elevate Your Hamburger
Inspiring Cheese Selections
When it comes to taking your hamburger to the next level, creative toppings are key. And what better way to elevate your burger than with a selection of inspiring cheeses? From creamy and mild to bold and tangy, there are endless possibilities to explore. Whether you prefer classic cheddar, smoky Gouda, or zesty pepper jack, the right cheese can add a whole new dimension of flavor to your burger.
“The perfect cheese can transform a regular burger into a mouthwatering masterpiece.”
To make things even more exciting, mix and match different cheeses to create your own unique flavor combinations. For example, combining sharp cheddar with creamy brie can result in a decadent and melty topping that will tantalize your taste buds. Or why not experiment with blue cheese crumbles and caramelized onions for a savory and savory sweet twist?
Fresh Vegetable Toppings
No burger is complete without a generous amount of fresh vegetables to add a burst of color and crunch. Not only do they provide added nutrition, but they also bring a refreshing element to the overall flavor profile. From crisp lettuce and juicy tomatoes to tangy pickles and sliced onions, the options are endless when it comes to fresh vegetable toppings.
Get creative with your vegetable choices and consider adding unexpected options to your burger. Think roasted bell peppers for a smoky and sweet flavor, avocado slices for a creamy and buttery texture, or even grilled pineapple for a tropical twist. Don’t be afraid to mix and match different vegetables to create a harmonious balance of flavors.
Remember, the key to elevating your burger with fresh vegetables is to prioritize quality and freshness. Opt for organic produce whenever possible and take advantage of seasonal offerings for the best taste and nutritional value.
With creative toppings like inspiring cheese selections and fresh vegetable toppings, you can take your homemade burger from ordinary to extraordinary. Experiment with different flavors, textures, and combinations to discover your own signature burger masterpiece.
Homemade vs. Store-bought: Hamburger Buns that Make the Difference
When it comes to crafting the perfect hamburger, the bun plays a crucial role. The choice between homemade and store-bought hamburger buns can make a significant difference in the overall taste and quality of your burgers. Let’s take a closer look at the differences between these two options.
When you opt for homemade hamburger buns, you have complete control over the ingredients and freshness. You can customize the size, shape, and flavor to perfectly complement your homemade patties. The process of making homemade buns adds a personal touch to your burgers, elevating them from ordinary to extraordinary.
“There’s something truly special about sinking your teeth into a juicy hamburger sandwiched between two soft, pillowy homemade buns. It adds a level of satisfaction and indulgence that store-bought buns simply can’t replicate.”
In contrast, store-bought hamburger buns offer convenience and time-saving benefits. They are readily available at grocery stores, making them a convenient option for quick burger nights. However, they often lack the fresh taste and texture that homemade buns provide.
Store-bought buns may contain preservatives and additives to prolong their shelf life, which can impact the overall flavor and quality. Additionally, the size and shape of store-bought buns are usually standardized, limiting your ability to customize your burgers to your exact preferences.
To visually illustrate the differences between homemade and store-bought hamburger buns, take a look at the following table:
Homemade Hamburger Buns
Store-bought Hamburger Buns
Taste
Fresh, flavorful
May lack freshness and flavor
Customization
Fully customizable
Standardized size and shape
Ingredients
Control over quality
May contain preservatives and additives
Texture
Soft, pillowy
May be less fluffy or dry
As you can see, homemade buns offer freshness, customization, and control over your ingredients, resulting in a superior burger experience. However, if convenience is a top priority, store-bought buns can still serve as a decent option for a quick meal.
Ultimately, the choice between homemade and store-bought hamburger buns depends on your preferences and available time. If you crave the satisfaction of sinking your teeth into a homemade masterpiece, we recommend trying your hand at making your own buns.
Side Dishes That Complement Your Hamburger Masterpiece
In addition to your delicious homemade hamburgers, choosing the perfect side dishes can elevate your meal to the next level. We have curated a selection of side dishes that are guaranteed to complement your hamburger masterpiece, offering a variety of flavors and textures to satisfy every palate.
Healthy Choices: Vegetable Sides and Salads
For those looking to add a healthy touch to their meal, vegetable sides and salads are the way to go. Not only do they provide a refreshing contrast to the rich flavors of the hamburger, but they also offer a range of nutrients and vibrant colors that enhance the overall dining experience. Consider these options:
Crisp garden salad with mixed greens, cherry tomatoes, cucumbers, and a tangy vinaigrette dressing
Grilled asparagus spears seasoned with olive oil, salt, and pepper
Roasted sweet potato wedges with a sprinkle of cinnamon and paprika
Zesty coleslaw made with fresh cabbage, carrots, and a creamy dressing
These vegetable sides and salads provide a refreshing and healthy balance to your burger indulgence, adding a burst of flavor and nutrition to your meal.
Classic Comforts: Fries and Onion Rings
If you’re in the mood for some classic comfort food, look no further than fries and onion rings. These crispy delights have long been favored as the perfect complement to a juicy hamburger. Whether you prefer them thin and crispy or thick and fluffy, fries are a timeless side dish that never disappoints. Here are some options to consider:
Thin-cut shoestring fries served with ketchup or a tangy aioli dipping sauce
Seasoned curly fries tossed in a blend of spices for an extra kick
Thick-cut steak fries seasoned with sea salt and accompanied by a creamy garlic dip
Onion rings, with their golden crispy coating and tender onion centers, are another classic favorite. These mouthwatering treats are perfect for those looking to indulge in a little extra flavor and crunch.
Don’t forget to add your favorite condiments like ketchup, mayo, mustard, or barbecue sauce to enhance the flavors and complete your hamburger feast.
Now that you have a variety of side dishes to choose from, your hamburger meal will be complete and satisfying. Whether you opt for the healthy freshness of vegetable sides and salads or the classic comforts of fries and onion rings, these side dishes will surely complement your hamburger masterpiece, leaving you and your loved ones in culinary bliss.
Adapting the Hamburger Home Recipe for Special Diets
At some point, we may need to adapt our favorite recipes to accommodate special dietary needs. The hamburger home recipe is no exception. Whether you or a loved one follows a special diet due to health reasons or personal preferences, there are plenty of ways to modify the classic hamburger to suit different nutritional requirements.
If you’re on a gluten-free diet, you can replace traditional hamburger buns with gluten-free alternatives, such as lettuce wraps, gluten-free bread, or gluten-free burger buns available in stores. These options allow you to enjoy a delicious hamburger while avoiding gluten-containing ingredients.
For individuals following a vegetarian or vegan diet, there are numerous plant-based alternatives to ground beef that can be used to make tasty burgers. Ingredients like black beans, chickpeas, mushrooms, or tofu can be mixed with various seasonings and formed into patties for a meat-free hamburger experience.
If you’re looking to reduce your red meat consumption, consider substituting ground beef with leaner meats like ground turkey or chicken. These alternatives are lower in fat and can still provide a flavorful and juicy hamburger.
Those with dairy sensitivities or lactose intolerance can opt for dairy-free cheese alternatives to add a creamy and cheesy element to their hamburgers. Brands like Daiya, Violife, and Follow Your Heart offer a range of dairy-free cheese options that melt and taste similar to traditional cheese.
When it comes to condiments and toppings, there are plenty of options to accommodate different dietary needs. For example:
For a low-sodium diet, choose low-sodium or no-salt-added condiments and seasonings.
Those following a keto or low-carb diet can use lettuce wraps instead of buns and incorporate keto-friendly toppings like avocado, bacon, or cheese.
If you’re watching your calorie intake, opt for lighter toppings like fresh vegetables, salsa, or mustard.
Remember, adapting the hamburger home recipe for special diets doesn’t mean sacrificing taste or enjoyment. With a little creativity and some ingredient swaps, you can create a burger that meets your dietary needs and still satisfies your taste buds.
Dietary Need
Suggested Modifications
Gluten-free
Replace traditional buns with gluten-free alternatives like lettuce wraps or gluten-free burger buns.
Vegetarian/Vegan
Use plant-based alternatives like black beans, chickpeas, mushrooms, or tofu to create meat-free patties.
Reduced Red Meat
Substitute ground beef with leaner meats like ground turkey or chicken.
Dairy-Free
Choose dairy-free cheese alternatives for a creamy and cheesy taste.
Low-Sodium
Opt for low-sodium or no-salt-added condiments and seasonings.
Keto/Low-Carb
Use lettuce wraps instead of buns and incorporate keto-friendly toppings like avocado, bacon, or cheese.
Low-Calorie
Choose lighter toppings like fresh vegetables, salsa, or mustard.
When it comes to feeding picky eaters, finding meals that are both nutritious and appetizing can be a challenge. However, with a little creativity, you can turn the humble hamburger into a kid-friendly delight that even the fussiest of eaters will enjoy. In this section, we will share some delicious burger variations that are sure to please picky eaters.
Mini-Burger Sliders for Little Hands
One way to make burgers more appealing to picky eaters is to serve them in a smaller, more manageable size. Mini-burger sliders are the perfect solution, as they are easy for little hands to hold and eat. These bite-sized burgers can be made using the same ingredients as regular burgers, but in a smaller patty size.
To make mini-burger sliders, start with your favorite ground beef mixture and shape it into small, palm-sized patties. Cook them on a grill or stovetop until they are cooked through and juicy. Then, assemble the sliders by placing a patty on a mini-burger bun or a dinner roll. Add any desired toppings, such as cheese, lettuce, and tomato, and serve with a side of ketchup or mayonnaise for dipping.
Not only are mini-burger sliders kid-friendly and fun to eat, but they also allow for easy customization. You can let your little ones choose their own toppings and create their own personalized sliders, making mealtime an interactive and enjoyable experience for the whole family.
Hidden Veggies Burger Tactics
Another strategy for getting picky eaters to consume more vegetables is to incorporate them into the burger itself. By adding hidden veggies to the burger mixture, you can increase the nutritional value of the meal without compromising on taste.
There are several ways to sneak veggies into burger patties. One option is to finely chop vegetables like carrots, zucchini, or bell peppers and mix them into the ground beef. This not only adds moisture to the patties but also enhances their flavor and provides added nutrients. Another technique is to grate vegetables like sweet potatoes or beetroot and mix them into the burger mixture. This adds vibrant color and subtle sweetness while boosting the nutritional content.
For those who prefer a smoother texture, you can even puree cooked vegetables like spinach, peas, or cauliflower and mix them into the ground beef mixture. This method ensures that the veggies are well-hidden and undetectable, making it ideal for those especially picky eaters.
By utilizing mini-burger sliders and incorporating hidden veggies, you can create kid-friendly burger variations that are both delicious and nutritious. These strategies are sure to appeal to picky eaters and help make mealtime a more enjoyable experience for the whole family.
Conclusion
In conclusion, we have explored an easy hamburger home recipe that is perfect for family nights. By following our step-by-step guide, you can create delicious and flavorful homemade hamburgers that will bring joy and togetherness to your family.
We discussed the importance of choosing the best ground beef, using the right techniques and ingredients to make your hamburgers juicy and flavorful. Additionally, we shared valuable tips for molding the ideal patty shape and enhancing the flavor through seasoning techniques.
To elevate your hamburgers, we suggested creative toppings such as inspiring cheese selections and fresh vegetable toppings. We also explored the difference between homemade and store-bought hamburger buns, emphasizing how homemade buns can make a significant difference in taste and quality.
Furthermore, we provided ideas for side dishes that complement your hamburger masterpiece, including healthy vegetable sides and classic comfort sides like fries and onion rings. We also addressed special diets by offering tips on how to adapt the hamburger home recipe to accommodate different dietary restrictions or preferences.
Lastly, we shared kid-friendly burger variations for picky eaters, including mini-burger sliders for little hands and hidden veggie tactics to add extra nutrition. Overall, the hamburger home recipe provides a versatile and satisfying meal option for the whole family to enjoy, creating lasting traditions and cherished memories.
FAQ
What is the hamburger home recipe for family nights?
The hamburger home recipe for family nights is an easy and delicious way to make homemade hamburgers that the whole family will love. It provides step-by-step instructions and tips for creating flavorful burgers.
Why are hamburger nights a family favorite?
Hamburger nights are a family favorite because they bring everyone together and create lasting memories. It’s a tradition that families enjoy, filled with joy and togetherness.
How do I choose the best ground beef for my hamburgers?
When choosing ground beef for your hamburgers, consider the different cuts and fat content. Look for high-quality ground beef that is fresh and has a good balance of fat for juicy and flavorful burgers.
What is the secret to making a juicy and flavorful hamburger?
The secret to making a juicy and flavorful hamburger lies in various techniques and ingredients. These can include using freshly ground beef, incorporating seasonings and spices, and cooking the patties to the desired level of doneness.
Can you provide a step-by-step guide to making homemade hamburgers?
Certainly! Our step-by-step guide covers everything from preparing the meat to grilling or cooking the patties to perfection. You’ll have delicious homemade burgers in no time!
What are some tips for perfecting my hamburger patty?
To perfect your hamburger patty, focus on molding the ideal shape and utilizing seasoning techniques to enhance the flavor. We provide expert tips and tricks to help you achieve burger perfection.
What are some creative toppings to elevate my hamburger?
Elevate your hamburger with inspiring cheese selections and fresh vegetable toppings. These toppings add unique flavors and textures to your burgers, taking them to the next level of deliciousness.
What’s the difference between homemade and store-bought hamburger buns?
Homemade hamburger buns can make a significant difference in the overall taste and quality of your burgers. We’ll delve into the differences between homemade and store-bought buns, so you can make an informed choice.
What are some side dishes that complement my hamburger masterpiece?
Complement your hamburger masterpiece with a variety of side dishes. We’ll provide ideas for healthy vegetable sides and salads, as well as classic comfort sides like fries and onion rings.
How can I adapt the hamburger home recipe for special diets?
Adapting the hamburger home recipe for special diets is possible with a few modifications. We’ll offer tips and suggestions to accommodate dietary restrictions or preferences, so everyone can enjoy a delicious hamburger.
Do you have kid-friendly burger variations for picky eaters?
Absolutely! We understand the challenges of having picky eaters. We’ll provide kid-friendly burger variations such as mini-burger sliders that are perfect for little hands, along with hidden veggie tactics to sneak in some extra nutrition.
Global Flavors, Global Recipes: Your Culinary Journey.