Coq au vin is as synonymous with French culture as hamburgers are with American. Hardly we can find a French who did not grew up having this dish. This is surely a comfort food with mom’s magic. Sauce it up with red wine and you will have the melting chicken in your mouth. This is of course more impressive than your average chicken recipe. (Coq au Vin)
It’s perfect for a dinner party, because it actually tastes better the next day, so you can make the entire recipe the day before and then gently reheat it as your guests arrive. Add a baguette for dunking and you’ve got an ideal cold-weather meal.
Special recommendation
How to serve Coq au Vin?
Pair it with anything starchy that can soak up the wine sauce, preferably potatoes or French bread
Goes very well with tangy salads, bitter greens like mustard or Kale.
Traditionally whole rooster is used, but if that’s not accessible chicken thighs and drumsticks can be used
Coq au Vin is always tastier the next day
Traditional Coq au Vin recipes call for a whole cut-up chicken, but using all dark meat gives you a particularly succulent dish without the risk of overcooked white meat. However, if you would rather substitute a whole cut-up bird, just add the breasts in the last 30 minutes of simmering.
Selecting the Right Ingredients for Authentic Coq au Vin
This recipe and ingredients will serve 4.
Ingredients
Quantity
Chicken (combination of legs, thighs, breasts, and wings)
3 lb skin-on, bone-in chicken legs
Kosher Salt
To taste
Freshly ground black pepper
To taste
Bay leaf
1
Carrot
1 peeled and diced
Garlic
2 minced cloves
Tomato paste
11/2 teaspoons
All purpose flour
2 tablespoons
Unsalted butter
2 tablespoons
Red wine
3 cups
Onions
1 diced
Bacon
4 ounces diced
Mushrooms
8 oz button mushrooms, trimmed and quartered
Thyme
2-4 fresh thyme sprigs
Flat leaf parsley
1/4 cup chopped
How to cook?
Season the chicken with salt and pepper. In a large bowl, combine the chicken with the wine, bay leaf, and thyme. Cover and marinate at least 30 minutes and up to one day.
In a large pot set over medium heat, cook the bacon until browned and crispy, about 10 minutes. Remove from heat and use a slotted spoon to transfer bacon to a plate lined with paper towels, reserving the fat in the pot.
Remove the chicken from the wine marinade and pat dry with paper towels. Reserve the marinade. Return the pot to the stovetop and heat the bacon fat over medium heat until it shimmers. Add the chicken, skin side down, in a single layer and cook until golden brown, about 5 minutes. Flip and cook until brown on the other side, about 4 more minutes. Transfer the seared chicken to a plate.
Add the diced onion, carrot, and mushrooms to the Dutch oven and season with salt. Cook until the vegetables are lightly browned, about 8 minutes.
Add the garlic and tomato paste and cook for about 1 minute, until it’s fragrant. Add the reserved marinade. Bring to a boil over medium-high heat and reduce liquid to about half.
Add the chicken and half of the bacon. There should be enough liquid to just cover the chicken—if not, add a little water or chicken stock. Cover and simmer over low heat until the chicken is tender, about 1 hour. Uncover, transfer chicken to a plate, and continue to simmer, about 10 minutes.
Meanwhile, whisk the flour and butter together into a smooth paste. Whisk the beurre manié into the stew to thicken. Continue to simmer until the sauce is thick enough to lightly coat the back of a spoon, about 2 more minutes.
Taste and season with salt and pepper if needed. Return the chicken to Dutch oven and simmer until warmed through, no more than 5 minutes. Remove from heat and garnish with remaining bacon and parsley.
For more such finger licking dishes please do try the below recipes:
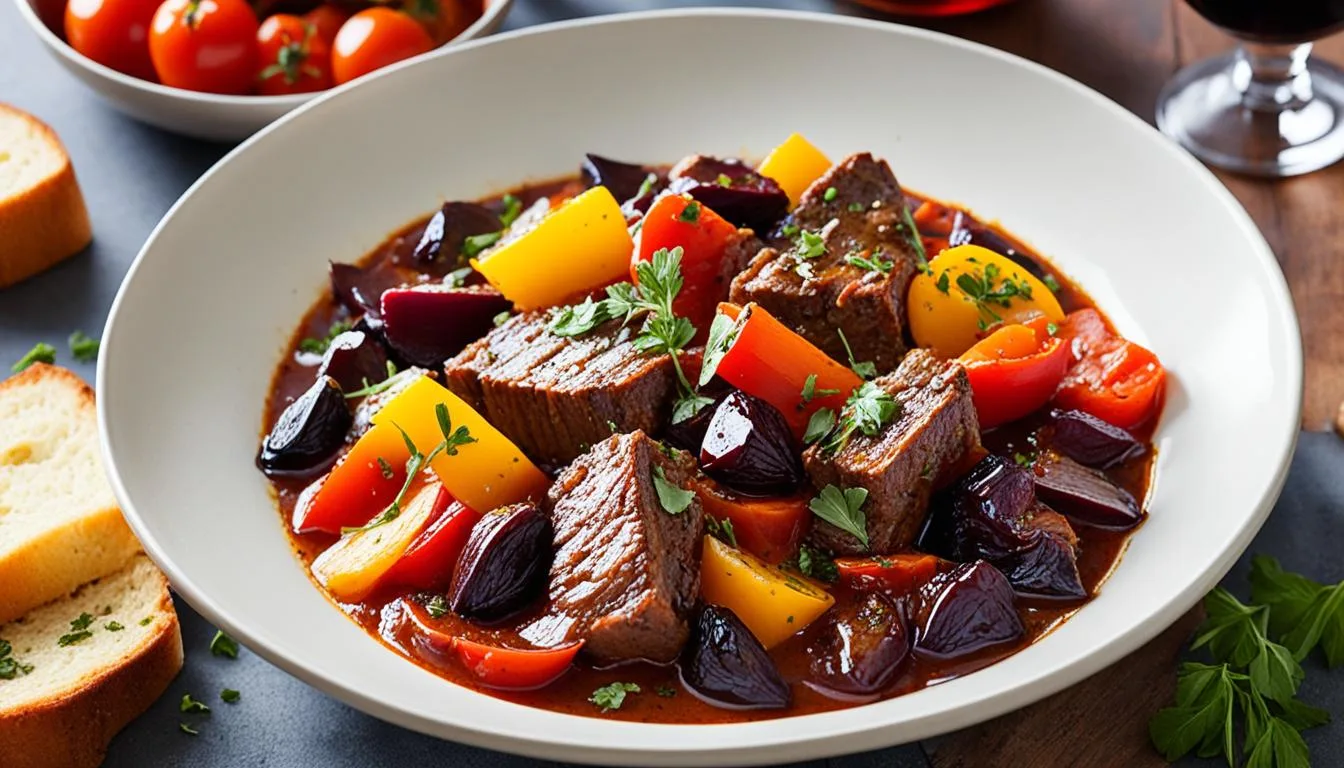
Dalmatian Pasticada Recipe is by far the best known and most traditional dish that reminds you of Dalmatia. It is interesting that not only every city has its own version or the method of preparation, but the recipes vary from household to household.
Pašticada is a Dalmatian specialty whose roots date back to the ancient Greek and Roman cuisine. This dish is listed in the List of Croatian gastronomic heritage. The preparation is very complex, you have to stuff the meat first, marinate overnight, and then cook it for hours. But it is worth it.
Whether enjoyed at a local tavern or prepared at home, Pasticada stew offers a truly authentic taste of Dalmatian cuisine. Its rich flavors and tender meat make it a cherished dish among locals and a must-try for visitors to the region.
(Pasticada Recipe)
Special recommendation for Pasticada Recipe
When marinating Pasticada, it’s important to choose the right cut of beef. Look for cuts that are well-marbled with fat, such as beef chuck or round roast for Pasticada Recipe. These cuts have enough fat content to keep the meat moist and tender during the slow cooking process. Avoid lean cuts of beef, as they can become dry and tough when marinated and cooked for an extended period.
Vinegar plays a significant role in tenderizing the beef and enhancing the flavors of Pasticada. It acts as a natural meat tenderizer by breaking down the connective tissues and proteins in the beef, resulting in a more tender and juicy texture. Additionally, vinegar helps to balance the flavors of the marinade and adds a subtle tang to the dish.
Use red wine vinegar or apple cider vinegar for a rich and robust flavor in your Pasticada marinade. Recommended for Pasticada Recipe
Allow the cooked beef to rest for a few minutes before slicing. This helps retain the juices and ensures a succulent texture.
Use a sharp knife to make clean, thin slices. Aim for uniform thickness to ensure consistent cooking throughout.
Slice against the grain to maximize tenderness. The grain refers to the lines visible on the surface of the meat.
The image above visualizes the rich history of Pasticada, showcasing its significance in Croatian gastronomic heritage.
Choosing the Perfect Cut of Beef
When marinating Pasticada, it’s important to choose the right cut of beef. Look for cuts that are well-marbled with fat, such as beef chuck or round roast. These cuts have enough fat content to keep the meat moist and tender during the slow cooking process. Avoid lean cuts of beef, as they can become dry and tough when marinated and cooked for an extended period.
Ingredients for Your Pasticada Recipe
Ingredients
Quantity
Beef
2 pounds (900 grams)
Red wine vinegar
1 cup
Carrots
2
Onions
2
Celery stalks
2
Garlic cloves
4
Bacon slices
4
Prunes
10
Bay leaves
3
Dried rosemary
1 tablespoon
Dried thyme
1 tablespoon
Olive oil
3 tablespoons
Salt
To taste
Black pepper
To taste
Cooking Your Dalmatian Pasticada
(Pasticada Recipe)
First, begin by browning the meat in a hot skillet. This step is essential for enhancing the depth of flavors and creating a rich, caramelized exterior on the beef.
Once the meat is browned, it’s time to add the marinade and flavors that will infuse the Pasticada with its distinctive taste. Slowly simmer the meat with red wine, vinegar, garlic, cloves, and various spices. Allow the flavors to meld together as the stew simmers over low heat, gradually transforming the simple ingredients into a culinary masterpiece.
The slow cooking process is crucial in achieving tender and succulent meat. The meat should be cooked until it becomes fork-tender, allowing it to melt in your mouth with each bite.
As the Pasticada cooks, your kitchen will be filled with the delightful aroma of the marinade and spices, building anticipation for the upcoming feast.
To further enhance the flavors, consider adding a touch of sweetness and acidity to the stew. Some variations of Pasticada include the addition of prunes or dried figs, which contribute to the sweet and sour balance of the dish.
Once the cooking process is complete, remove the tender meat from the flavorful sauce and let it rest for a few minutes. This will allow the juices to redistribute and ensure that every bite is moist and juicy.
Serving and Presentation: Plating Your Pasticada
The presentation of Pasticada plays a crucial role in enhancing the overall dining experience. To create an appetizing and visually appealing dish, careful attention must be paid to plating. There are two key aspects to consider: slicing the meat and arranging it on the plate, and dressing up your Pasticada with homemade gnocchi and sauce.
For more such delicious recipe please do visit the below links:
The history of Pasticada can be traced back to ancient times when Greek and Roman civilizations flourished. The dish was born out of the rich flavors, ingredients, and cooking techniques that characterized these ancient cultures. Over time, Pasticada developed its unique identity and became synonymous with Dalmatian cuisine.
To fully understand the ancient roots of Pasticada, we need to explore the traditions, ingredients, and cooking methods of this bygone era. By doing so, we gain insight into the authentic flavors and culinary heritage that have been preserved throughout history.
Nutrition value
Magnesium mg 96.5 Phosphor mg 556.02 Potassium mg 1360.21 Niacin mg 21.51 154 Vitamin C mg 23.7 Vitamin D μg 26.84 Vitamin A μg 4858.94 Salt g 2.61 Total proteins g 63.57 Diet fibres g 4.31 Total carbohydrates g Total fat g 37.1
Danish open faced sandwiches, known as smorrebrod, are an integral part of Danish food culture. These delectable sandwiches are not only a feast for the taste buds but also a reflection of the rich food traditions and artistic presentation that the Danish people are proud of.
In this article, we will guide you through the world of smorrebrod, from the essential ingredients to crafting the perfect spreads, selecting diverse toppings, and mastering the art of layering. We’ll also provide a step-by-step guide to preparing your very own smorrebrod at home.
So, get ready to tantalize your senses and experience the true essence of Danish cuisine as we explore the delightful world of authentic smorrebrod!
Special recommendation for Danish Open Faced Sandwiches
Topping
Description
Explore a wide range of toppings including roast beef, smoked salmon, pickled herring, fresh vegetables, and creamy cheeses. Let your creativity soar and mix and match to create the perfect open-faced sandwich.
Essential Ingredients for a True Smorrebrod Experience
A true Smorrebrod experience is marked by the use of fresh, high-quality ingredients. Traditional Danish dishes, such as pickled herring, smoked salmon, liver pate, and roast beef, are often featured as toppings. Accompanied by an array of flavorful spreads, herbs, vegetables, and garnishes, these ingredients come together to create a symphony of tastes and textures on a foundation of hearty Danish rye bread.
Exploring the world of Smorrebrod is a journey through the diverse flavors and culinary traditions of Denmark. Each bite offers a delightful combination of sweet, savory, tangy, and spicy flavors, harmoniously arranged to tantalize the taste buds and celebrate the art of Danish cuisine.
Crafting the Perfect Spreads: From Butter to Creative Toppings
In addition to the delicious base of rye bread, a key element in creating the perfect smorrebrod is the spread. The spread not only enhances the flavors of the toppings but also adds a creamy and smooth texture to each bite. Whether you prefer a classic butter spread or want to explore more creative options, there are plenty of choices to elevate your open-faced sandwiches.
Classic Butter Spread and its Significance in Smorrebrod
The classic butter spread is a staple in Danish open-faced sandwiches, and its significance cannot be overstated. The smooth and creamy butter is the foundation upon which the other toppings are built. It provides a rich and velvety texture while enhancing the flavors of the meat, fish, or vegetables that accompany it. Danish butter, known for its high fat content, ensures a luscious and indulgent experience on every smorrebrod.
Pate and Spreads that Elevate Your Sandwich
While the classic butter spread is beloved, there are endless possibilities to take your smorrebrod to a new level of deliciousness.
Spread
Classic Butter Spread
Pate
Herb-Infused Creams
Tangy Mustard Sauces
Creamy Avocado Spreads
Ingredients of Danish Open Faced Sandwiches
For more such finger licking recipes please click below:
Topping Varieties: Meat, Fish, and Vegetarian Options
For meat lovers, smorrebrod offers an array of delicious options. Thinly sliced roast beef, pork loin, or Danish liver pate are popular choices that add a rich and savory element to the sandwich. Smoked meats such as ham or mackerel provide a smoky and distinctive flavor profile. And for those looking for a taste of traditional Danish cuisine, try topping your smorrebrod with hot dog slices, meatballs, or even cured herring.
For seafood enthusiasts, fish options for smorrebrod are abundant. Smoked salmon, known as “røget laks” in Danish, is a classic and elegant topping choice that pairs perfectly with cream cheese, dill, and lemon. Other popular fish toppings include pickled herring, shrimp, and marinated mackerel. These fish options not only add a burst of flavor but also provide a refreshing and light element to the smorrebrod.
Vegetarians need not worry, as there are plenty of delicious options for them as well. From fresh vegetables such as tomatoes, cucumbers, and radishes to creamy cheeses like brie and Danish blue, the possibilities for vegetarian smorrebrod are endless. Consider topping your open-faced sandwich with avocado, hummus, or even pickled beets for a burst of tangy sweetness.
The Art of Layering: Constructing Your Danish Open Faced Sandwiches
When it comes to crafting the perfect Danish open faced sandwich, layering is key. Each layer contributes to the overall flavor and texture of the smorrebrod, creating a harmonious and satisfying eating experience. In this section, we will explore the art of layering and the importance of balancing flavors and textures to create visually appealing smorrebrod.
Balancing Flavors and Textures
Layering smorrebrod involves carefully selecting ingredients that complement each other, creating a symphony of flavors. It’s important to balance different tastes, such as sweet, savory, tangy, and salty, to create a well-rounded and delicious sandwich. Consider combining contrasting flavors, like the richness of smoked salmon with the freshness of dill and lemon, or the creaminess of avocado with the crunch of radishes.
Texture also plays a crucial role in layering smorrebrod. Aim for a balance of soft and crisp elements by incorporating ingredients like creamy spreads, crunchy vegetables, and crispy toppings. The contrast in textures adds depth and interest to each bite, elevating the overall enjoyment of the sandwich.
Danish Open Faced Sandwiches
Preparation Tips for Danish Open Faced Sandwiches
To ensure a successful smorrebrod preparation, keep the following tips in mind:
Start with fresh, high-quality ingredients to maximize flavors.
Have all the necessary ingredients and spreads ready before assembling.
Prepare the toppings in advance to save time during assembly.
Slice the bread evenly to create a sturdy base for the toppings.
Keep the spreads and toppings refrigerated until ready to assemble.
Designate a clean and spacious work area for assembling the smorrebrod.
By following these preparation tips, you’ll ensure a seamless experience and reduce stress during the assembly process.
Assembling the Smorrebrod – Danish Open Faced Sandwiches
When it comes to assembling smorrebrod, precision and care are crucial. Here’s a step-by-step guide:
Place a slice of bread on a clean plate or board.
Spread a thin layer of butter or other spread on the bread to enhance the flavors.
Add your desired toppings, arranging them in an appealing and balanced manner.
Garnish the smorrebrod with fresh herbs or other decorative elements for an aesthetic touch.
Repeat the process with additional slices of bread and different toppings to create a variety of smorrebrod.
Beverages and Side Dishes
When enjoying the delightful flavors of smorrebrod, it’s essential to consider the perfect beverage pairing and side dishes to elevate your dining experience. Whether you prefer a refreshing Danish beer or a glass of aquavit, we have you covered. Additionally, complementing your open-faced sandwiches with side dishes will create a complete and satisfying meal.
Welcome to our blog post on a homemade potato dumplings recipe, the epitome of cozy comfort food. There’s nothing quite like indulging in a warm bowl of potato dumplings during the colder months or enjoying them as a comforting family dinner. Whether you’re looking for a delicious and satisfying meal or seeking a taste of nostalgia, potato dumplings are sure to hit the spot.
Homemade potato dumplings are a cozy comfort food, perfect for colder months.
Enjoy the satisfying and comforting nature of potato dumplings.
Potato dumplings have a rich heritage in German cuisine.
Choose the right ingredients to make flavorful potato dumplings.
Follow our step-by-step guide for foolproof potato dumplings.
(Potato Dumplings Recipe)
Special recommendation
Choose the right potatoes: Opt for starchy potatoes like Russets or Yukon Golds. They have a higher starch content, which helps create light and fluffy dumplings.
Avoid overworking the dough: When mixing the potato and flour mixture, be gentle. Overworking the dough can make the dumplings tough and dense.
Adjust the dough consistency: Make sure to add enough flour to the dough to prevent it from being too sticky. The right consistency is crucial for shaping and cooking the dumplings.
Test the dumpling consistency: Before cooking all the dumplings, test one in simmering water to ensure it holds its shape. If it falls apart, add more flour to the dough.
Use a light touch when shaping: When rolling the dumplings, use a light touch. Pressing too hard can lead to dense dumplings instead of light and airy ones.
Cook in simmering liquid: Rather than boiling the dumplings vigorously, cook them in gently simmering water or broth. This helps maintain their shape and texture.
Give them time to cook: Dumplings need adequate cooking time to become fully cooked and tender. Resist the temptation to rush the process.
Enjoy leftovers in a new way: If you have leftover potato dumplings, pan-fry them with butter for a crispy and delicious alternative.
Gathering Your Ingredients for Potato Dumplings
In order to make delicious potato dumplings, it’s important to gather the right ingredients. From selecting the best potatoes to choosing the right binders and spices, each component plays a crucial role in creating dumplings that are full of flavor and have the perfect texture.
When selecting potatoes, look for ones that are firm and smooth without any sprouting or green patches. These imperfections can affect the taste and texture of the dumplings. Additionally, choose potatoes that are medium to large in size, as they are easier to work with when mashing and forming dumplings.
For more such lip smacking recipes please do click below
Peel and dice the potatoes. Place them in a large pot of boiling water and cook until fork-tender, approximately 15-20 minutes.
Drain the potatoes and allow them to cool slightly before transferring them to a large mixing bowl. Use a potato masher or fork to mash the potatoes until smooth.
In a separate bowl, combine the flour, eggs, salt, and nutmeg. Mix well until a sticky dough forms.
Add the dough to the mashed potatoes and gently knead until well combined.
Dust your hands with flour to prevent sticking. Take a small portion of the dough and roll it into a ball, approximately 1-2 inches in diameter.
Repeat the rolling process with the remaining dough, placing the formed dumplings onto a lightly floured surface.
In a large pot, bring water to a gentle simmer. Carefully drop the dumplings into the simmering water and cook for 10-15 minutes or until they float to the surface.
Remove the dumplings from the water using a slotted spoon and serve immediately with your favorite sauce, gravy, or soup.
Enjoy these homemade potato dumplings as a hearty side dish or as the main attraction in a comforting meal. The creamy texture and rich flavor will surely satisfy your taste buds.
Potato Dumplings recipe
Potato Dumplings Recipe tips and tricks
Tips for Achieving the Perfect Texture
Choose starchy potatoes (such as Russet or Yukon Gold)
Mash potatoes thoroughly to a smooth consistency
Balance the moisture: avoid adding too much liquid
Form the dumplings gently and avoid applying excessive pressure
Cook dumplings until they float and avoid overcooking
There you have it! With these tips and tricks, you’ll be able to achieve the perfect texture for your potato dumplings every time. Enjoy the light, fluffy goodness that will elevate your dining experience and leave your taste buds craving more.
Welcome to our comprehensive guide on making easy fondue without a pot! Whether you’re hosting a last-minute gathering or simply want a cozy night in, we’ve got you covered. In this guide, we will explore various ways to create delicious fondue without the need for traditional equipment. So, let’s dive in and discover the secrets to a flavorful and smooth fondue experience!
Table of Contents
Key Takeaways:
Learn how to make delicious fondue without a fondue pot
Discover alternative methods and equipment for fondue making
Choose the perfect cheese blend for your fondue
Master the art of creating an easy fondue base with wine and cheese
Explore alternative heat sources for melting cheese
Navigating the Delicious World of Fondue Without Traditional Equipment
Fondue is known for its communal and sociable nature, but not everyone has access to a traditional fondue pot. In this section, we will discuss alternative methods and equipment that can be used to achieve the same delicious results. From using a heavy-bottomed pan to crockpots and double boilers, we’ll explore different options that can help you create a memorable fondue experience.
While a fondue pot may be the traditional choice, there are numerous alternatives that can be just as effective. A heavy-bottomed pan is an excellent option. Its thick construction helps distribute heat evenly, preventing the cheese from scorching. Simply heat the pan on low to medium heat and stir the ingredients until smooth and creamy.
If you prefer a hands-off approach, a crockpot is perfect for slow and steady heating. Set it to a low or warm setting and periodically stir the cheese mixture to avoid clumping. This method allows you to keep the fondue warm throughout your gathering, ensuring a consistent texture and temperature.
For those concerned about precision heating, a double boiler provides a gentle and controlled environment. Fill the bottom pot with water and bring it to a simmer. Place the second pot with the cheese mixture on top, allowing the indirect heat to slowly melt the cheese without the risk of burning.
These alternative fondue methods offer flexibility and convenience, allowing you to enjoy the delightful experience of fondue without traditional equipment. Experiment with different techniques to find the one that suits your preferences and resources. The goal is to create a smooth, flavorful, and communal fondue experience that will be a hit at any gathering.
The Perfect Fondue Cheese Blend
Choosing the Right Cheeses
The selection of cheeses for your fondue is crucial in achieving the perfect blend of flavors. When choosing cheeses, opt for varieties that melt smoothly and have a good balance of flavors. Here are some tips to help you choose the right cheeses:
Consider using a combination of cheeses such as Gruyère, Emmental, and Fontina for a classic Swiss fondue.
Experiment with different types of cheeses like Cheddar, Gouda, or Brie to add unique flavor profiles to your fondue.
Make sure to include a cheese with a stronger flavor to add depth and complexity to the blend.
Ask your local cheesemonger for recommendations or try different cheeses to find your favorite combination.
Remember, the key to a delicious fondue cheese blend is balancing flavors and textures, so don’t be afraid to get creative and try new combinations!
Adjusting Cheese Quantities for Texture
The texture of your fondue can greatly impact the overall experience. To achieve the desired consistency, you may need to adjust the quantities of cheese used in your blend. Here are some guidelines to help you achieve the perfect texture:
If your fondue is too thick and clumpy, add more liquid, such as wine or broth, to thin it out.
If your fondue is too runny, add more cheese to thicken it. Gradually add small amounts of cheese until you reach the desired consistency.
For a silky-smooth texture, grate or finely shred the cheese before melting it. This allows the cheese to melt more evenly and creates a creamy texture.
Remember to adjust the cheese quantities gradually and taste as you go until you achieve the desired texture. With a little experimentation, you’ll find the perfect balance of cheeses and achieve a fondue with a creamy and velvety consistency.
How to Make Fondue Without a Fondue Pot
Making fondue without a traditional fondue pot is easier than you might think. With alternative equipment such as a heavy-bottomed pan or a crockpot, you can still enjoy a delicious fondue experience without the need for a specialized pot. Let us guide you through the process from start to finish!
First, gather all the ingredients for your fondue. This typically includes cheese, wine or other liquid, and seasonings. You can choose from a variety of cheese options such as Gruyère, Emmental, or Cheddar, depending on your preference.
Pro Tip: For a smooth and creamy fondue, it’s important to shred or grate the cheese before melting.
Once you have your ingredients ready, it’s time to select the appropriate alternative equipment. A heavy-bottomed pan or a crockpot will work well for melting the cheese. These options provide even heat distribution, ensuring that your fondue doesn’t burn or stick to the bottom.
To make fondue in a heavy-bottomed pan:
Place the pan over low to medium heat.
Add the shredded cheese and liquid (wine, broth, or beer) to the pan.
Stir continuously until the cheese has completely melted and the mixture is smooth.
Season with spices and herbs according to your taste.
If you prefer using a crockpot:
Set the crockpot to a low or medium setting.
Add the cheese and liquid to the pot.
Cover and allow the cheese to melt slowly, stirring occasionally.
Once the cheese has melted and the fondue is smooth, adjust the heat to keep it warm.
Remember to keep an eye on the heat to avoid overheating or scorching the cheese. It’s important to maintain a low and steady heat to achieve the desired consistency.
Once your fondue is ready, transfer it to a fondue serving dish or keep it in the crockpot for communal dipping. Serve with an assortment of dippers such as bread cubes, vegetables, or meats.
Now you can enjoy a delightful fondue experience without the need for a fondue pot. Whether you’re hosting a gathering or simply craving a cozy night in, this alternative method will surely impress your guests and satisfy your taste buds. Bon appétit!
Creating an Easy Fondue Base with Wine and Cheese
The base of a great fondue is a combination of wine and cheese. In this section, we will delve into the importance of acidity in fondue and how it contributes to the overall flavor profile. We’ll also discuss the role of cornstarch in creating a smooth and consistent texture for your fondue base.
Understanding the Role of Acidity in Fondue
Acidity is a crucial element in creating a well-balanced fondue base. The addition of wine brings a tangy and bright flavor that complements the richness of the cheese. The acidity helps to cut through the richness, resulting in a more enjoyable and flavorful fondue experience. It adds complexity and depth to the overall taste, enhancing the overall dining experience.
When choosing a wine for your fondue base, opt for dry white wines such as Chardonnay, Sauvignon Blanc, or Pinot Grigio. These wines provide the right amount of acidity without overwhelming the cheese flavors. Experiment with different wine varieties to find the perfect balance that suits your taste preferences.
The Importance of Cornstarch for Smooth Consistency
Cornstarch is a key ingredient in creating a smooth and creamy consistency for your fondue base. It acts as a thickening agent, preventing the cheese from separating and creating a lumpy texture. When heated, cornstarch absorbs moisture and forms a gel-like substance, providing a smooth and velvety texture to the fondue.
To incorporate cornstarch into your fondue base, start by tossing the grated cheese with cornstarch before adding it to the wine. This step helps the cheese melt evenly and prevents clumping. Gradually add the cheese mixture to the heated wine, stirring constantly until the cheese has fully melted and the fondue reaches the desired consistency.
It’s essential to remember that cornstarch should be used sparingly to avoid a starchy taste. Start with a small amount, and if you prefer a thicker fondue, gradually add more cornstarch until you achieve the desired thickness.
Creating an easy fondue base with wine and cheese allows you to elevate your fondue experience by enhancing the flavors and ensuring a smooth consistency. Understanding the role of acidity and incorporating cornstarch in your fondue base will help you create a delicious and satisfying fondue that will impress your guests and make your fondue night truly memorable.
Alternative Heat Sources for Melting Cheese
Melting cheese is a crucial step in making fondue. While a traditional fondue pot provides the perfect heat for melting cheese, there are alternative heat sources that can be used to achieve the same delicious results. Whether you don’t have a fondue pot or simply want to try something different, these options will ensure you can still enjoy a smooth and creamy melted cheese experience.
One alternative heat source for melting cheese is the stovetop. Simply use a heavy-bottomed pan or a saucepan and melt the cheese over low heat. Stir continuously to prevent the cheese from burning or sticking to the pan. This method allows for precise temperature control, ensuring the cheese melts evenly and smoothly.
Another option is to use kitchen tools such as a microwave or oven. Place the cheese in a microwave-safe dish or an oven-safe dish and heat it in short intervals, checking and stirring the cheese between each interval. This method requires careful monitoring to prevent the cheese from overheating or becoming too liquidy.
Note: When using alternative heat sources, it’s important to remember that the cheese may not have the same consistency and texture as when melted in a fondue pot. Experimentation and adjustments may be necessary to achieve the desired fondue consistency.
By exploring these alternative heat sources, you can melt cheese without the need for a fondue pot and still enjoy a delicious fondue experience. Get creative and try different methods to find the one that works best for you.
Alternative Heat Sources
Pros
Cons
Stovetop (heavy-bottomed pan or saucepan)
– Precise temperature control – Even and smooth melting
– Requires constant stirring – Limited capacity
Microwave
– Quick and convenient – Easy cleanup
– May require multiple intervals – Watch closely to prevent overheating
Oven
– Even heat distribution – Ability to melt larger quantities
– Longer melting time – Requires careful monitoring
Specialty Cheese Options and Substitutes
While traditional cheese blends are popular choices for fondue, there is a world of specialty options and substitutes that can take your fondue experience to the next level. Whether you’re looking for a classic taste or a flavorful twist, exploring different types of cheeses can add a unique touch to your fondue.
Cow’s Milk Cheeses for a Traditional Taste
Cow’s milk cheeses are widely used in traditional fondue recipes, known for their smooth and creamy texture. They melt beautifully and have a rich, savory flavor that pairs perfectly with bread, vegetables, and other fondue dippers. Gruyère is a popular choice, known for its nutty and slightly sweet taste. Emmental, with its holey texture and mild flavor, is another great option. These cow’s milk cheeses provide a classic and authentic fondue experience.
Sheep and Goat Cheeses for a Flavorful Twist
If you’re looking to add a unique and flavorful twist to your fondue, consider using specialty sheep and goat cheeses. These cheeses bring a more pronounced and distinct flavor profile to the fondue. Sheep’s milk cheeses like Pecorino Romano and Manchego offer a rich and slightly tangy taste that can elevate your fondue. Goat cheeses, such as Chèvre or Bucheron, provide a creamy and earthy flavor that adds complexity to the dish. Experimenting with different sheep and goat cheeses allows you to create a fondue that is truly your own.
Type of Cheese
Flavor
Melting Characteristics
Gruyère (Cow’s Milk)
Nutty, slightly sweet
Smooth melting
Emmental (Cow’s Milk)
Mild, slightly fruity
Holey texture, melts well
Pecorino Romano (Sheep’s Milk)
Rich, tangy
Melts well, adds complexity to flavor
Manchego (Sheep’s Milk)
Nutty, slightly sweet
Smooth melting, enhances fondue taste
Chèvre (Goat’s Milk)
Creamy, earthy
Soft texture, melts well
Bucheron (Goat’s Milk)
Mild, slightly tangy
Soft and crumbly texture, melts smoothly
Pairing Wine and Beer with Your Fondue
Fondue is often enjoyed with a glass of wine or beer. The right alcoholic pairing can enhance the flavors of your fondue and elevate your dining experience. In this section, we will provide guidance on choosing the perfect wine or beer to complement your fondue. We’ll explore the different flavors and profiles that harmonize well with various cheese blends and offer suggestions for non-alcoholic alternatives for those who prefer to enjoy their fondue without alcohol.
When it comes to wine pairing with fondue, there are a few key considerations to keep in mind. The general rule is to match the intensity and flavors of the wine with those of the cheese. Here are some popular wine options that pair well with fondue:
White Wine: A dry, crisp white wine like Chardonnay or Sauvignon Blanc can complement a variety of cheese blends. The acidity and fruity notes of these wines balance the richness of the cheese.
Red Wine: For a heartier fondue, a medium-bodied red wine like Pinot Noir or Merlot can be a great choice. The tannins and fruitiness of these wines help cut through the creamy texture of the cheese.
Sparkling Wine: Sparkling wines like Champagne or Prosecco can add a touch of elegance to your fondue experience. Their effervescence can cleanse the palate between bites and enhance the overall enjoyment.
When it comes to beer pairing with fondue, there are also several options that can complement the flavors of the cheese. Here are some popular beer styles to consider:
Lager: A light and crisp lager can offer a refreshing contrast to the richness of the cheese. Pilsners or pale lagers are excellent choices that won’t overpower the flavors of the fondue.
Amber Ale: The caramel and toasty notes of an amber ale can provide a nice complement to the cheese. The medium body and balanced flavors make it a versatile option for fondue.
Belgian Tripel: If you’re looking for a beer with a little more complexity, a Belgian tripel can be a great choice. The fruity and spicy flavors can harmonize well with the flavors of the fondue.
Non-Alcoholic Substitutes for Fondue
Not everyone prefers to enjoy their fondue with alcohol. Thankfully, there are non-alcoholic alternatives that can still enhance the fondue experience. Here are a few suggestions:
Fruit Juice: A glass of freshly squeezed fruit juice, such as apple or pear, can provide a refreshing and fruity accompaniment to your fondue.
Mocktails: Mocktails made with sparkling water, fruit puree, and herbs can offer a fun and flavorful alternative to alcoholic beverages.
Herbal Infusions: Herbal teas or infusions made with delicate flavors like chamomile or mint can provide a soothing and aromatic pairing with your fondue.
Regardless of your preference, the key is to choose a pairing that brings out the best in your fondue and creates a delightful culinary experience.
Accompaniments and Dippers to Complete Your Fondue Experience
Fondue is best enjoyed with a variety of accompaniments and dippers. Whether you prefer the classic options or are looking for something unique, there are plenty of choices to enhance your fondue experience.
Traditional Fondue Dippers
When it comes to traditional fondue dippers, there are some tried-and-true options that never disappoint. Consider these delicious choices:
Bread cubes
Vegetables like broccoli, cauliflower, and cherry tomatoes
Meat such as chicken, beef, or shrimp
Boiled potatoes
These classic dippers provide a fantastic combination of flavors and textures that pair perfectly with melted cheese or chocolate fondue.
Unique and Unconventional Dippers
If you’re looking to add a fun twist to your fondue experience, consider trying some unique and unconventional dippers. These options can elevate your fondue to a whole new level:
Apple or pear slices
Pretzels or pretzel bread
Mini meatballs
Pickle slices
Spicy popcorn
These unexpected dippers bring exciting flavors and textures that will surprise and delight your taste buds.
Dippers
Traditional Choices
Unique and Unconventional
Bread cubes
Apple or pear slices
Vegetables
Pretzels or pretzel bread
Meat
Mini meatballs
Boiled potatoes
Pickle slices
Spicy popcorn
Preventing Common Fondue Faux Pas
Fondue is a delightful culinary experience that brings people together. However, it can sometimes present challenges, such as cheese clumping and separation. Don’t worry, though! With the right techniques, you can avoid these common fondue faux pas and ensure a smooth and velvety fondue.
Avoiding Cheese Clumping and Separation
One of the most frustrating issues in fondue is when the cheese starts to clump or separate, compromising the smooth texture. To prevent this, here are some tips:
Grate the cheese finely: Grating the cheese into small shreds allows it to melt evenly and prevents clumping.
Toss the cheese with cornstarch: Coat the grated cheese in cornstarch before adding it to the pot. The cornstarch acts as a stabilizer, preventing clumping and separation.
Gradually add the cheese: Add the cheese to the pot slowly, allowing each batch to melt completely before adding more. This ensures a smooth and consistent texture.
Following these steps will help you achieve a creamy and lump-free fondue.
Ensuring Perfect Fondue Texture
Texture plays a crucial role in the overall fondue experience. Here are some tips to ensure a perfect fondue texture:
Stir constantly: Stirring the fondue continuously helps to distribute the heat evenly and prevents the cheese from sticking or burning.
Use low heat: Avoid high heat settings that can cause the cheese to scorch or curdle. Gentle heat allows the cheese to melt slowly and maintain a smooth consistency.
Add liquid gradually: If your fondue becomes too thick, gradually add small amounts of liquid (such as wine or broth) while stirring until you achieve the desired consistency.
By following these tips, you can create a velvety and perfect fondue texture that will impress your guests.
Now that you have the knowledge to prevent clumping and separation and achieve a fantastic fondue texture, you’re ready to enjoy a seamless and delicious fondue experience.
Quick Fondue Solutions with Common Kitchen Tools
If you’re in a pinch and don’t have access to specialized fondue equipment, there’s no need to worry. You can still enjoy delicious fondue using common kitchen tools that you likely already have. In this section, we’ll share quick and easy solutions for making fondue without a pot, using tools that are readily available in your kitchen.
One of the simplest alternatives to a fondue pot is using a saucepan. A heavy-bottomed saucepan can provide the necessary heat distribution to melt your cheese and keep it warm throughout your fondue experience. Just make sure to use low heat and stir frequently to prevent scorching.
If you want to take it a step further, you can also create a double boiler using a heat-safe bowl and a saucepan filled with water. This setup allows for gentle and indirect heat, which is ideal for melting cheese without burning it. Place the cheese in the bowl and set it over the simmering water. Stir continuously until the cheese is melted and smooth.
Another option is using a crockpot or slow cooker. These versatile kitchen tools can be a game-changer when it comes to making fondue. Simply add your cheese mixture to the crockpot, set it on low heat, and let it slowly melt to perfection. This method is ideal for parties and gatherings, as it keeps the fondue warm throughout the event.
No fondue forks? No problem! You can use regular skewers or even toothpicks as dippers for your fondue. Just make sure they’re long enough for easy dipping and retrieval.
Whether you opt for a saucepan, a double boiler, or a crockpot, these quick fondue solutions will allow you to enjoy the rich and flavorful experience of fondue without the need for specialized equipment. Get creative with your choice of dippers and gather your friends and family for a delightful fondue feast!
Conclusion
In conclusion, making fondue without a traditional fondue pot is entirely possible and can be just as delicious. Throughout this guide, we have explored various ways to create a flavorful and smooth fondue experience without the need for specialized equipment.
We discussed alternative methods and equipment that can be used, such as a heavy-bottomed pan, crockpots, and double boilers. We also explored how to choose the right cheeses and balance flavors and textures to create the perfect fondue cheese blend.
Furthermore, we provided step-by-step instructions on how to make fondue with alternative equipment, and we highlighted the importance of creating an easy fondue base with wine and cheese. We also discussed alternative heat sources for melting cheese and specialty cheese options that can enhance your fondue.
With our guidance on pairing wine and beer with your fondue, and suggesting a variety of accompaniments and dippers, you will be able to create a truly memorable fondue experience at home. We also provided tips on avoiding common pitfalls, achieving the perfect fondue texture, and quick solutions using common kitchen tools.
We hope you’ve found this guide helpful and that it inspires you to embark on your fondue-making adventures. So gather your ingredients, gather your friends and family, and enjoy the delightful world of fondue without the need for a pot!
FAQ
Can I make fondue without a traditional fondue pot?
Yes, you can make fondue without a traditional fondue pot. There are alternative methods and equipment that can be used to achieve the same delicious results.
How do I choose the right cheeses for my fondue?
When choosing cheeses for your fondue, it’s important to consider balancing flavors and textures. You can also adjust cheese quantities to achieve the desired consistency and texture.
How do I make fondue without a fondue pot?
Making fondue without a fondue pot is easier than you might think. You can use alternative equipment such as a heavy-bottomed pan or a crockpot. We provide step-by-step instructions in this guide.
What is the base of a great fondue?
The base of a great fondue is a combination of wine and cheese. The acidity in the wine contributes to the overall flavor profile, and cornstarch is used to create a smooth and consistent texture.
What are alternative heat sources for melting cheese?
If you don’t have a fondue pot, you can use alternative heat sources such as a stovetop, microwave, or oven to melt cheese for your fondue.
Are there specialty cheese options and substitutes for fondue?
Yes, there are specialty cheese options that can elevate your fondue experience, including cow’s milk cheeses for a traditional taste and sheep and goat cheeses for a flavorful twist.
What alcoholic pairings are recommended for fondue?
Fondue is often enjoyed with a glass of wine or beer. Choosing the right alcoholic pairings depends on the cheese blend, and we provide guidance on flavors and profiles that complement different cheeses. Non-alcoholic substitutes are also suggested.
What are some recommended accompaniments and dippers for fondue?
Traditional fondue dippers include bread cubes, vegetables, and meats. We also explore unique and unconventional dippers that can add a fun twist to your fondue experience.
How can I prevent common fondue challenges?
To avoid cheese clumping and separation, you can follow our tips for achieving a smooth and velvety fondue. We also provide tips on achieving the perfect fondue texture and consistency.
Can I make fondue without specialized equipment?
Yes, if you don’t have access to specialized fondue equipment, there are quick solutions using common kitchen tools such as saucepans and double boilers.
Welcome to our easy homemade pasta guide! Are you ready to embark on a culinary adventure and create your very own delicious pasta from scratch? Making homemade pasta is a fun and rewarding experience that allows you to enjoy the freshness and flavors of pasta right in your own kitchen. With just a few simple ingredients and some basic techniques, you’ll be able to create mouthwatering pasta dishes that will impress your family and friends.
Table of Contents
Are you excited to learn more about the art of homemade pasta? In this guide, we’ll take you through the step-by-step process of making pasta at home, from choosing the right ingredients to shaping and cooking your pasta to perfection. Whether you’re a beginner or an experienced cook, this guide has something for everyone. So put on your apron and let’s dive into the world of homemade pasta!
Key Takeaways:
Homemade pasta allows you to enjoy the freshest flavors right in your own kitchen.
With just a few ingredients and simple techniques, you can create delicious pasta dishes.
The process involves combining flour and eggs to create a dough, which is then rolled out and shaped.
Kneading the dough is essential for developing the gluten and achieving the right texture.
Rolling out the pasta to the right thickness is crucial for the perfect cooking time.
Embracing the Joy of Homemade Pasta
Homemade pasta is a culinary delight that brings joy to both the cook and the lucky individuals who get to savor its flavors. There’s something truly special about creating pasta from scratch in your own kitchen, where you can infuse it with love, creativity, and your unique personal touch.
Whether you’re a seasoned home cook or a beginner in the kitchen, making homemade pasta is an experience that anyone can enjoy. It’s a chance to connect with your food on a deeper level, to appreciate the simplicity of its ingredients, and to revel in the process of transforming flour and eggs into silky strands of pasta or delicate pockets of ravioli.
When you make homemade pasta, you have the power to customize it to your liking. You can choose the type of flour you prefer, whether it’s the silky “00” flour, the hearty semolina, or the versatile all-purpose flour. You can play with different flavors and colors by adding herbs, spices, or vegetable purees to the dough. The possibilities are endless, and that’s what makes homemade pasta so exciting and enticing.
Not only is homemade pasta incredibly delicious, but it’s also a tactile and meditative experience. Kneading the dough, rolling it out, and cutting it into various shapes can be therapeutic and calming, allowing you to escape the stresses of daily life and focus on the simple act of creation. Plus, the satisfaction of enjoying a plate of pasta that you made with your own two hands is truly unmatched.
So, let’s embrace the joy of homemade pasta together. In the next sections, we’ll delve into the magic of making pasta from scratch, explore different techniques and equipment, and guide you through the step-by-step process of creating your very own homemade pasta masterpiece. Get ready to embark on a culinary adventure that will leave you with a newfound appreciation for this timeless and beloved dish.
Pasta From Scratch: The 4-Ingredient Magic
When it comes to making delicious homemade pasta, simplicity is key. With just four basic ingredients, you can create pasta from scratch that will rival any store-bought variety. In this section, we’ll explore the essential components of homemade pasta: flour and eggs. Let’s dive in!
Choosing Your Flour: “00”, Semolina, or All-Purpose?
The first decision you’ll need to make when making homemade pasta is choosing the right flour. There are several options available, each with its own unique characteristics.
Italian “00” Flour: This finely ground flour is traditionally used in pasta making. It has a low protein content, resulting in a tender texture and delicate flavor. “00” flour is ideal for making fresh pasta, especially if you prefer a softer and more supple dough.
Semolina Flour: Made from durum wheat, semolina flour is coarser and has a higher protein content than “00” flour. It is commonly used for making dried pasta. Semolina flour produces a firmer dough that holds its shape well and creates pasta with a slightly chewy texture.
All-Purpose Flour: If you don’t have “00” or semolina flour on hand, you can still make homemade pasta using all-purpose flour. While it may not produce the same authentic results as the other flours, all-purpose flour can still yield tasty homemade pasta with a softer texture.
Ultimately, the choice of flour depends on your personal preference and the type of pasta you want to create. Feel free to experiment with different flours to find the perfect balance of flavor and texture for your homemade pasta.
The Role of Eggs in Pasta: Providing Moisture and Richness
Eggs are an essential ingredient in homemade pasta, as they contribute moisture and richness to the dough. They also act as a binding agent, helping the pasta hold its shape during cooking.
Typically, a basic pasta dough recipe calls for one egg per 100 grams of flour. However, the exact ratio may vary depending on the desired consistency and the size of the eggs. It’s important to note that the number of eggs can also affect the color of the pasta, with more eggs resulting in a richer, golden hue.
When adding eggs to the flour, you’ll create a well in the center of the flour mound and crack the eggs into it. Gently whisk the eggs, gradually incorporating the surrounding flour until a cohesive dough forms. Be careful not to overmix, as this can result in a tough pasta dough.
Now that you understand the role of flour and eggs in homemade pasta, you’re ready to dive into the process of actually making your pasta from scratch. In the next section, we’ll guide you through the step-by-step instructions, so get your apron on and let’s get cooking!
Essential Equipment for Crafting Pasta
When it comes to making homemade pasta, having the right equipment can make all the difference. Here are some essential tools that will help you craft perfect pasta every time.
Rolling by Hand Versus Using a Pasta Machine
Rolling out pasta dough by hand is a traditional method that requires a bit of skill and practice. It involves using a rolling pin to roll the dough into thin sheets, which can then be cut into various shapes. While this method allows for a more hands-on and intimate pasta-making experience, it can be time-consuming and physically demanding.
On the other hand, using a pasta machine provides convenience and consistency. A pasta machine is designed to roll out the dough evenly and to the desired thickness with minimal effort. It typically comes with adjustable settings, allowing you to achieve the perfect thickness for different pasta shapes. Whether you choose a manual or electric pasta machine, it can save you time and effort in the pasta-making process.
Ultimately, the choice between rolling by hand and using a pasta machine depends on your personal preference and the time you’re willing to invest in creating homemade pasta. Both methods can yield fantastic results, so it’s up to you to decide which approach suits you best.
Food Processor or Stand Mixer: What’s Best for Pasta?
While kneading pasta dough by hand can be a meditative and rewarding experience, it can also be quite labor-intensive. If you prefer a more effortless approach, using a food processor or a stand mixer can be a game-changer.
A food processor equipped with a dough blade can quickly bring the pasta dough together. Simply combine the ingredients in the food processor bowl, pulse until the dough forms, and then continue kneading by hand to achieve the desired texture.
A stand mixer with a dough hook attachment is another excellent option for making pasta dough. The mixer does the hard work of kneading the dough, allowing you to multitask in the kitchen. Just be mindful not to overwork the dough, as it can lead to a tougher texture.
Both the food processor and stand mixer methods provide convenience and ensure consistent results. Choose the option that best fits your kitchen setup and personal preferences.
With the right equipment at your disposal, crafting homemade pasta becomes an enjoyable and effortless process. Now that we’ve covered the essential tools, let’s move on to the exciting part – the pasta-making process itself.
How to Make Pasta at Home
Making pasta at home is a fun and rewarding activity that allows you to enjoy the freshest flavors right in your own kitchen. With just a few ingredients and simple techniques, you can create delicious homemade pasta that will impress your family and friends. (pasta at home)
The process of making pasta involves combining flour and eggs to create a dough, which is then rolled out and shaped into various pasta shapes. By following the step-by-step instructions, you’ll be able to make your own pasta and customize it to your liking, whether it’s fettuccine, spaghetti, or ravioli.
“Making your own pasta is not only a delicious way to enjoy a classic dish, but it’s also a creative and satisfying culinary experience. You can experiment with different flavors, shapes, and sauces to create a truly unique pasta dish that reflects your personal taste.” (pasta at home)
To get started, gather the following ingredients:
2 cups of all-purpose flour
2 large eggs
A pinch of salt
Here is a simplified step-by-step guide on how to make pasta at home:
In a large mixing bowl, combine the flour and salt.
Create a well in the center of the flour mixture and crack the eggs into it.
Using a fork, gradually incorporate the flour into the eggs until a shaggy dough forms.
Knead the dough on a lightly floured surface for about 5-10 minutes until it becomes smooth and elastic.
Divide the dough into smaller portions and cover them with plastic wrap. Allow the dough to rest for at least 30 minutes.
Using a rolling pin or a pasta machine, roll out the dough to your desired thickness.
Cut the rolled-out dough into your preferred pasta shapes, such as fettuccine or ravioli.
Cook the fresh pasta in a large pot of salted boiling water for a few minutes until it is al dente.
Drain the cooked pasta and serve it with your favorite homemade sauce and garnishes.
Now that you know the basics of making pasta at home, you can let your creativity shine by experimenting with different flavors, fillings, and sauces. Making homemade pasta is a rewarding culinary journey that allows you to take control of your meals and create dishes that are truly made with love.
The Art of Kneading: Techniques for Perfect Pasta Dough
Kneading is an essential step in making pasta dough, as it helps to develop the gluten, which gives pasta its desired texture. There are different techniques for kneading pasta dough, including kneading by hand, using a stand mixer, or a food processor. (pasta at home)
When kneading by hand, you’ll need to apply pressure and fold the dough repeatedly until it becomes smooth and elastic. This traditional method allows you to feel the dough’s consistency and adjust the kneading process accordingly.
If you prefer a more convenient option, you can use a stand mixer with a dough hook attachment or a food processor with a dough blade. These machines take the manual labor out of kneading and save you time and effort. However, it’s crucial not to over-knead the dough, as it can result in a tough and chewy pasta. (pasta at home)
The key to kneading pasta dough is to achieve the right consistency. The dough should be smooth, elastic, and not too sticky or dry. Proper kneading ensures that the gluten strands are well-formed, resulting in a pasta that cooks evenly and has a satisfying bite.
Experiment with different kneading methods to find the one that works best for you. Whether you choose to knead by hand or with the help of a stand mixer or food processor, the goal is to create a dough that is easy to work with and yields delicious homemade pasta.
Mastering the Roll: Achieving the Ideal Pasta Thickness
Rolling out pasta dough to the right thickness is essential for creating the perfect texture and cooking time for your homemade pasta. The thickness of pasta sheets can vary depending on the type of pasta you’re making, such as fettuccine, lasagna, or ravioli. Different pasta shapes require different thicknesses, so it’s important to follow recipes and guidelines to ensure the best results. (pasta at home)
Pasta Thickness for Different Pasta Types
Each pasta shape has an ideal thickness that allows it to cook evenly and achieve the desired texture. Here are some general guidelines for pasta thickness:
Fettuccine: Roll the pasta dough to a thickness of about 1/16 inch or 1.5 mm.
Lasagna: The pasta sheets for lasagna should be slightly thicker, around 1/8 inch or 3 mm, to hold up to the layers of sauce and filling.
Ravioli: Ravioli can be made with pasta sheets that are slightly thicker, around 1/16 inch or 1.5 mm, to ensure the filling stays enclosed.
These are just general guidelines, and some recipes may have specific recommendations for pasta thickness. Always refer to the recipe instructions to achieve the best results. (pasta at home)
Tips for Preventing Dough from Sticking
One common challenge when rolling out pasta dough is preventing it from sticking to the rolling surface. Here are some tips to help you avoid sticky situations:
Lightly dust with flour: Before rolling the dough, lightly dust both sides with flour. This will create a barrier and prevent the dough from sticking to the rolling pin or surface.
Rotate the dough: As you roll the dough, rotate it frequently. This ensures that it doesn’t stick to the surface and allows for even rolling.
Use parchment paper or silicone mat: Placing a sheet of parchment paper or a silicone mat between the dough and the rolling pin can prevent sticking and make the rolling process smoother.
By following these tips, you can master the art of rolling pasta dough and achieve the ideal thickness for your homemade pasta.
Pasta Type
Ideal Thickness
Fettuccine
1/16 inch or 1.5 mm
Lasagna
1/8 inch or 3 mm
Ravioli
1/16 inch or 1.5 mm
The table above summarizes the ideal thickness for different pasta types.
Shaping Your Creation: Cutting Pasta into Classic Forms
Cutting pasta into specific shapes adds variety and visual appeal to your homemade pasta dishes. Whether you’re making a classic fettuccine or getting creative with unique designs, the cutting technique and tools you use can make a difference in the final result. (pasta at home)
From Fettuccine to Pappardelle: Cutting Pasta By Hand or Machine
When it comes to cutting pasta into long, ribbon-like shapes like fettuccine or pappardelle, you have two options: cutting by hand or using a pasta machine. Each method offers its own advantages and allows you to achieve different textures and appearances.
Hand-Cutting: Cutting pasta by hand allows for more rustic and uneven shapes, giving your homemade pasta a homemade and artisanal feel. To hand-cut your pasta, roll out the pasta dough into a thin sheet and use a sharp knife or a pizza cutter to slice it into the desired widths. This method requires a bit of practice to achieve consistency, but it gives you the freedom to create unique shapes and sizes.
Pasta Machine: Using a pasta machine offers precision and consistency when cutting pasta. Start by rolling the pasta dough through the machine, gradually decreasing the thickness setting until you achieve the desired thickness. Then, switch to the cutting attachment of the machine to cut the pasta into your desired shapes. With a pasta machine, you can easily achieve uniform and professional-looking pasta shapes like fettuccine or pappardelle. (pasta at home)
Creative Shapes: Trying Homemade Ravioli and More
Cutting pasta into creative shapes opens up a world of possibilities and allows you to experiment with different flavors and fillings. Here are some ideas for getting creative with your homemade pasta:
Homemade Ravioli: To make ravioli, roll out a sheet of pasta dough and place dollops of your desired filling evenly spaced on the dough. Cover with another sheet of pasta dough and press around the filling to seal. Use a ravioli cutter or a knife to cut out individual ravioli shapes.
Stuffed Pasta: Explore other stuffed pasta shapes like tortellini, mezzelune, or agnolotti by folding and sealing small pasta squares around your chosen fillings.
Specialty Shapes: Use cookie cutters or specialized pasta cutters to create fun and unique pasta shapes. From flowers to animals, the possibilities are endless.
Get creative with your pasta shapes and have fun experimenting in the kitchen. With a little practice and the right tools, you can make pasta that not only tastes delicious but also looks impressive on the plate.
Pasta Shape
Cutting Technique
Fettuccine
Cut by hand or with a pasta machine
Pappardelle
Cut by hand or with a pasta machine
Ravioli
Cut with a ravioli cutter or a knife
Tortellini
Fold and seal small pasta squares
Experiment with different cutting techniques and shapes to elevate your pasta dishes and impress your friends and family with your homemade creations. Remember, the presentation is just as important as the taste, so have fun and let your creativity shine!
Preserving the Freshness: Drying and Storing Pasta
If you’re not planning to cook your homemade pasta immediately, it’s important to properly dry and store it to maintain its freshness.
Air-drying pasta is a traditional method that involves hanging pasta strands or laying them flat on a drying rack until they are completely dry.
Once pasta is dry, store it in an airtight container in a cool, dry place for several weeks.
Alternatively, you can freeze homemade pasta for longer storage. Lay the pasta flat on a baking sheet and freeze it until firm, then transfer to a freezer-safe bag or container. (pasta at home)
Cooking Homemade Pasta: Timing and Techniques
Cooking homemade pasta requires proper timing and technique to achieve the desired texture and doneness. To ensure that your pasta is perfectly cooked, follow these steps:
Fill a large pot with water and bring it to a rolling boil. Add salt to the water to season the pasta.
Add the homemade pasta to the boiling water. The cooking time will vary depending on the thickness and shape of the pasta.
While the pasta cooks, it’s important to test it for doneness. Al dente pasta is the desired texture, which means it is cooked through but still has a slight bite to it.
To test the pasta, take a small piece and taste it. It should be tender yet firm when bitten.
If the pasta is not yet done, continue cooking it for another minute or two and test again.
Once the pasta reaches the desired texture, drain it immediately to stop the cooking process. Avoid rinsing the pasta with water, as this removes the starches that help sauce adhere to the pasta.
Now that your homemade pasta is perfectly cooked, it’s ready to be enjoyed in your favorite sauce or recipe. Bon appétit! (pasta at home)
Perfect Pairings: Choosing the Right Sauce for Your Pasta
The right sauce can elevate your homemade pasta dish and complement the flavors and textures of the pasta. When it comes to pasta sauce pairings, there are endless possibilities to explore. From classic pasta sauces to homemade creations, the sauce you choose can make all the difference in creating a truly memorable pasta dish.
Classic pasta sauces like marinara, carbonara, and pesto are popular choices that pair well with a variety of pasta shapes. Marinara sauce, made with tomatoes, garlic, and herbs, is a timeless favorite that goes well with spaghetti or fettuccine. Carbonara sauce, featuring a creamy and rich combination of eggs, cheese, and pancetta, is a delectable match for spaghetti or linguine. Pesto sauce, made with fresh basil, pine nuts, garlic, and Parmesan cheese, adds a burst of flavor that pairs beautifully with linguine or penne. (pasta at home)
When choosing a sauce for your homemade pasta, consider the flavors, ingredients, and cooking styles of different pasta sauces. Cream-based sauces like Alfredo or vodka sauce work well with wider noodles such as fettuccine or pappardelle, while lighter olive oil-based sauces are great for delicate angel hair or capellini pasta. Meat-based sauces like Bolognese or ragù are perfect for heartier pasta shapes like rigatoni or penne.
To create unique and personalized pasta dishes, don’t be afraid to experiment with different sauce combinations. Mix and match classic sauces, add extra ingredients such as vegetables, seafood, or herbs, and discover your favorite flavor profiles. Whether you prefer a traditional pasta sauce recipe or a creative homemade pasta sauce, the possibilities are endless when it comes to pasta and sauce combinations.
With the perfect sauce, your homemade pasta will become a culinary masterpiece. So, next time you cook up a batch of fresh pasta, choose a sauce that enhances its flavors and textures, creating a harmonious and satisfying meal. Whether you’re serving a simple weeknight dinner or hosting a special occasion, the right sauce can take your homemade pasta to the next level and leave your guests craving more. (pasta at home)
When it comes to gift-giving, homemade pasta is a thoughtful and delicious option that is sure to impress your friends and family. Whether it’s a special occasion or just a spontaneous gesture, homemade pasta as a gift shows that you’ve put in the extra effort to create something unique and meaningful. (pasta at home)
Hosting Pasta Nights for Friends and Family
Why not take your homemade pasta skills to the next level by hosting a pasta night for your loved ones? Gather your friends and family around the table and showcase your culinary talents. Let them experience the joy of homemade pasta and create a fun and interactive dining experience.
During the pasta night, you can demonstrate different pasta-making techniques, share stories and tips, and even let your guests try their hand at making their own pasta. It’s a fantastic opportunity to bond over food and create lasting memories. (pasta at home)
Surprise Your Neighbors with Handcrafted Pasta Nests
If you’re looking for a unique and creative gift or party favor, consider surprising your neighbors with handcrafted pasta nests. These adorable little nests can be made by shaping your homemade pasta strands into nests and allowing them to dry. Package them in decorative boxes or bags and add a personalized touch with a handwritten note. It’s a charming and unexpected gift that will surely bring a smile to their faces.
Whether you’re giving the homemade pasta nests as a housewarming gift or as a token of appreciation, it’s a thoughtful gesture that shows you care. Your neighbors will appreciate the effort and the delicious homemade pasta that awaits them. (pasta at home)
Conclusion
Making homemade pasta is a wonderful way to unleash your creativity in the kitchen and delight your taste buds. Whether you’re a seasoned chef or just starting out, crafting your own pasta allows you to personalize your dishes and create flavors that are truly unique.
By using simple ingredients and following the step-by-step instructions, you can master the art of homemade pasta and enjoy the fruits of your labor. The process may seem daunting at first, but with practice, you’ll become more confident and skilled in kneading the dough, rolling it out to the perfect thickness, and shaping it into various forms. (pasta at home)
When you sit down to enjoy a plate of homemade pasta, you’ll be able to taste the love and effort that went into its creation. Whether you’re cooking for a special occasion or simply craving a delicious weeknight meal, homemade pasta will always impress your family and friends. So, grab your apron, gather your ingredients, and embark on a culinary adventure that will leave you with a sense of accomplishment and a satisfied appetite. Bon appétit!
FAQ
What ingredients do I need to make homemade pasta?
You will need flour and eggs to make pasta dough. Depending on the recipe, you may also need salt and water.
What type of flour should I use for making pasta?
The most common types of flour used for making pasta are “00” flour, semolina flour, and all-purpose flour. Each has its own characteristics and can affect the texture of the pasta.
How do eggs contribute to pasta dough?
Eggs provide moisture and richness to the pasta dough, helping to create a tender and flavorful final product.
Do I need special equipment to make homemade pasta?
While not essential, having a rolling pin, a pasta machine, or a stand mixer with a pasta attachment can make the process easier and more efficient.
What are the different techniques for kneading pasta dough?
You can knead pasta dough by hand, using a stand mixer, or a food processor. Each method requires a slightly different approach but can achieve the desired results.
How do I know if the pasta dough is properly kneaded?
The pasta dough should be smooth, elastic, and not too sticky or dry. It should be able to stretch without tearing when pulled. The exact consistency may vary slightly depending on the recipe.
How do I roll out pasta dough to the right thickness?
Rolling out pasta dough to the right thickness is crucial for achieving the desired texture and cooking time. Using a rolling pin or a pasta machine, you can gradually roll the dough until it reaches the desired thickness.
What are the different pasta shapes I can create?
You can create various pasta shapes such as fettuccine, spaghetti, ravioli, and lasagna. The shape can be achieved by cutting the pasta dough into specific sizes and forms.
How do I store homemade pasta?
If you’re not planning to cook the pasta immediately, you can air-dry it by hanging the strands or laying them flat on a drying rack. Once completely dry, store the pasta in an airtight container in a cool, dry place. Alternatively, you can freeze the pasta for longer storage.
How long does homemade pasta need to cook?
The cooking time for homemade pasta will vary depending on the thickness and shape. It’s best to test the pasta while it cooks to achieve the desired texture. Pasta should be cooked until it is al dente, which means it still has a slight bite to it.
What sauces go well with homemade pasta?
Classic pasta sauces like marinara, carbonara, and pesto are popular choices that pair well with a variety of pasta shapes. The choice of sauce depends on your personal preference and the flavors you want to complement.
Can I give homemade pasta as a gift?
Absolutely! Homemade pasta can make a thoughtful and delicious gift for friends and family. You can also consider hosting pasta nights to showcase your skills and create a fun dining experience. Another idea is to surprise your neighbors with handcrafted pasta nests as a unique and creative gift or party favor.
Global Flavors, Global Recipes: Your Culinary Journey.